Panda Breath
Important firmware update
Before you use the Panda Breath please ensure that you have updated to the firmware located here (ignore if your unit shipped with later firmware)
This firmware adds some important new features as well as bug fixes. Without installing it, there is the possibility that your Panda Breath may turn off after 30s of heating each time you try to use it as a result of the integrated software safety monitor being overly sensitive on one of the thermistor inputs. This firmware adds a small self-calibration feature on the very first startup which helps to identify the specific characteristics of your Panda Breath.
- Product Link: Buy Here
- Print files are available on: GitHub bigtreetech/Panda_Breath
- Github: https://github.com/bigtreetech/Panda_Breath
Revision Log
| Version | Date | Revision |
|---|---|---|
| v1.00 | December 12th, 2025 | Initial Version |
Introduction
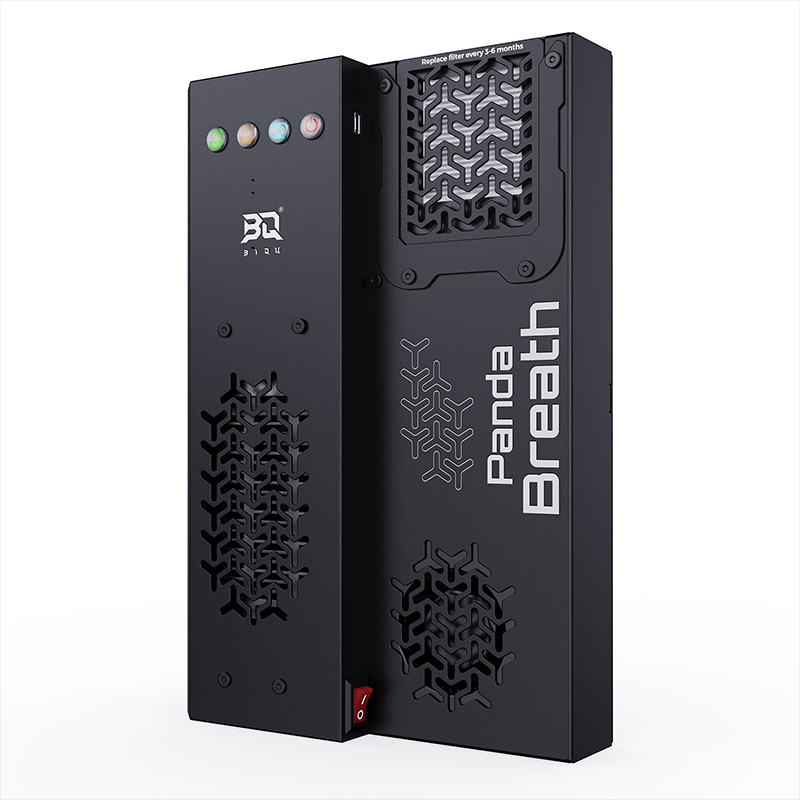
The BIQU Panda Breath is a chamber heater and filter for Bambu Lab printers. It uses a 300W PTC heater to warm the chamber, which helps prevent warping, strengthens layer adhesion in engineering materials (ABS, ASA, PC, PA...), and improves first-layer adhesion for all filaments.
Its dual HEPA and carbon filters remove fine particles and VOCs from the air during printing, reducing odors and improving air quality.
Key Features
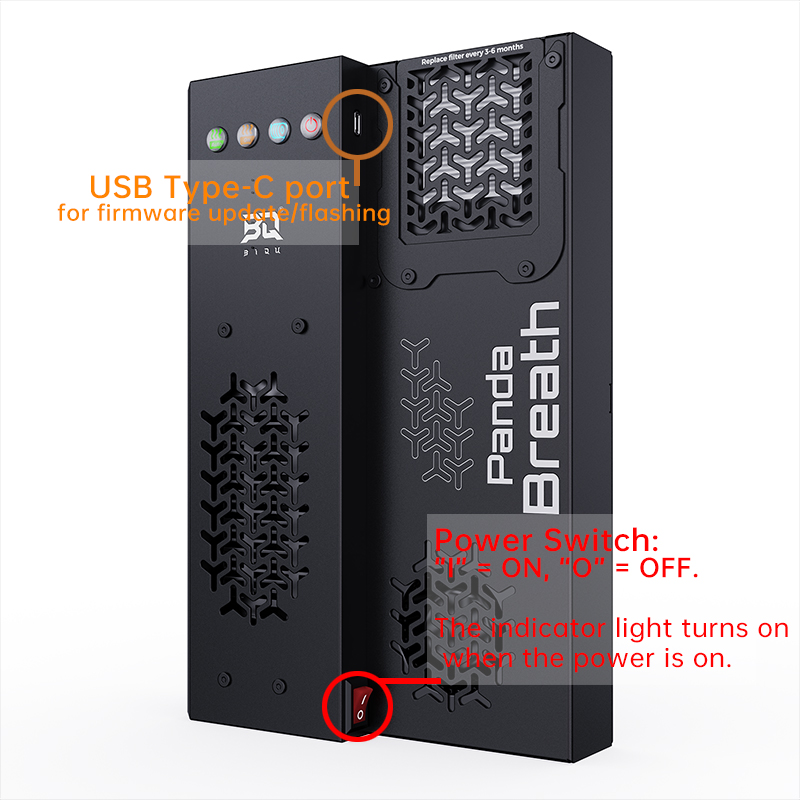
- Easy Firmware Updates: Includes quick-flash interface for DIY firmware burning and future upgrades.
- Main Power Switch: Convenient one-touch total power cutoff.
- Quick-Access Controls: Dedicated function buttons for streamlined operation.
- Automatic Start/Stop: Intelligently manages chamber heating and air filtration by monitoring the print bed’s temperature in real time.
- High-Temperature Capability: Reaches up to 60°C chamber temperature, ideal for engineering-grade filaments.
- Wireless Control: Onboard ESP32 WiFi module enables remote operation.
- Rapid Heating: High-power PTC heater ensures fast temperature ramp-up.
- Wide Voltage Compatibility: Broad input voltage range maximizes printer compatibility.
Technical Specifications
| Product Name | BIQU Panda Breath |
|---|---|
| Compatibility | For Bambu Lab P1S, P1P, X1C, A1 3D Printers Supports Klipper printers (Snapmaker U1, Voron, and more). Currently requires manual heating control; automatic operation coming soon via firmware update. |
| Main Controller | ESP32-C3-MINI |
| Power Input | AC110V–220V |
| PTC Heater Power | 300W |
| Fans | 2pcs 75×75×30mm, 7.8W rated, 5000 RPM, 19.2 CFM max airflow |
| Standby Power | 0.45W |
| Operating Power | 330W |
| Logic Voltage | 3.3V |
| Power Cable Length | 1.1m |
| PTC Temperature Limit | 105℃ |
| Maximum Chamber Temperature | 60℃ |
| Minimum Operating Ambient Temperature | 15℃ |
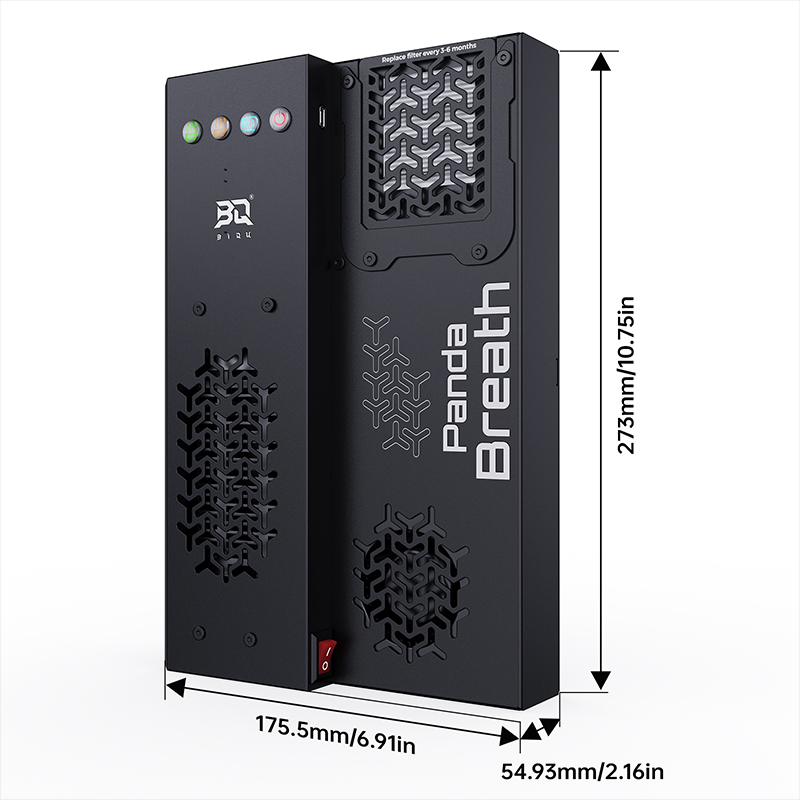
Dimensions
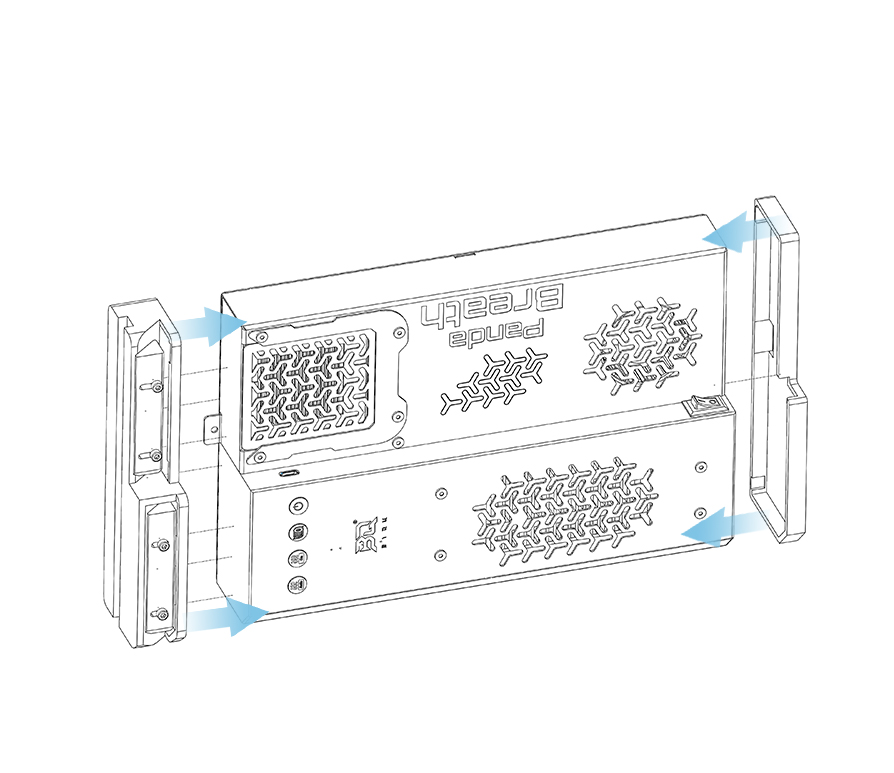
Installation Guide
Preparation Before Assembly
- P, X Series:
Print the Riser: Use your 3D printer to print the Riser. Download print files here.
X Series models also require the Mounting Insert Download print files here.

- Snapmaker U1:
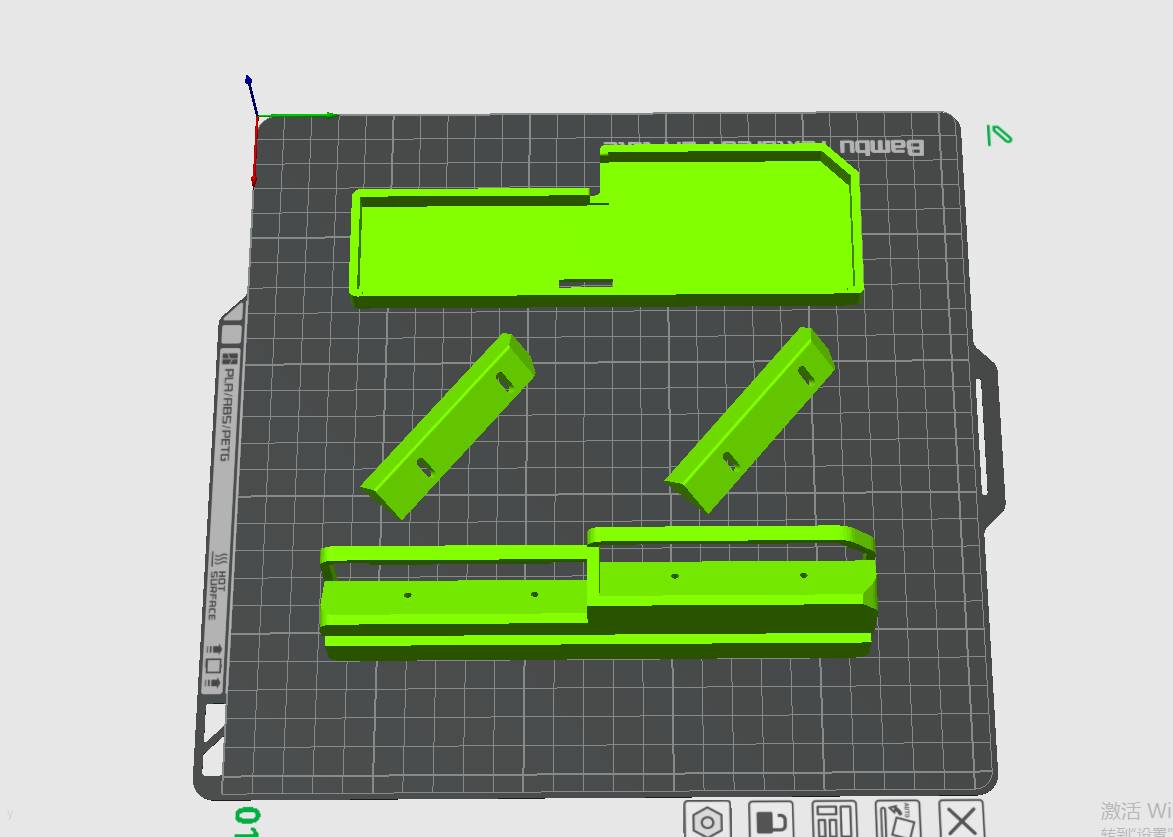
Print the Left and Right Mounting Brackets using your 3D printer. Download print files here.
Safety First: Power off and unplug the printer completely
Installation Steps for P Series
- Remove the top glass panel and place the printed riser on the top of the printer.

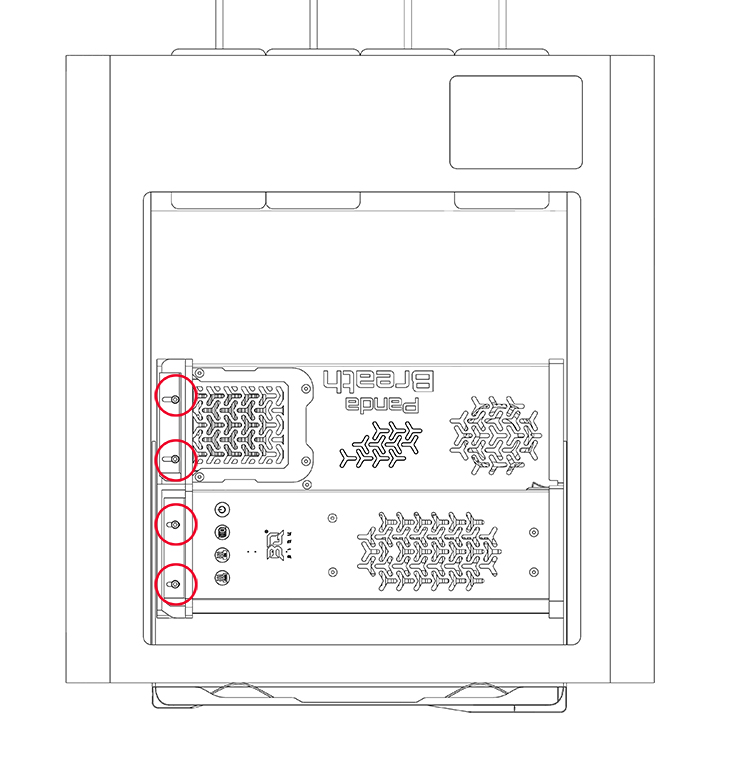
- Locate and remove the mounting screw at the center of the right-side crossbar using a screwdriver.
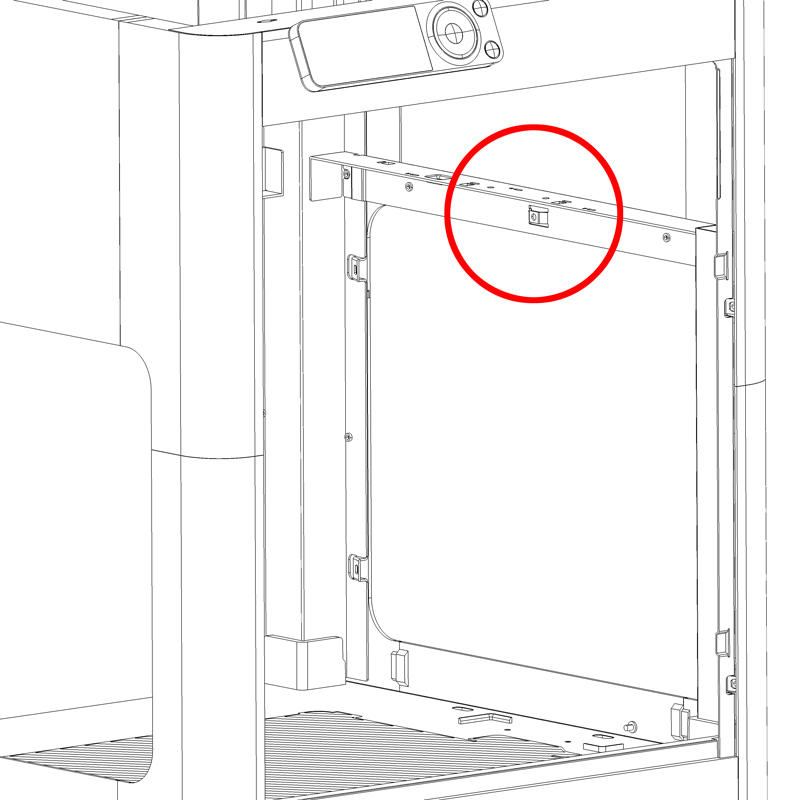
- Align the bottom mounting tabs of Panda Breath with the printer's alignment posts.
- Fasten Panda Breath using the included M3×8 self-tapping screws.
Important
Tighten all screws securely, but avoid using excessive force. Over-tightening can strip the threads or crack the housing.
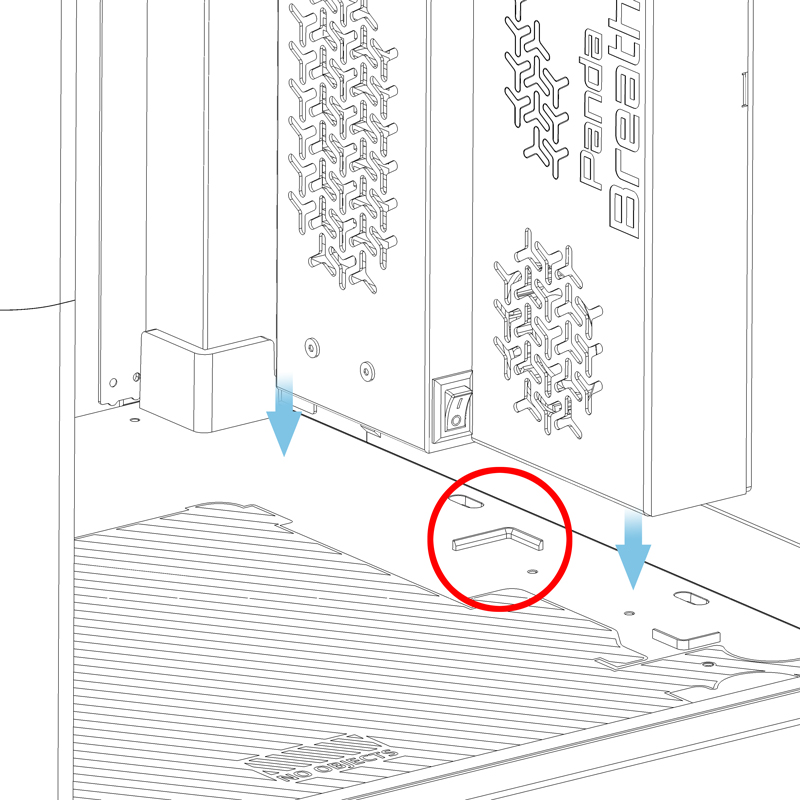
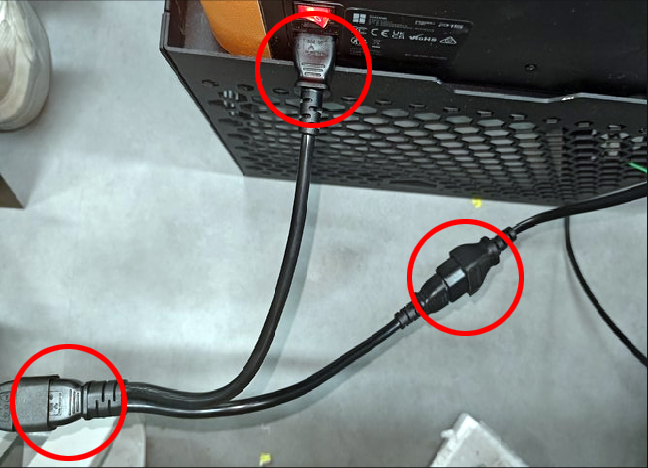
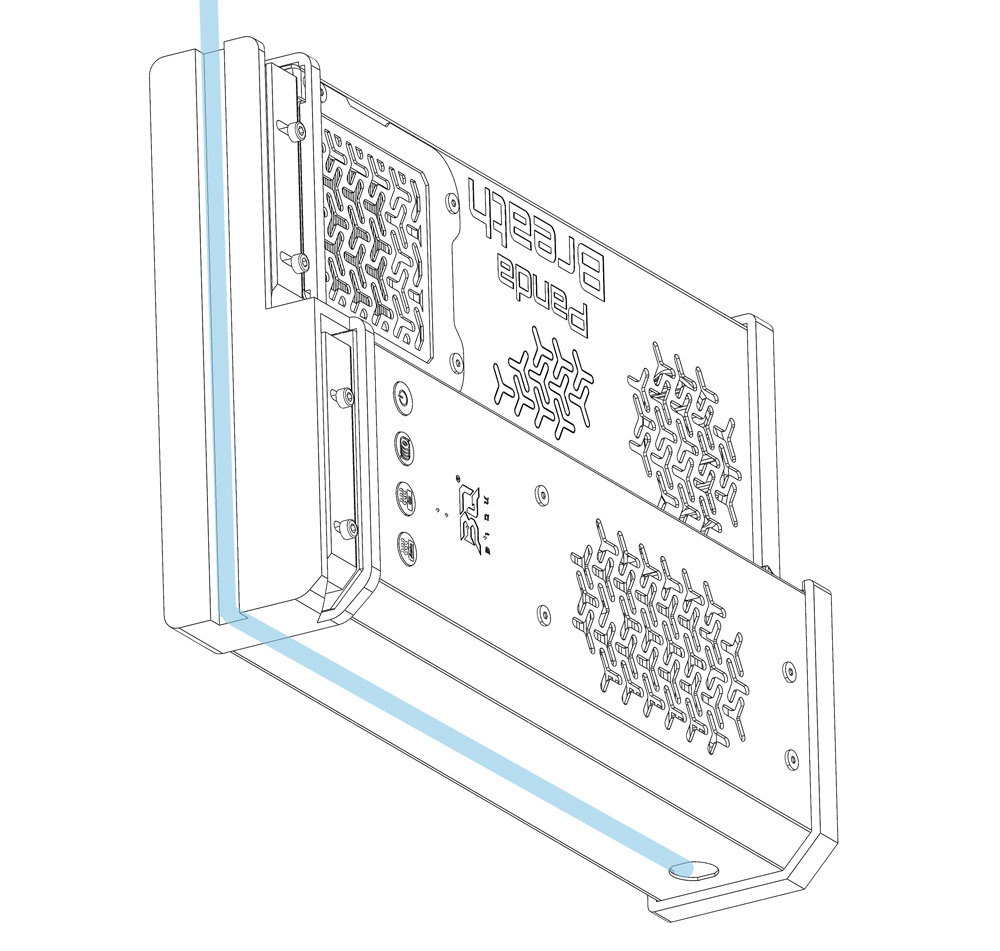
- Route and secure the power cable using the included cable clips, following the reference diagram.
- Pass the cable through the rear opening in the printed riser.

- Unplug the printer's original power cable and connect the included Y-cable as shown in the diagram.
- Remove the backing from the 2 included aluminum foil insulation pads and stick them to the bottom and right side of the left fan inside the printer to prevent the exterior from getting too hot during prolonged use.

Installation Complete!
Installation Steps for X Series
- Remove the top glass panel and place the printed riser on the top of the printer.
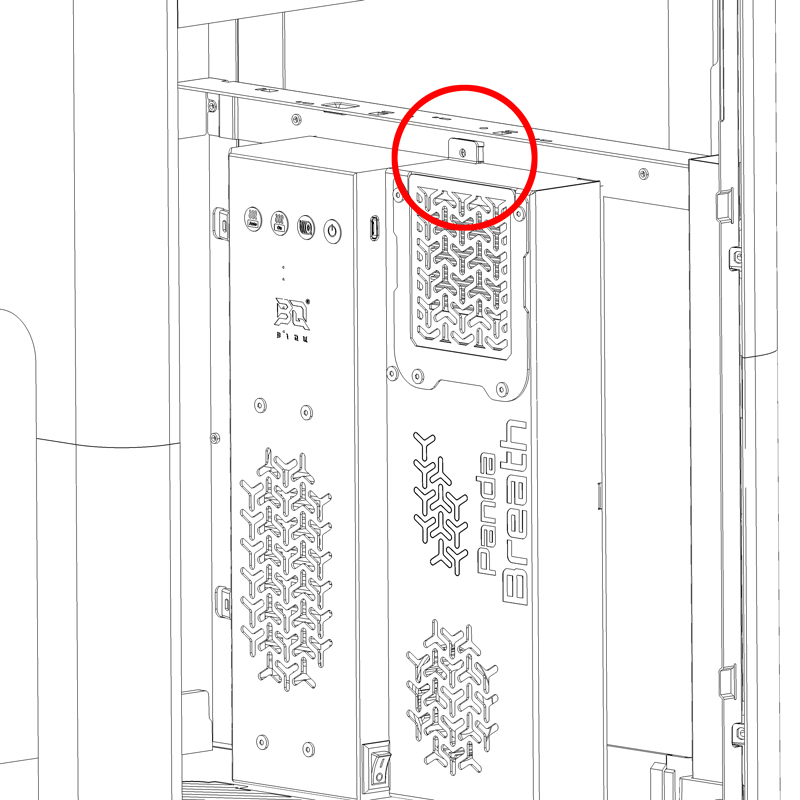
- Prepare the Mounting Insert
Remove the factory screw from the center of the right-side crossbar, and insert the printed part into the crossbar channel.
Early Production Units: If your X1 has factory-installed threaded posts on the right side (early batches), use the included M3×8 machine screws directly—no printed insert needed.
- Align Panda Breath's bottom tabs with the alignment posts and fasten using the included self-tapping screws. Avoid over-tightening, as previously mentioned.
Remaining Steps: Follow P Series Steps 5–8 for cable management and power connection.
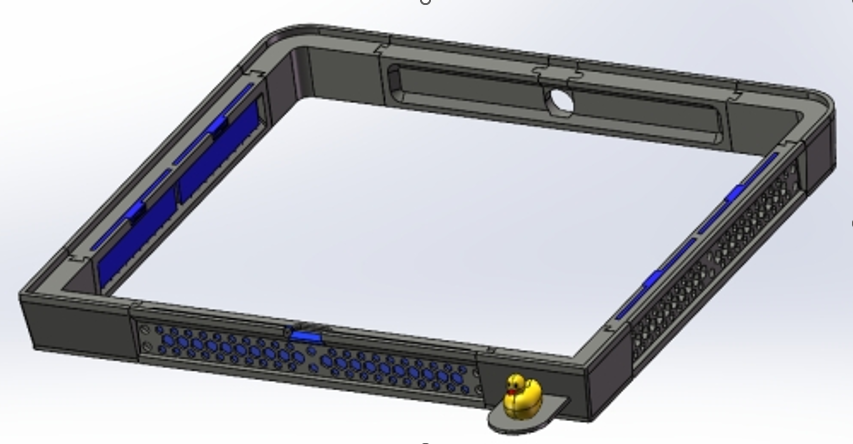
Installation Steps for Snapmaker U1
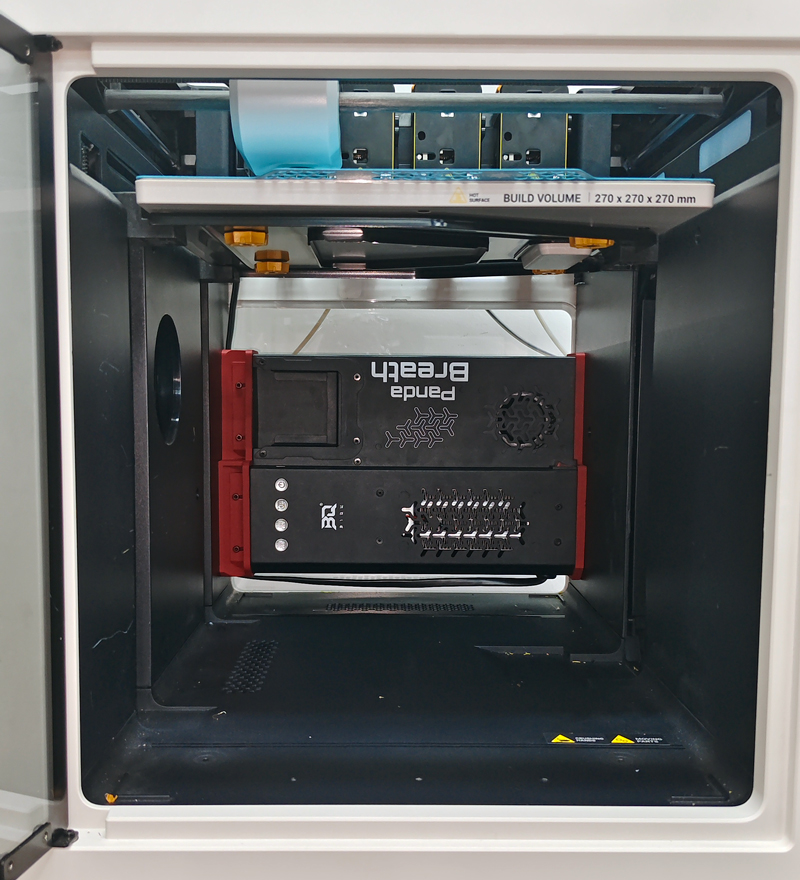
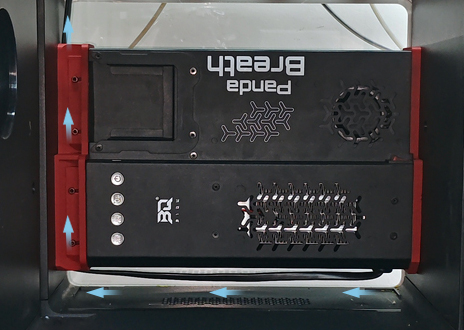
Final Installation View: When correctly installed, your setup should match the following illustration:
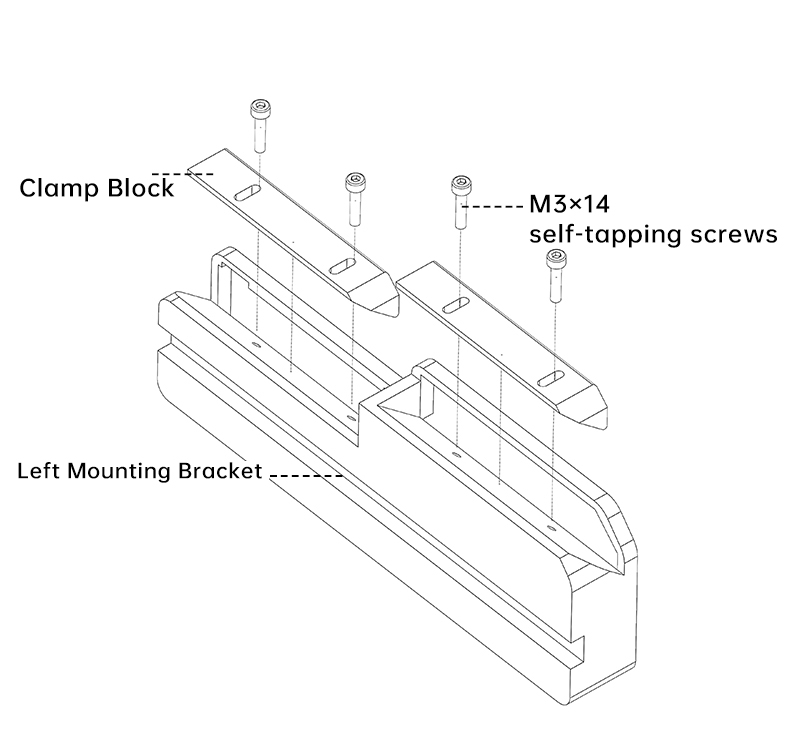
- Prepare the Mounting Brackets
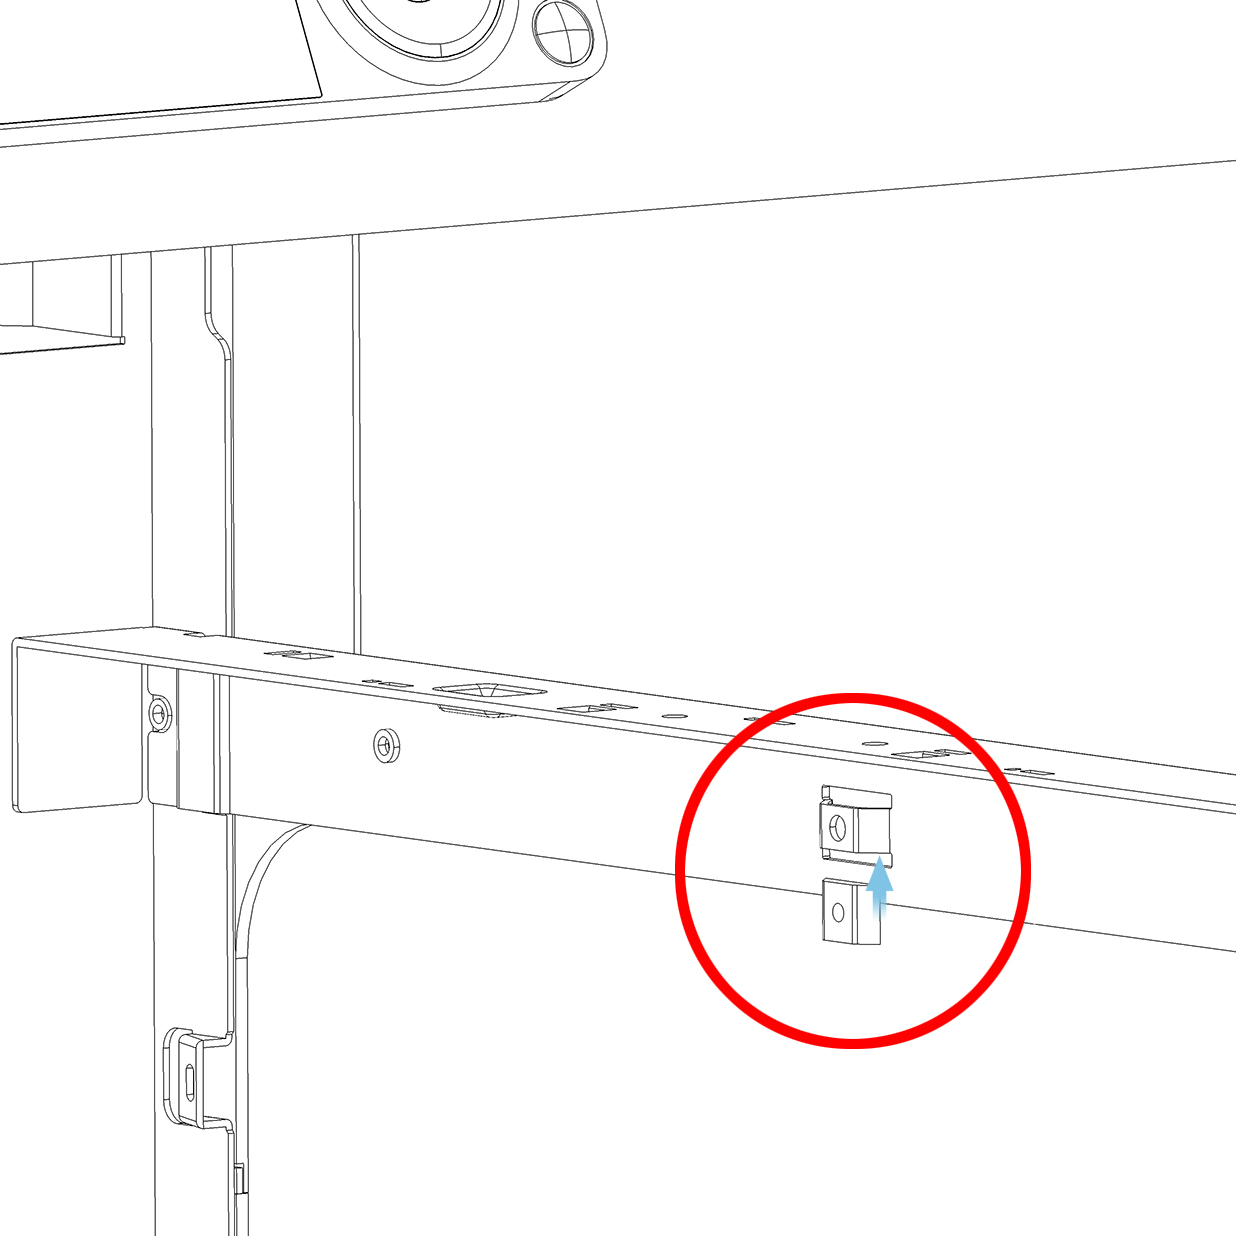
Take the two pre-printed clamp blocks.
Insert an M3×14 self-tapping screw into each hole on the left mounting bracket.
Do not tighten the screws completely at this stage; leave them loose for adjustment.
- Mount the Panda Breath Module
Slide the left and right mounting brackets onto the corresponding sides of the Panda Breath module.
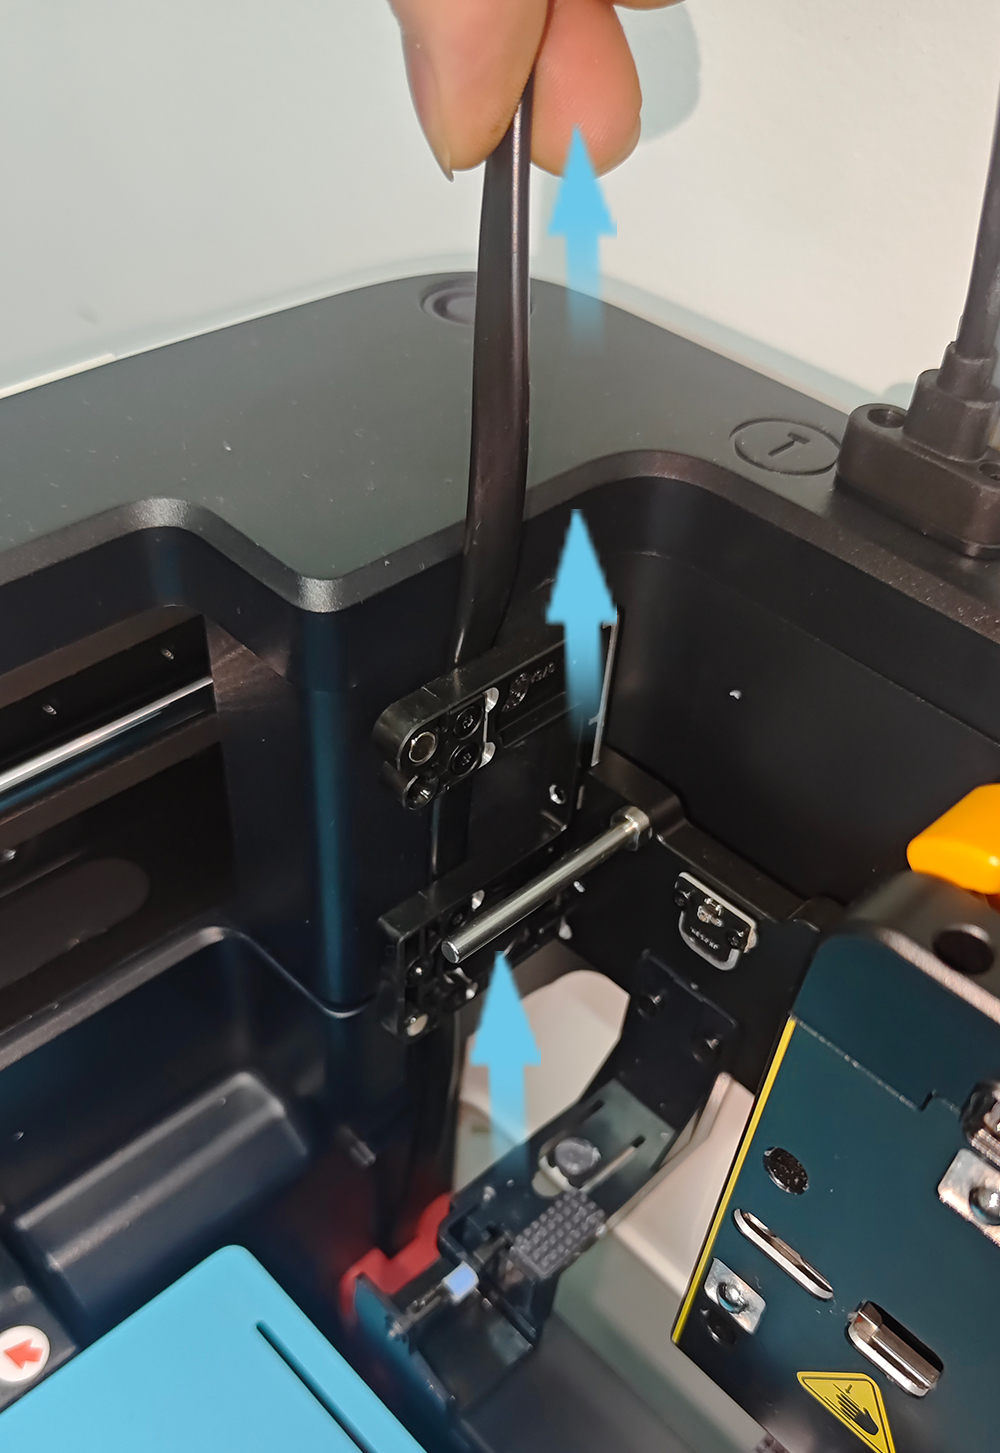
- Route the Cable
Guide the Panda Breath cable toward the left side of the module.
Thread the cable through the dedicated channel on the left mounting bracket.
Gently pull the cable upward and out through the top exit of the channel.
- Position the Module
Place the Panda Breath at the very back of the Snapmaker U1 chamber, gently pressing it against the transparent rear panel.Important: Ensure the bottom of the Panda Breath is suspended—do not let it press on the cable.
- Secure the Installation
Once the module is correctly positioned, fully tighten all four screws on the left mounting bracket to secure it in place.
Installation is now complete.
Interface and Button Functions
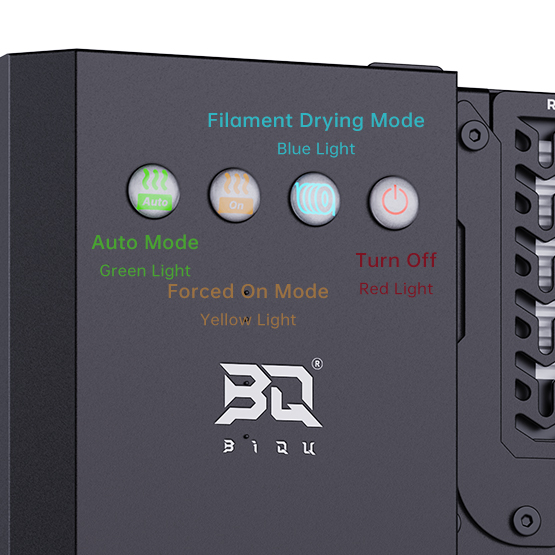
Press a mode button to switch modes; the selected button’s backlight will turn on.
Example: After power-on, the Panda Breath enters Auto Mode by default (Auto button: green). Press On to switch to Forced On Mode (On button: yellow).
While Panda Breath is operating, the Off button backlight remains on. It turns off automatically when the device stops, indicating the operating status.
Initial Connection
After the first power-on, the Panda Breath defaults to Auto Mode, and the green indicator on the button turns on. Note: Auto Mode requires the Panda Breath to be paired with a printer.
WiFi Connection Guide
-
Connecting to the Panda Breath's WiFi_AP Hotspot
-
Connect to the Panda Breath AP hotspot:
Panda_Breath_XXXXXXXXXX. The default password is987654321.
-
-
Accessing the AP Page
- After connecting to the AP, open a browser on your computer and enter the default IP address:
192.168.254.1. On mobile devices, the Panda_Breath Web UI will automatically appear, or you can manually enter the IP address in the browser:192.168.254.1. Below, the mobile version will be used as an example for explanation. The web version operates similarly. For Mobile:
- After connecting to the AP, open a browser on your computer and enter the default IP address:
-
Select Language (Default: English)
-
After selecting a language, tap
Next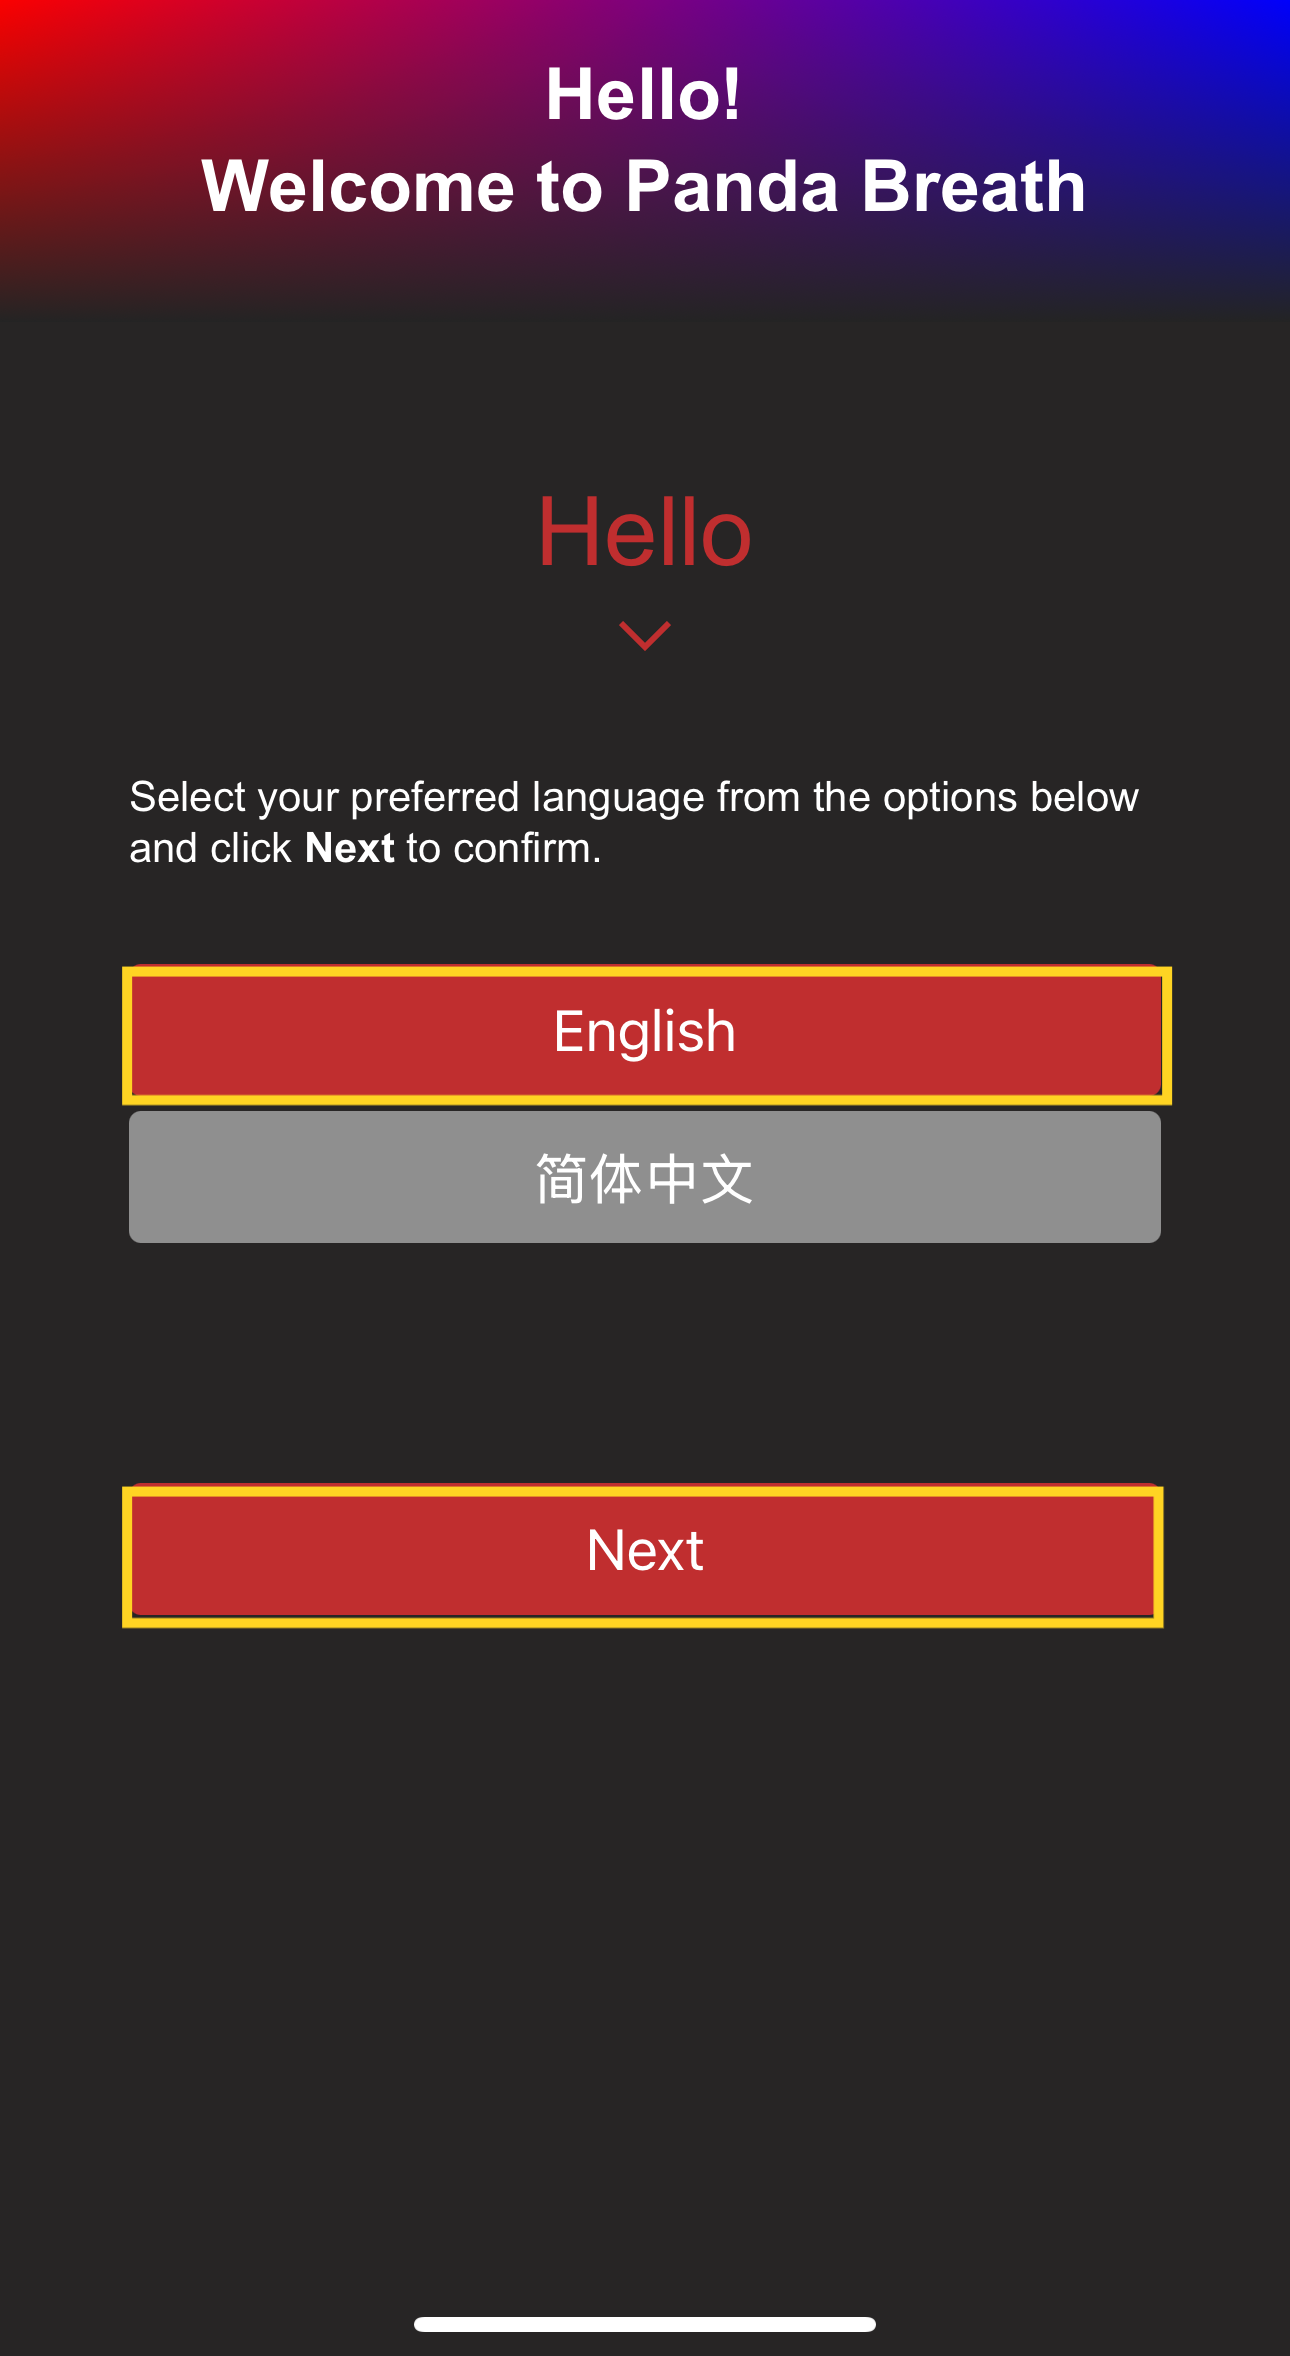
-
-
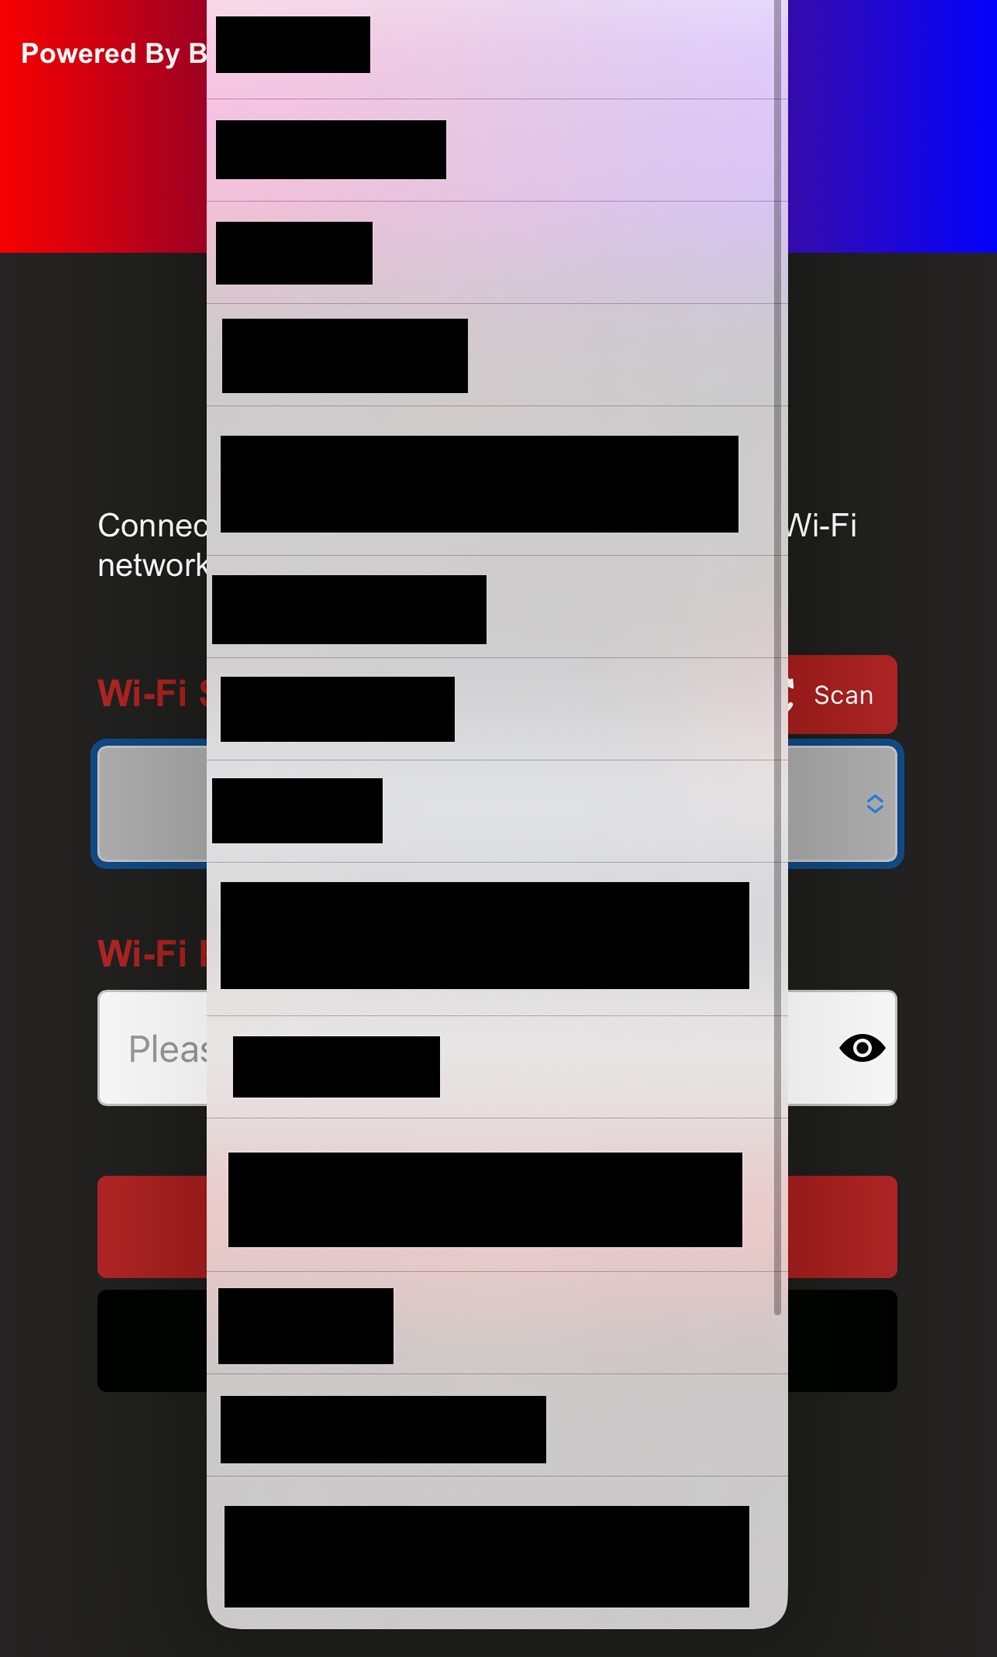
WiFi Connection Page
-
After initial setup or a factory reset, the interface will automatically scan for available Wi-Fi networks. If your network is not listed, tap Scan to refresh the list manually.
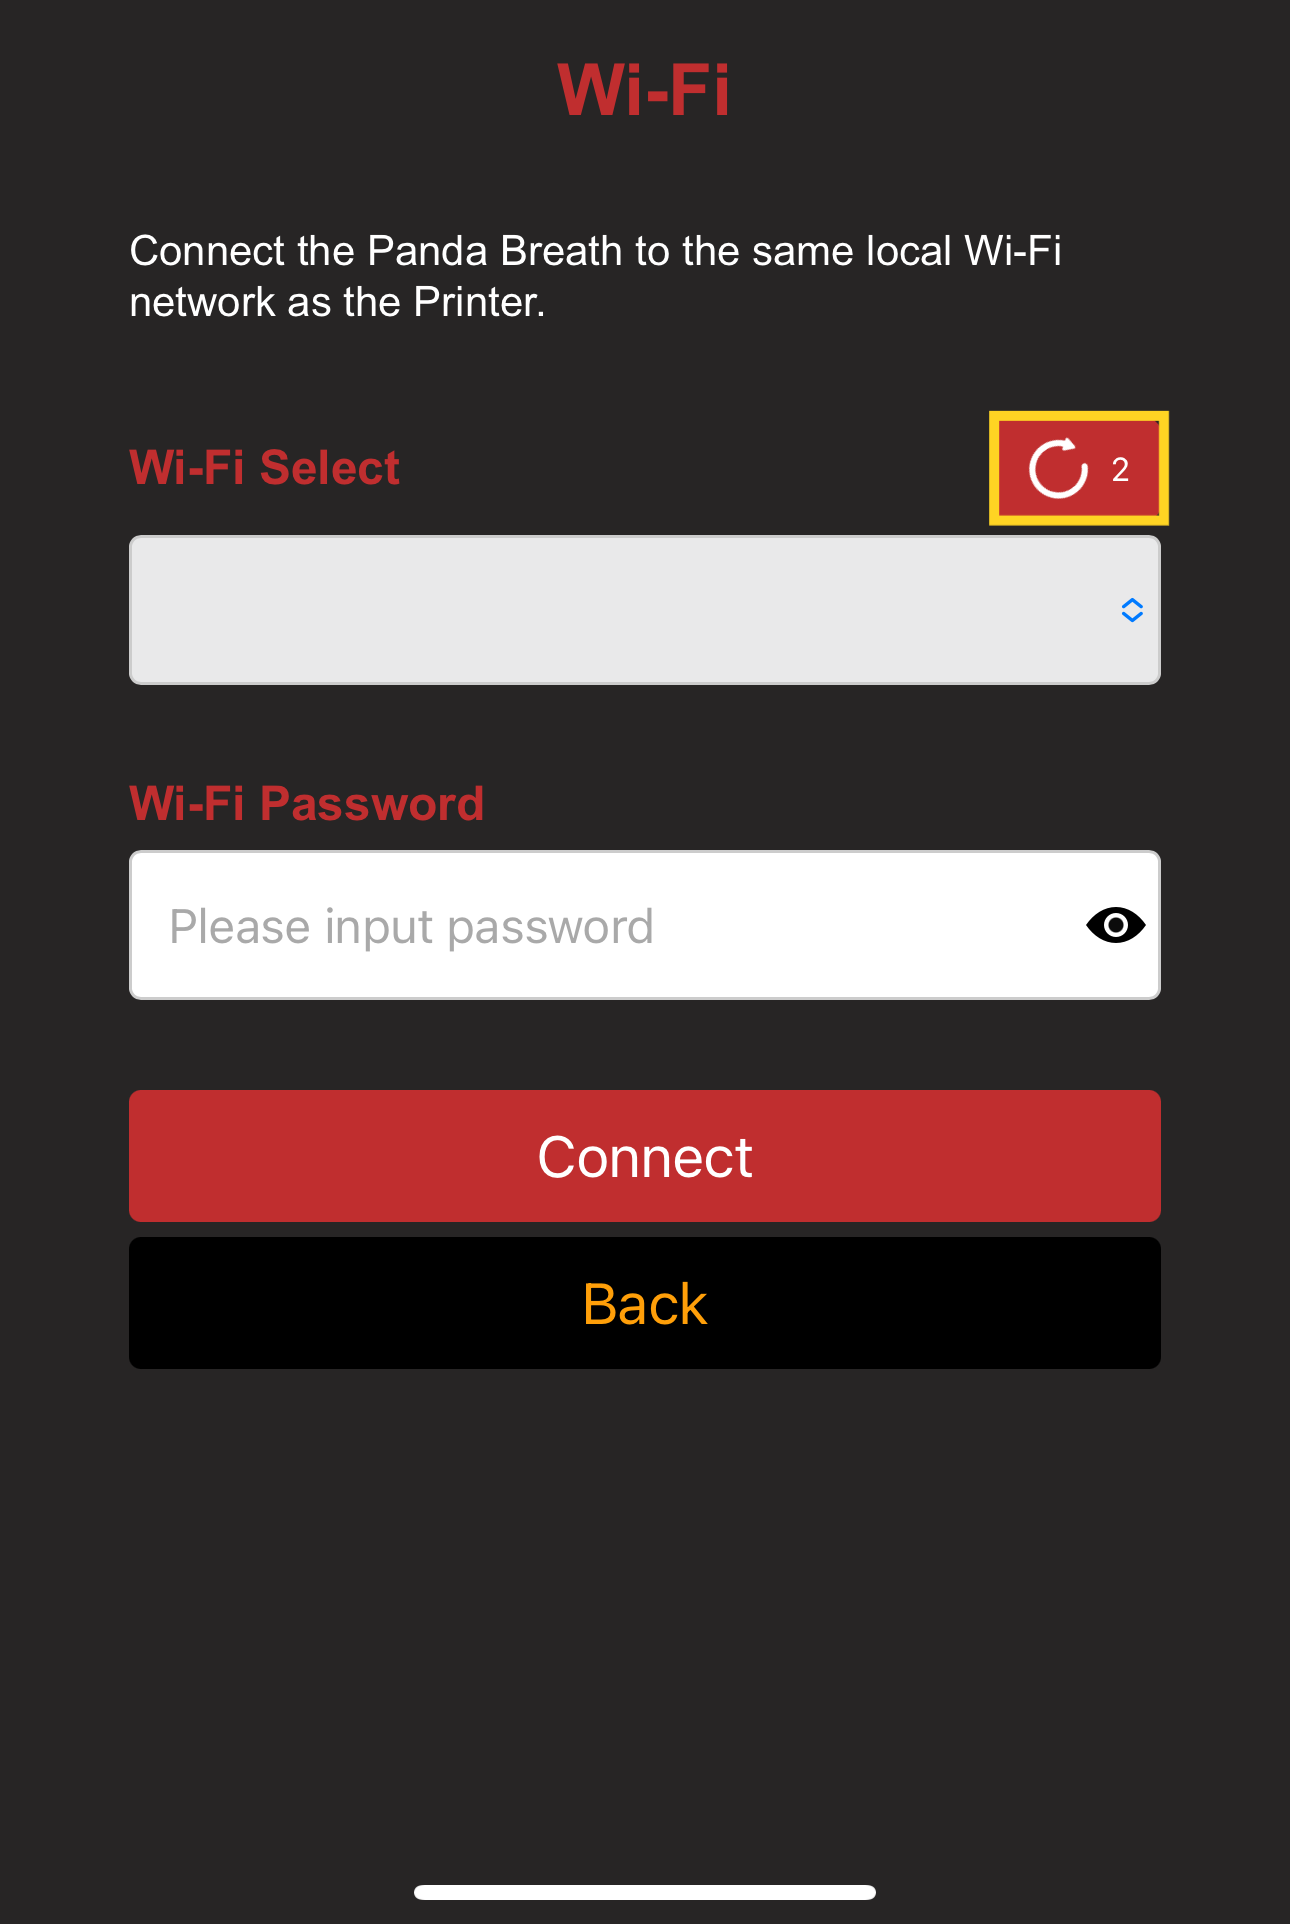
-
A confirmation message will appear when the scan is complete.

-
Select the WiFi network you want to connect to.
-
Type your password and tap the
eye iconif you'd like to see the password you've entered.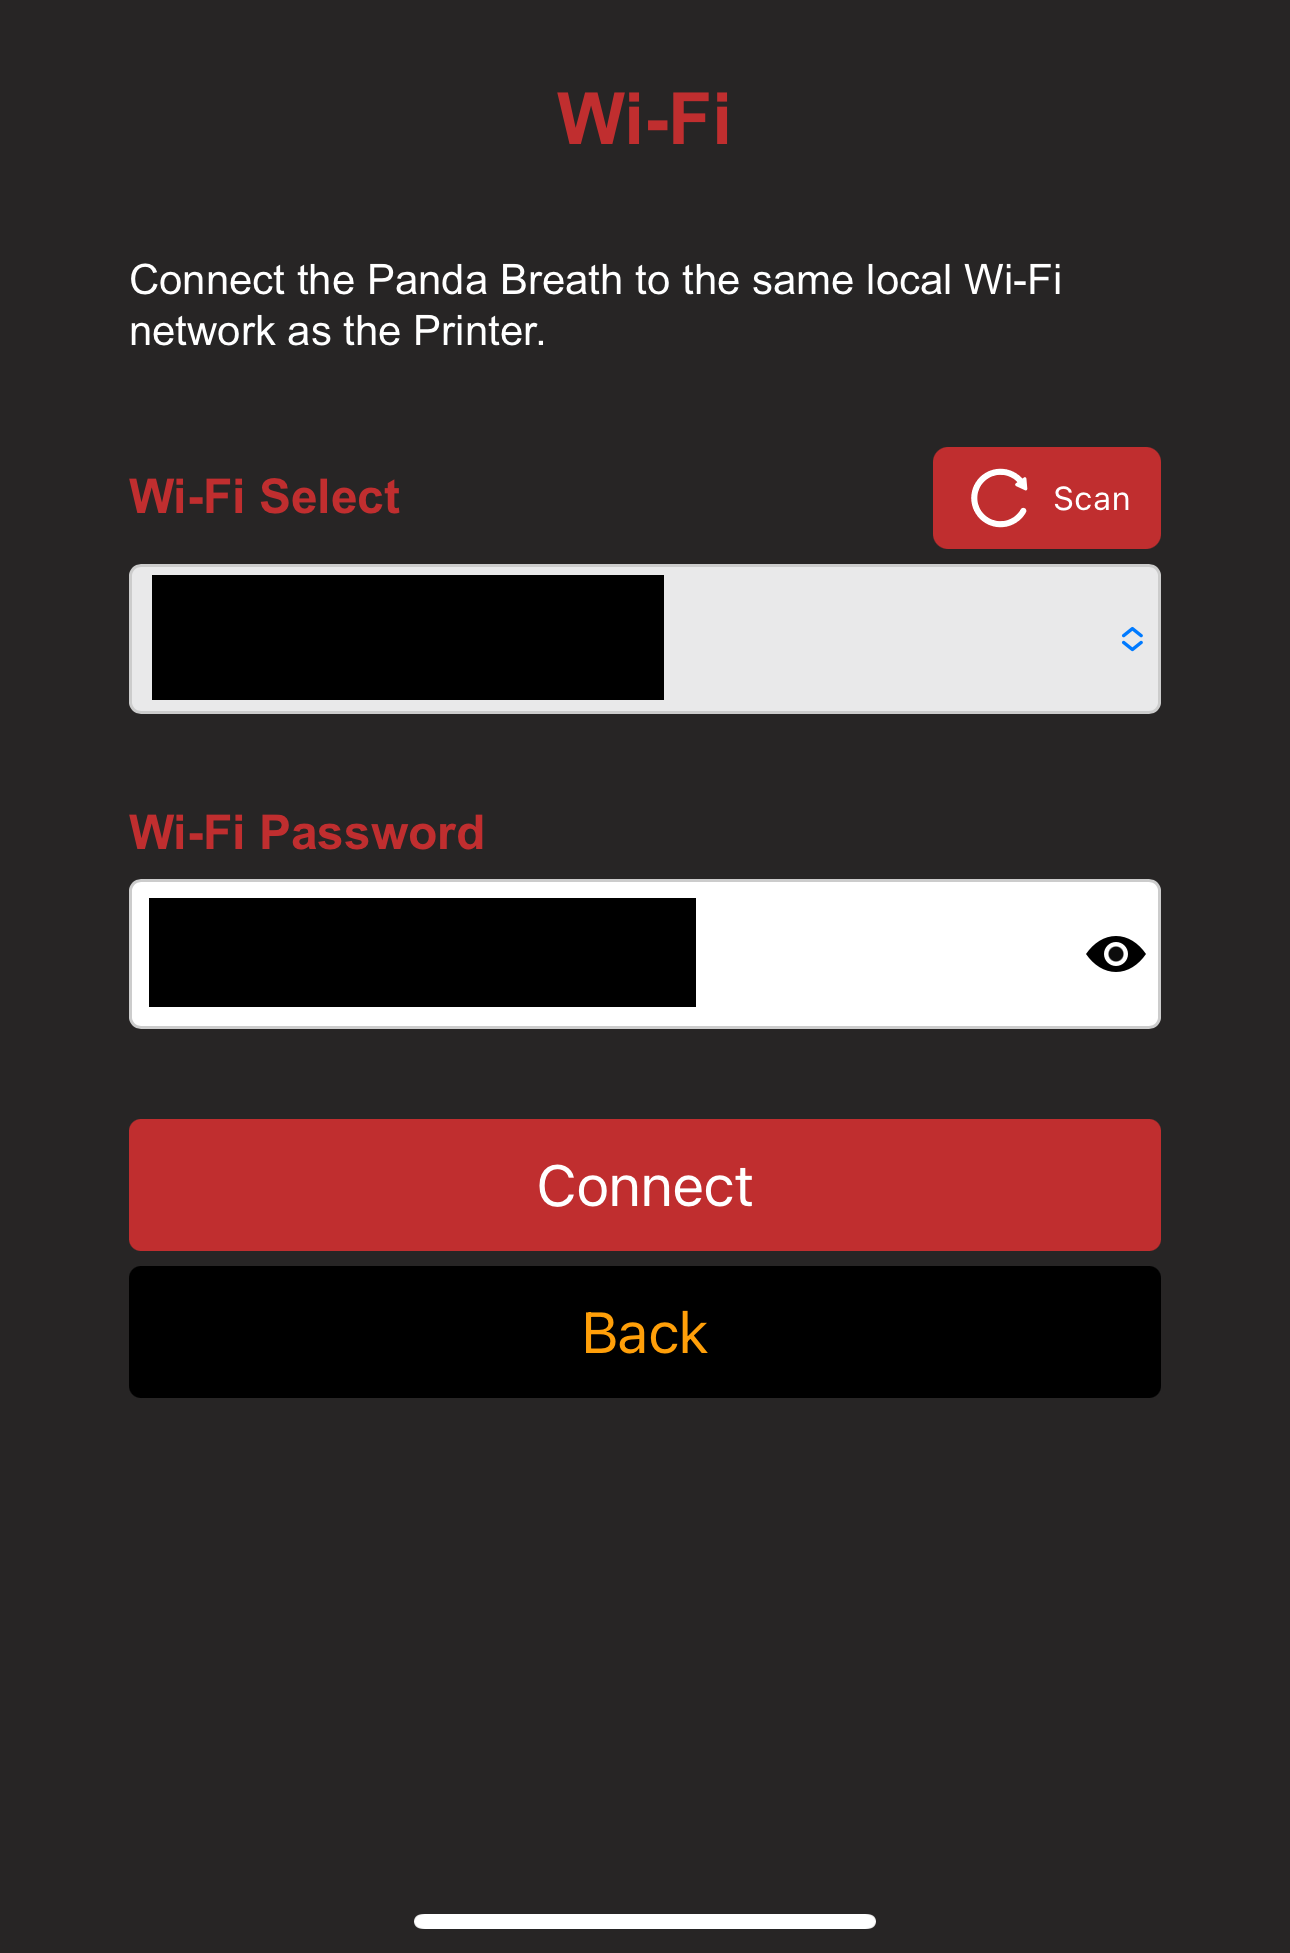
-
Tap Connect. You will then see the WiFi connection page with the status
WiFi connecting...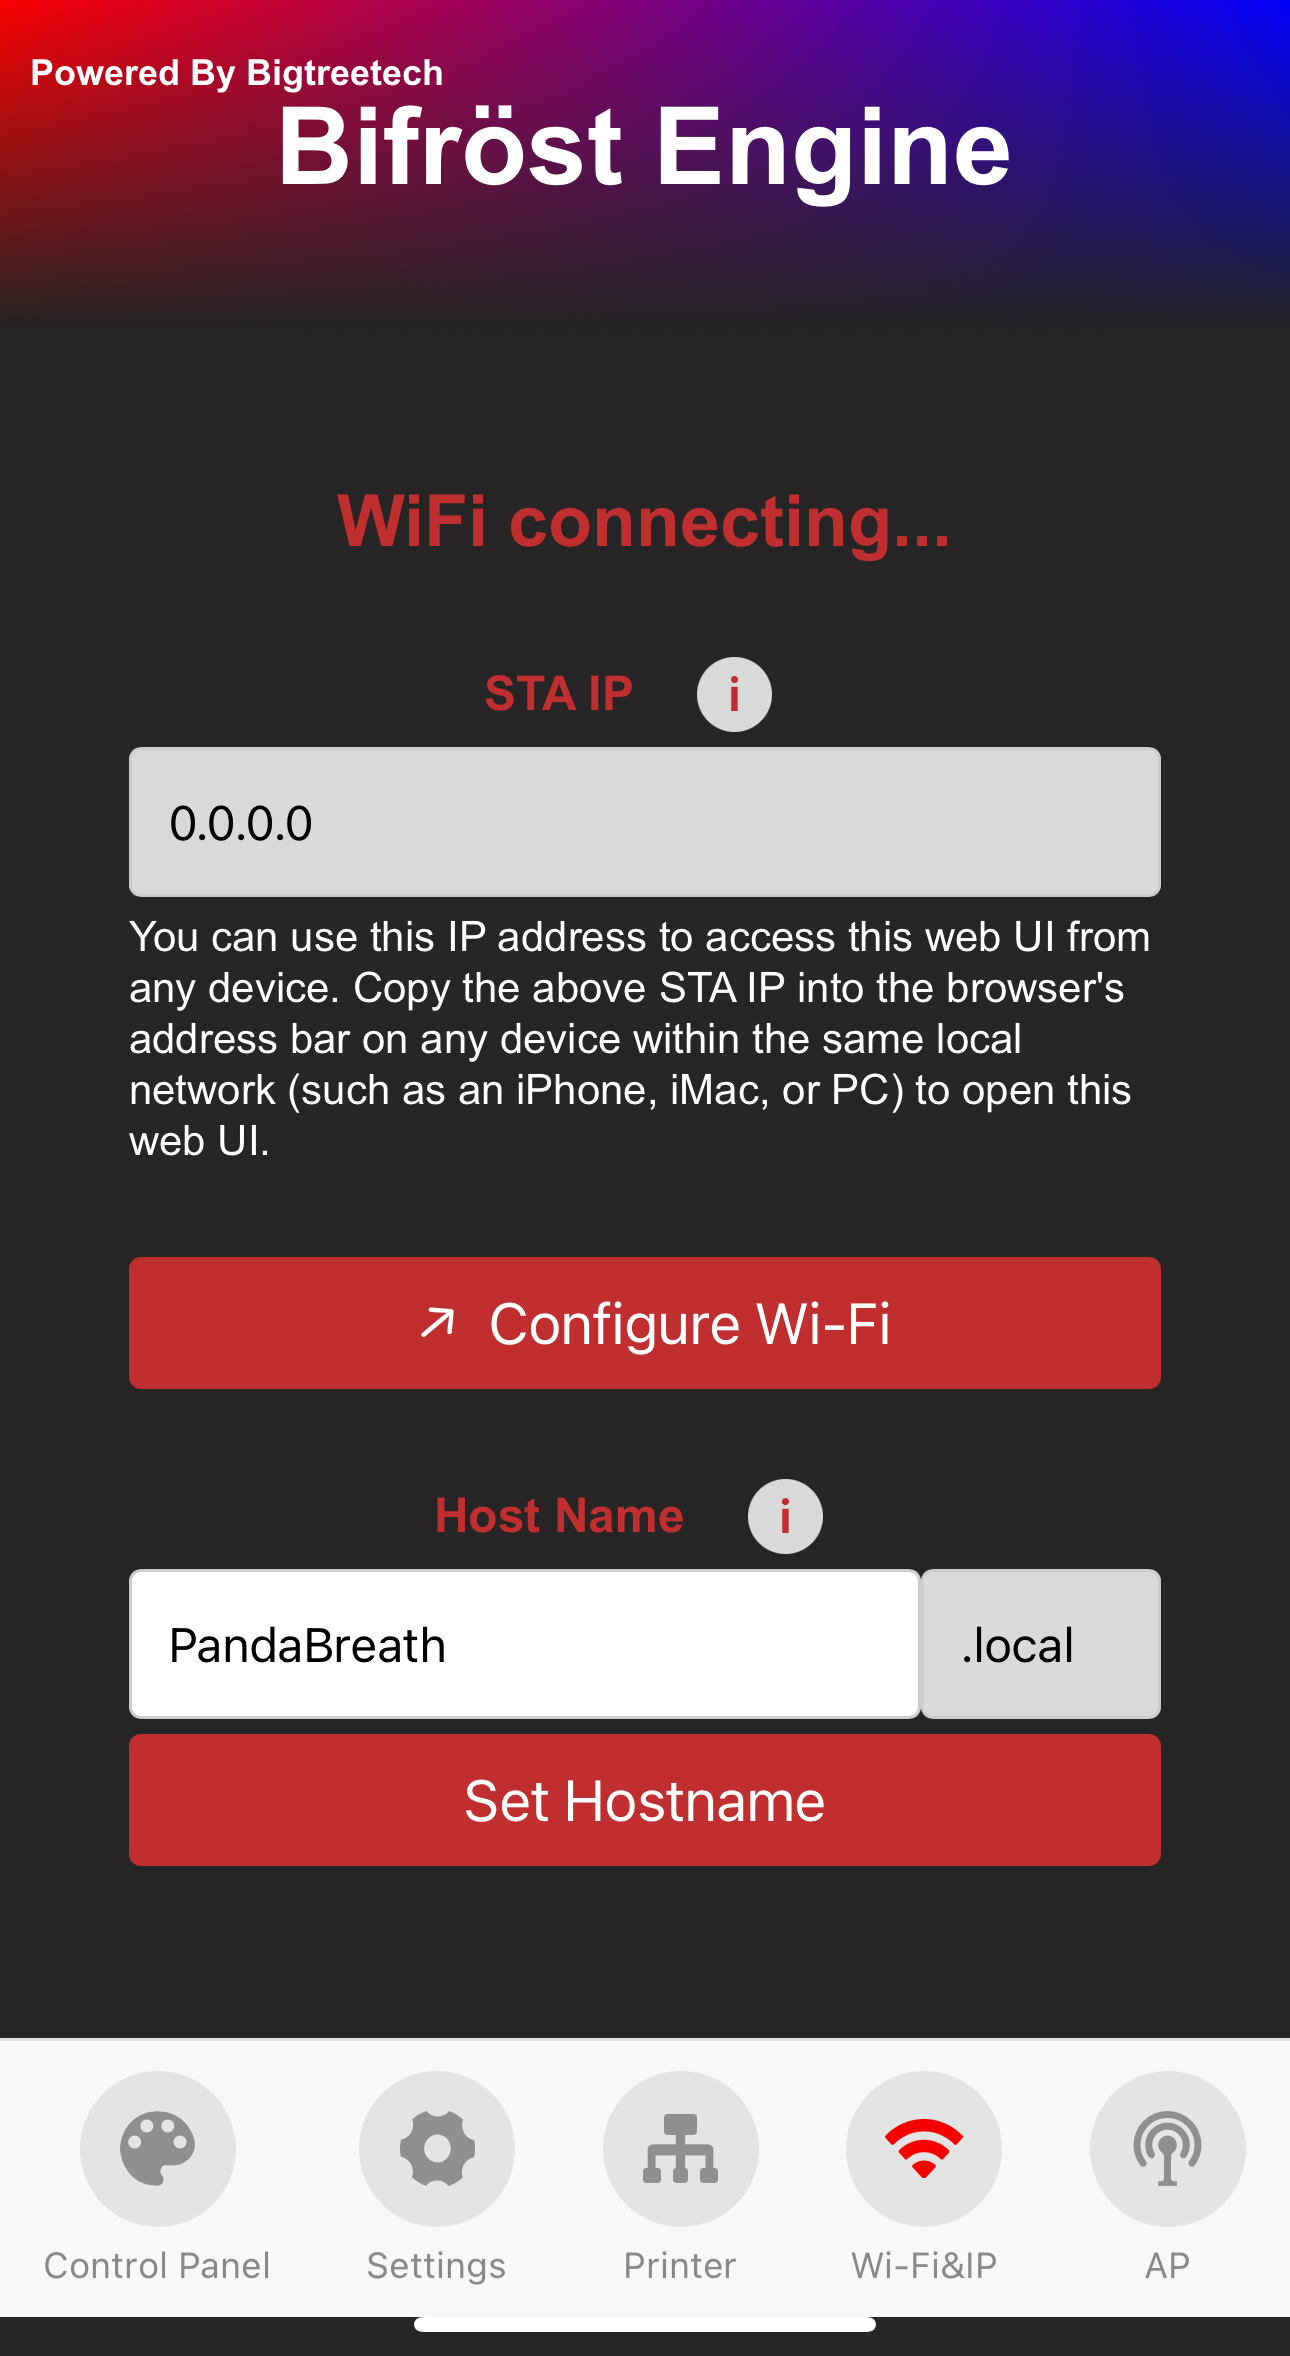
-
Wait a moment, and a WiFi connection status pop-up will appear.
-
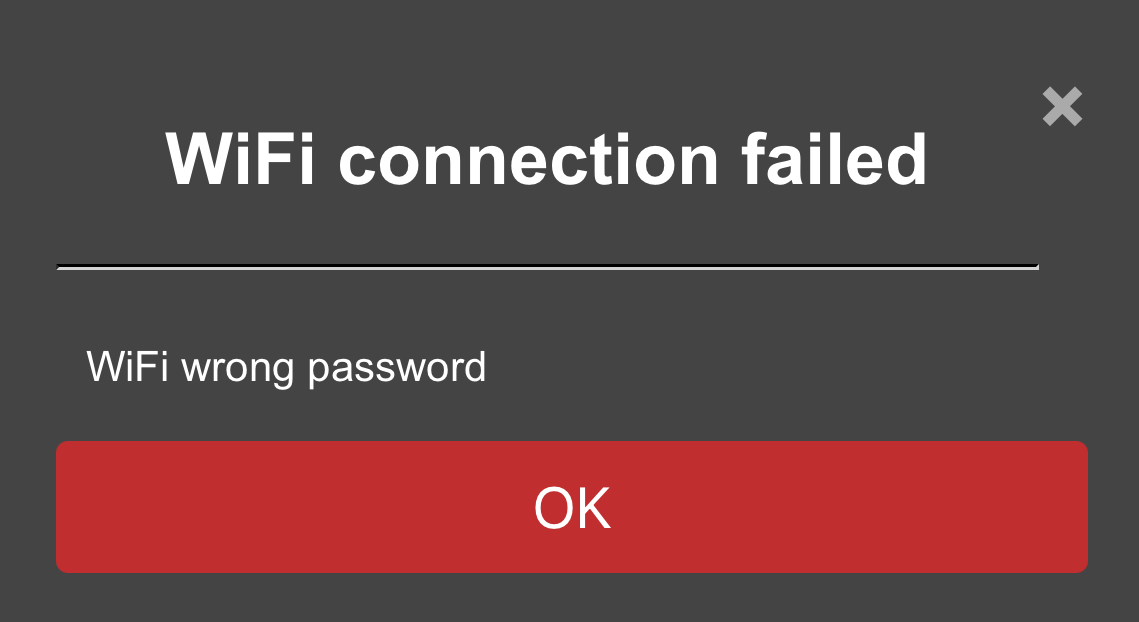
Connection Failed:
-
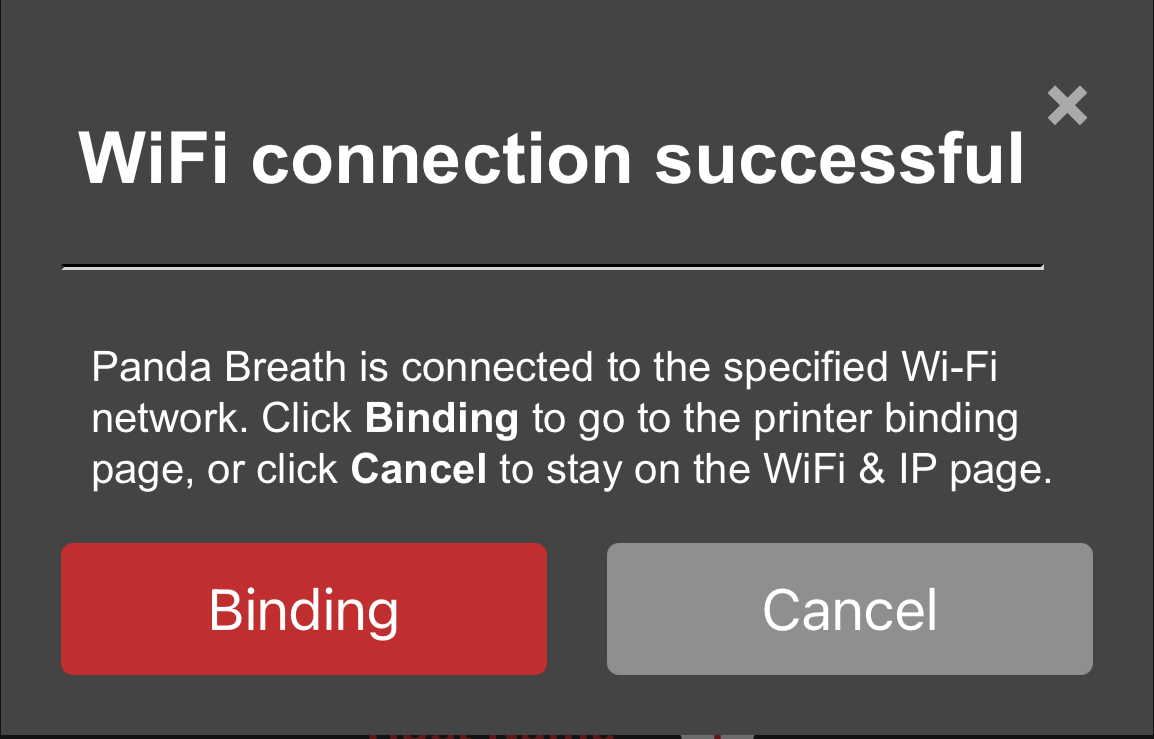
Connection Successful: You can either bind the printer and proceed to the printer interface or tap Cancel to stay on the WiFi page.
-
-
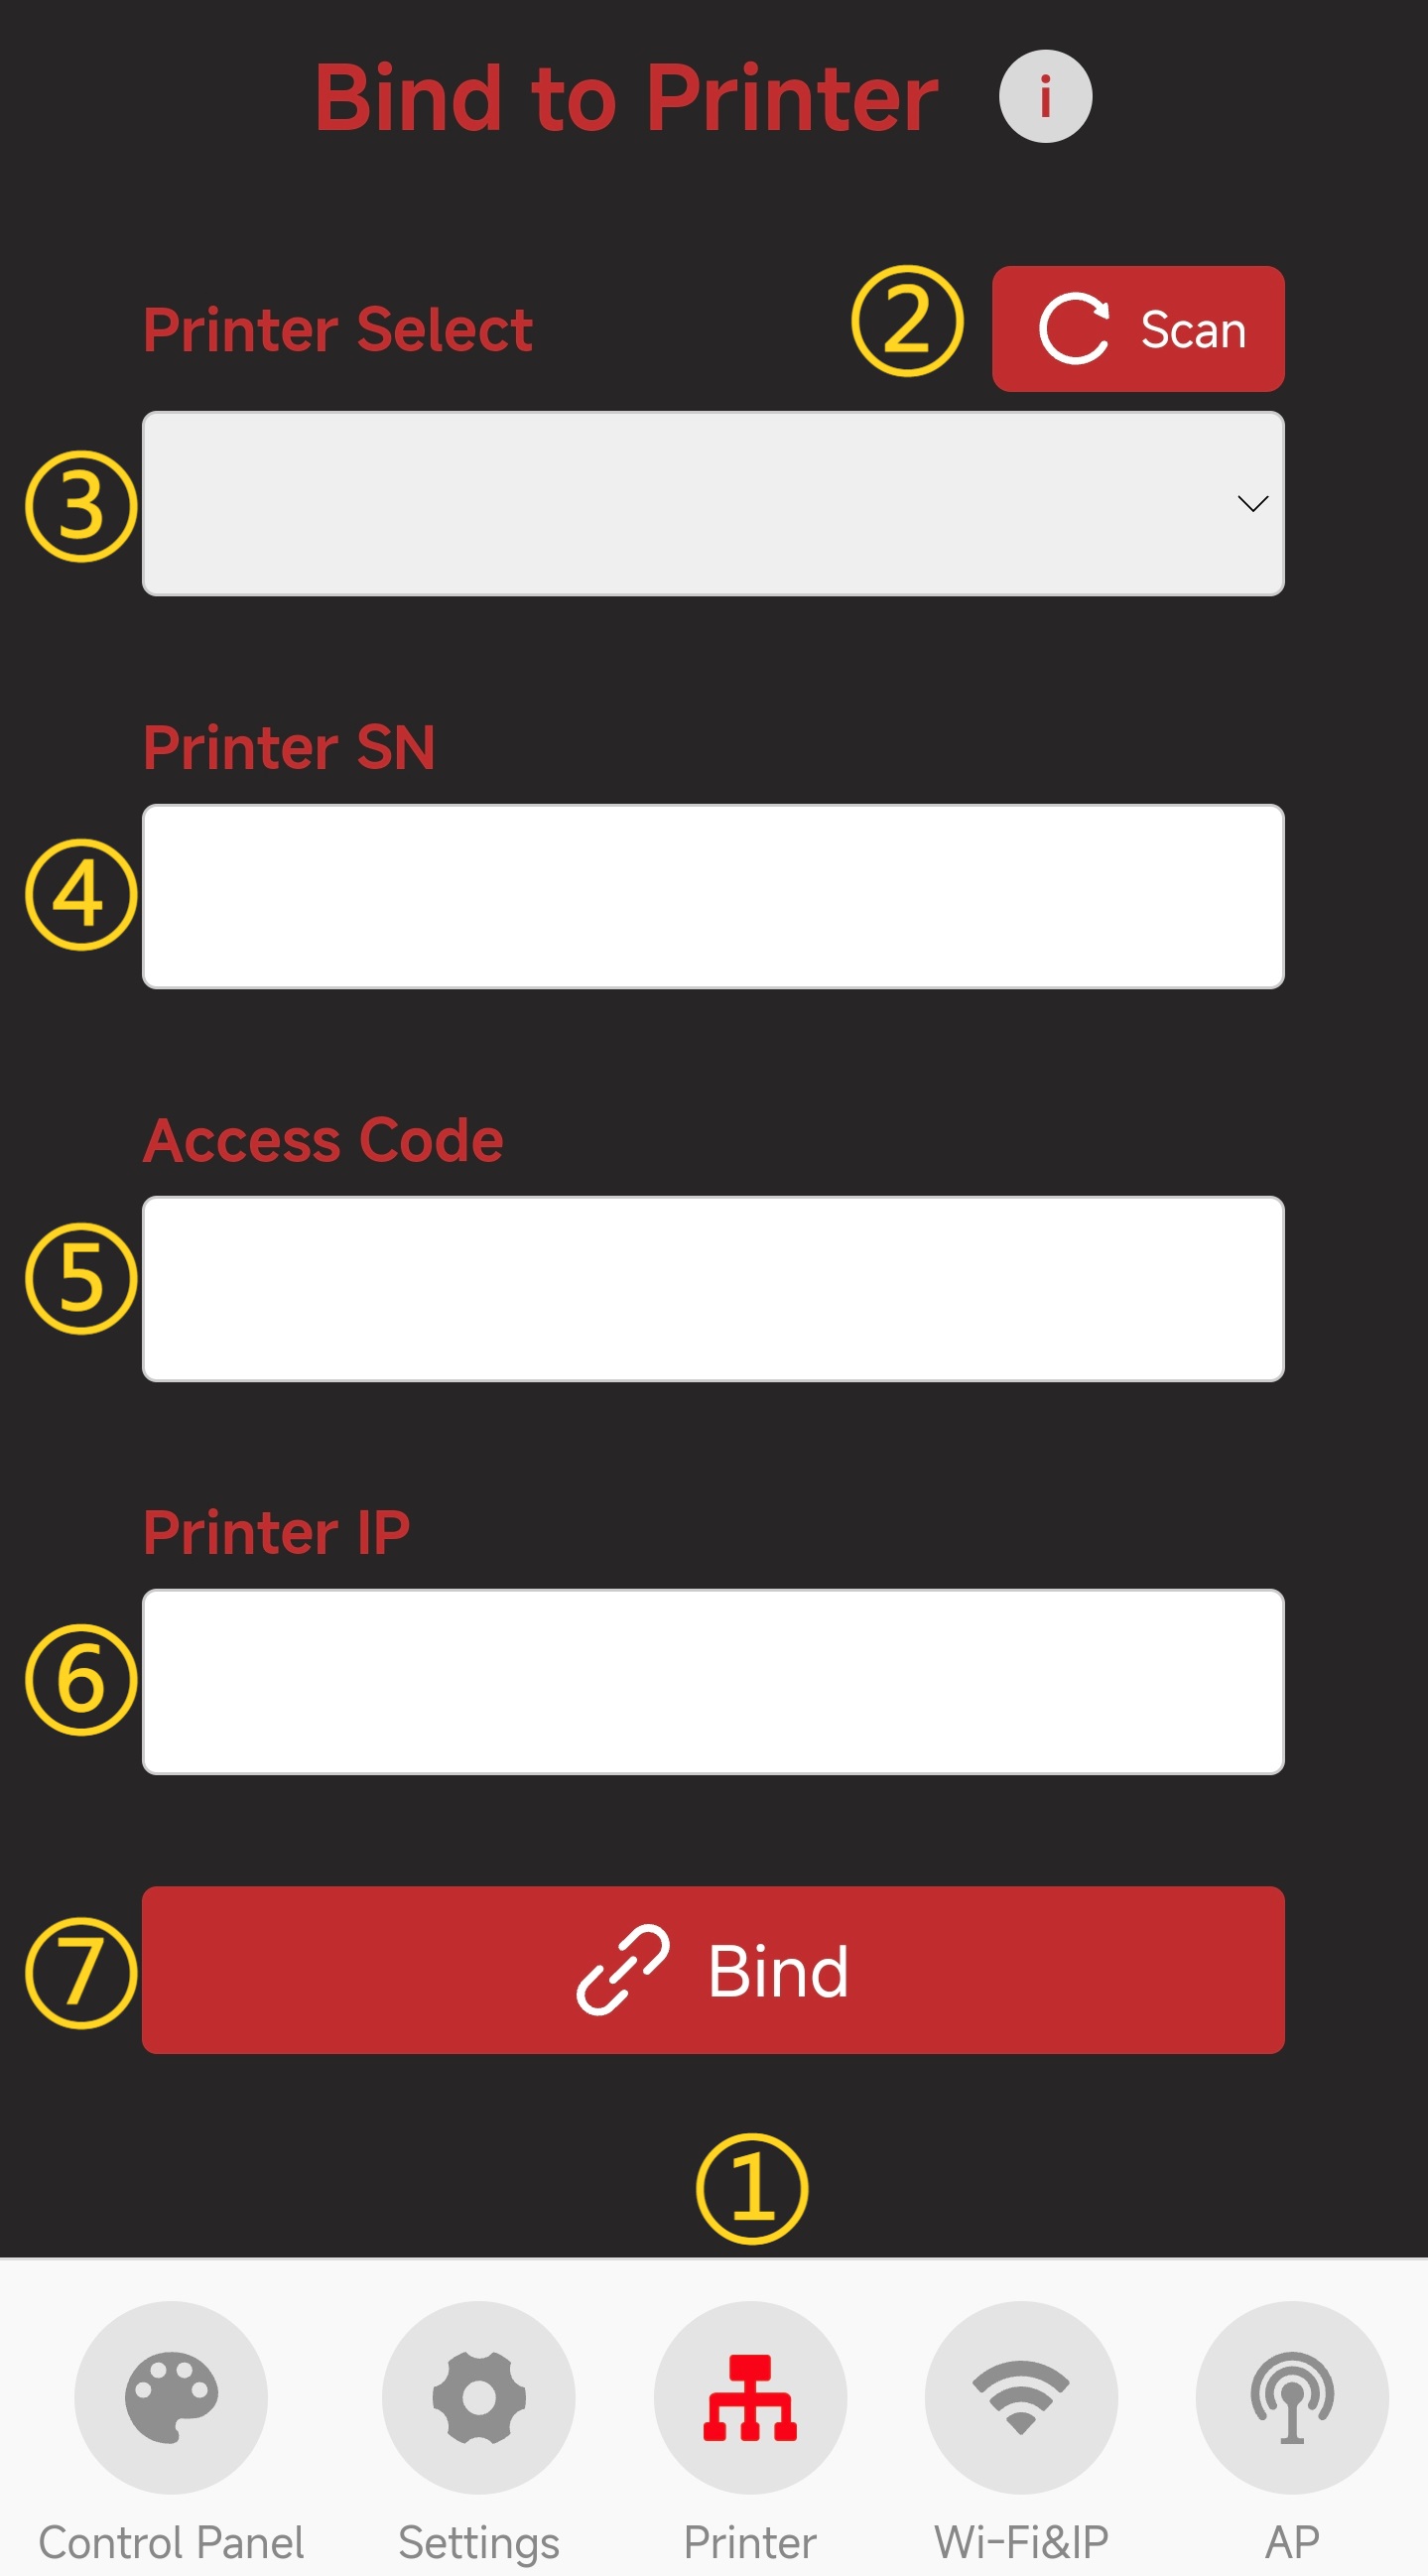
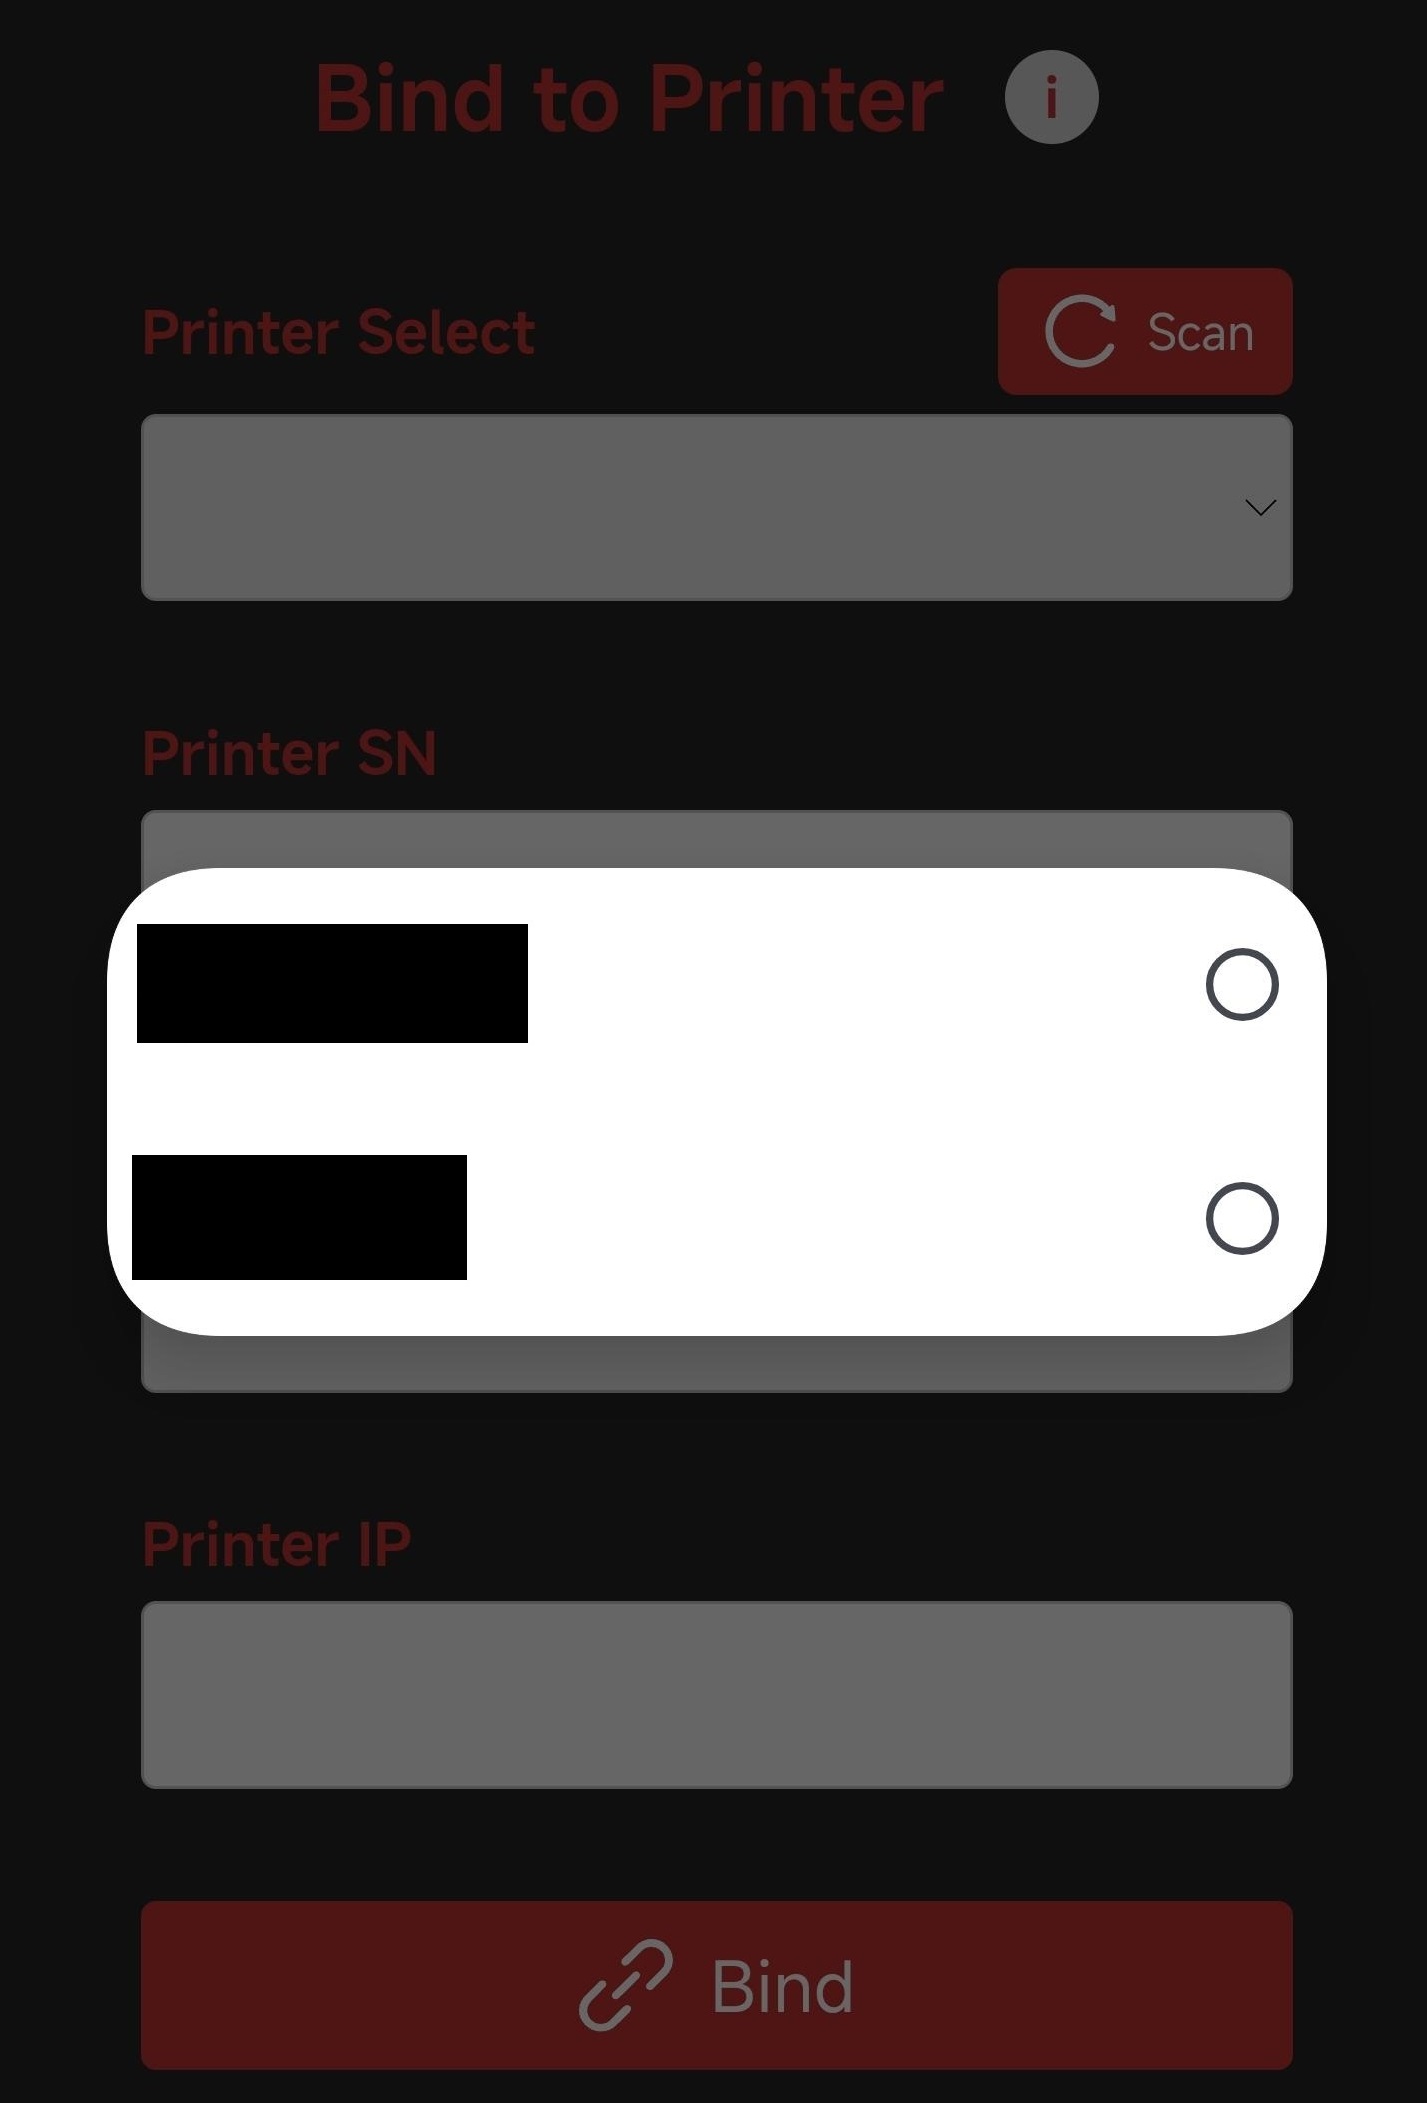
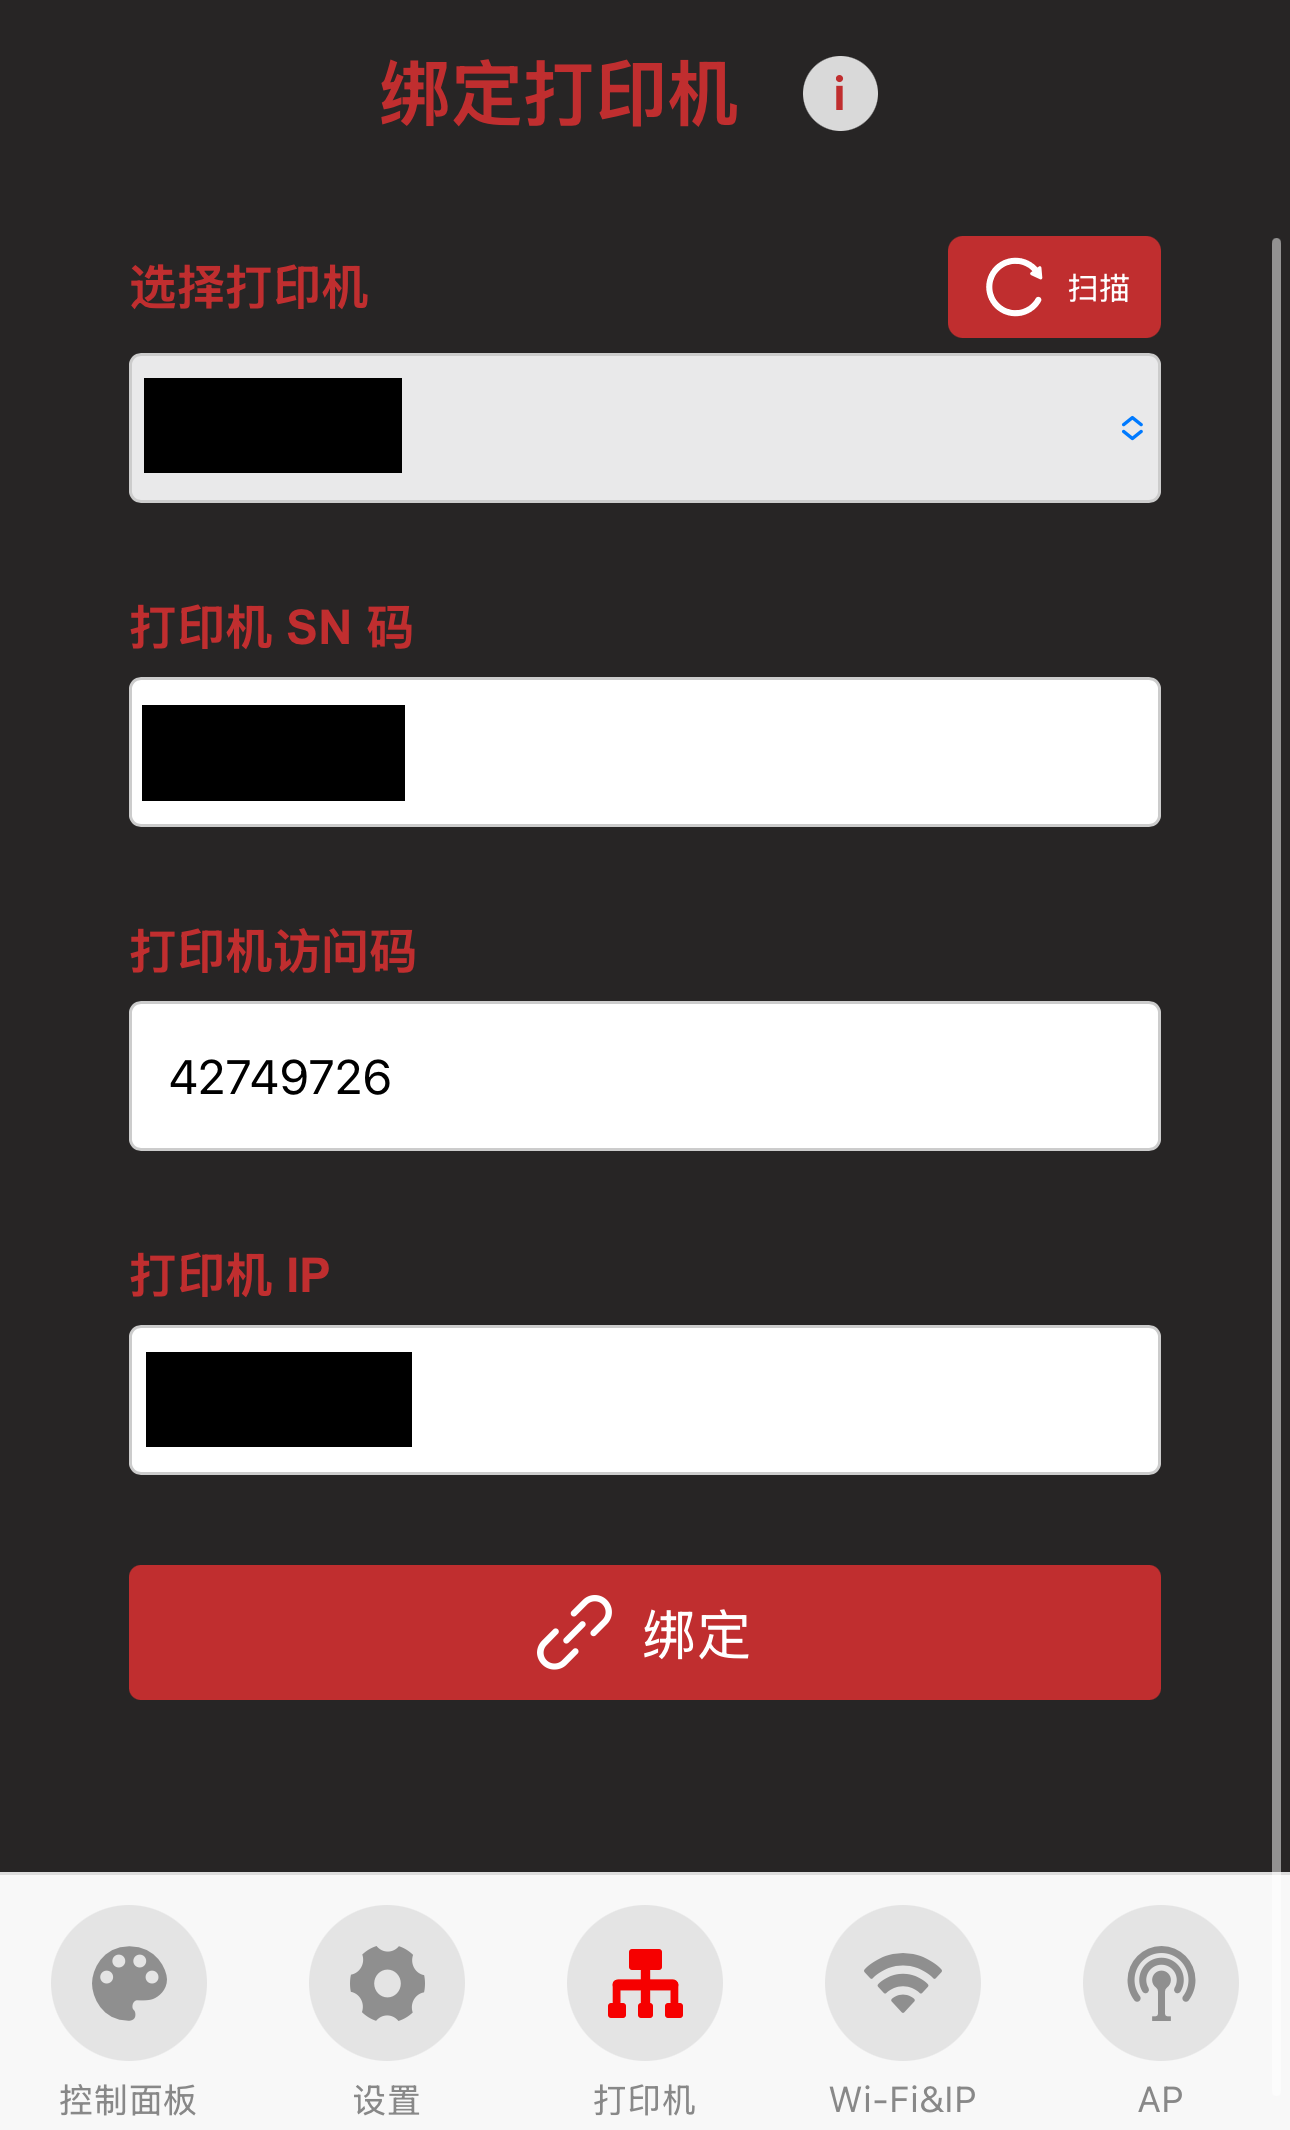
Printer Binding Page
-
Features Overview
-
① Printer Page Selection: When you tap the icon, it will turn red to indicate that you are on the Printer page.
-
② Scan for Printers on the Same Local Network
-
③ Select the Detected Printer
-
④ Enter Printer's SN Code
-
⑤ Enter Printer's Access Code
-
⑥ Enter Printer's IP Address
-
⑦ Confirm to Bind This Printer
-
-
How to Bind a Printer (Using P1P as an Example)
-
Tap
Scanbutton. After a short wait, a pop-up will appear confirming that the scan was successful.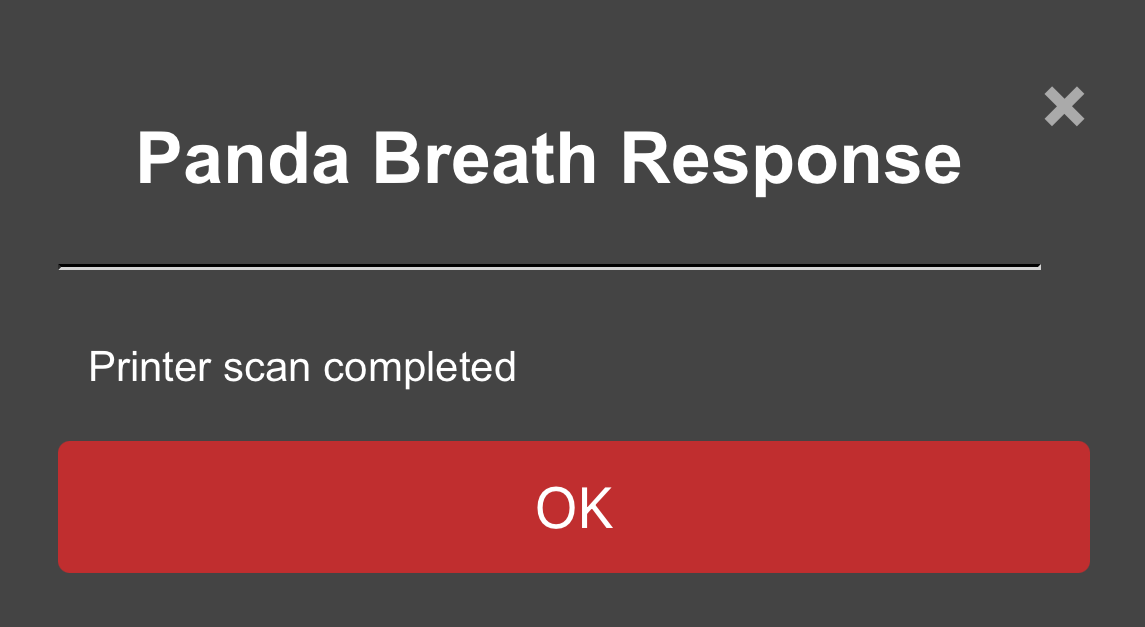
-
Select the printer from the list. The printer's SN code and IP address will automatically fill in.
-
Enter the printer's
Access Code-
Find the access code in the printer's settings, enter it in the box, and tap Bind to successfully bind the printer.

-
-
Introduction to Each Page
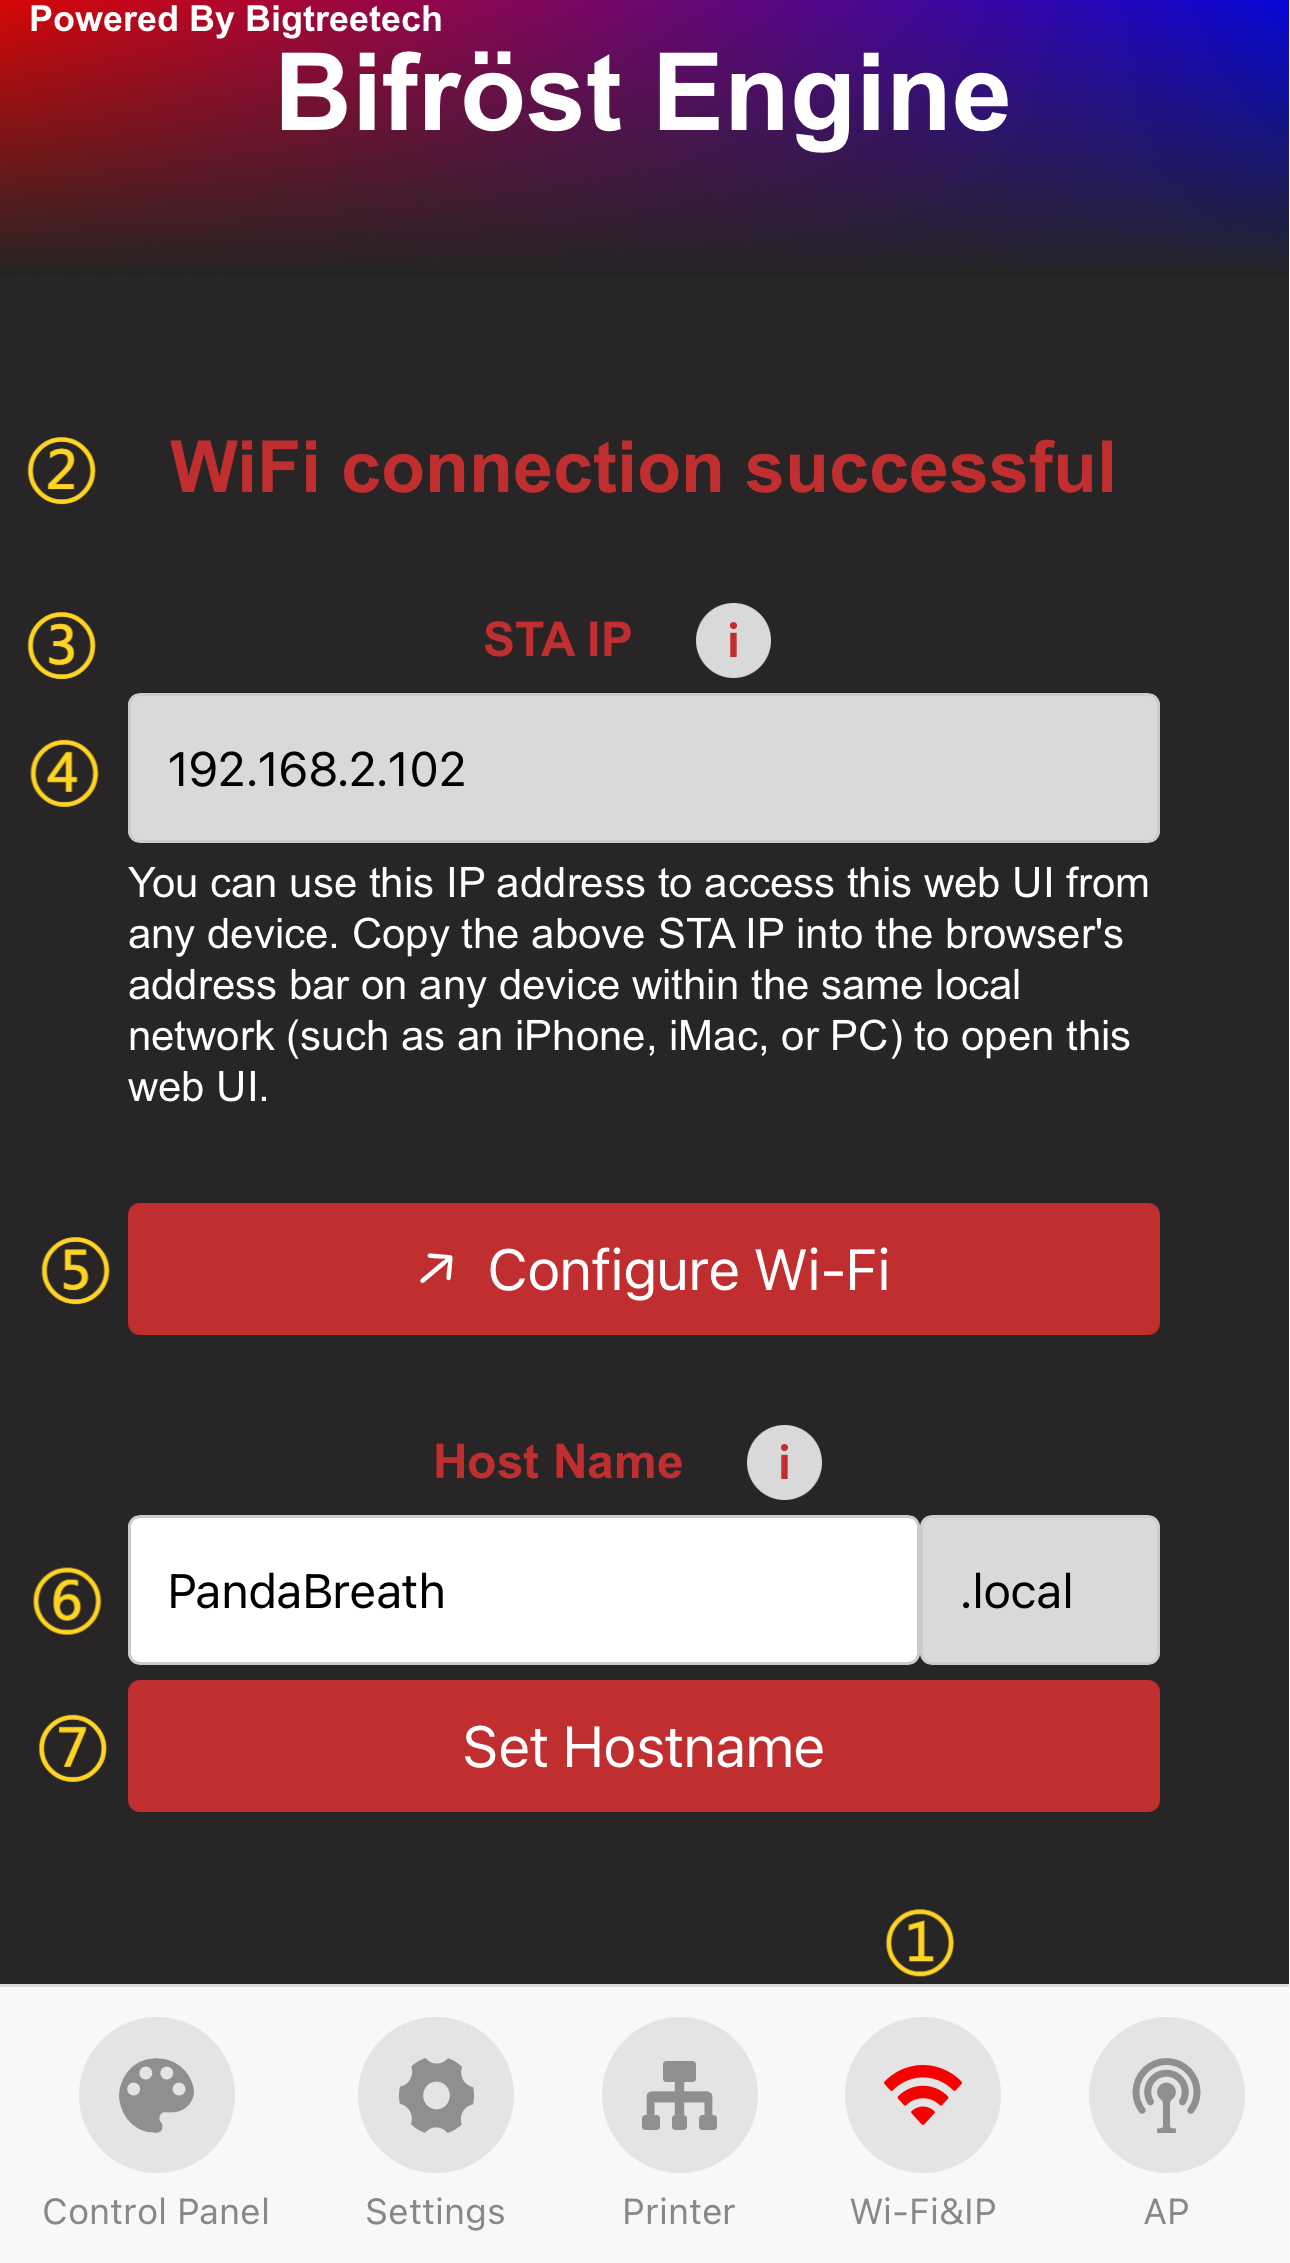
WiFi Page
-
① WiFi Page Selection: When you tap the icon, it will turn red to indicate that you are on the WiFi page.
-
② Current WiFi Connection Status
-
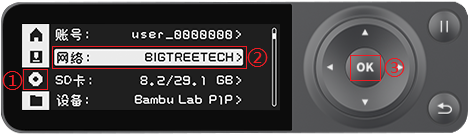
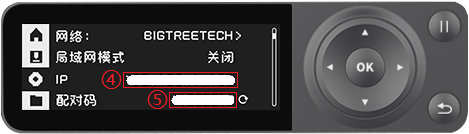
③ IP Address Icon: Tap the icon to display a pop-up. If the IP field is blank, ensure Panda Breath shows "Connected." If it says, "Not Connected," check your network settings.
-
④ IP Address Display: Entering this IP in your browser will take you to the Web page, as long as you're on the same local network.
-
⑤ WiFi Network Configuration Button: Tap to go to the WiFi connection page
-
⑥ Host Name: The default hostname is "PandaBreath." If you forget the IP, you can use the hostname followed by "local" in the browser (e.g., http://PandaBreath.local). To modify the hostname, tap the text box to edit it, then tap "Set Hostname" to confirm.
-
⑦ Confirm Hostname Modification
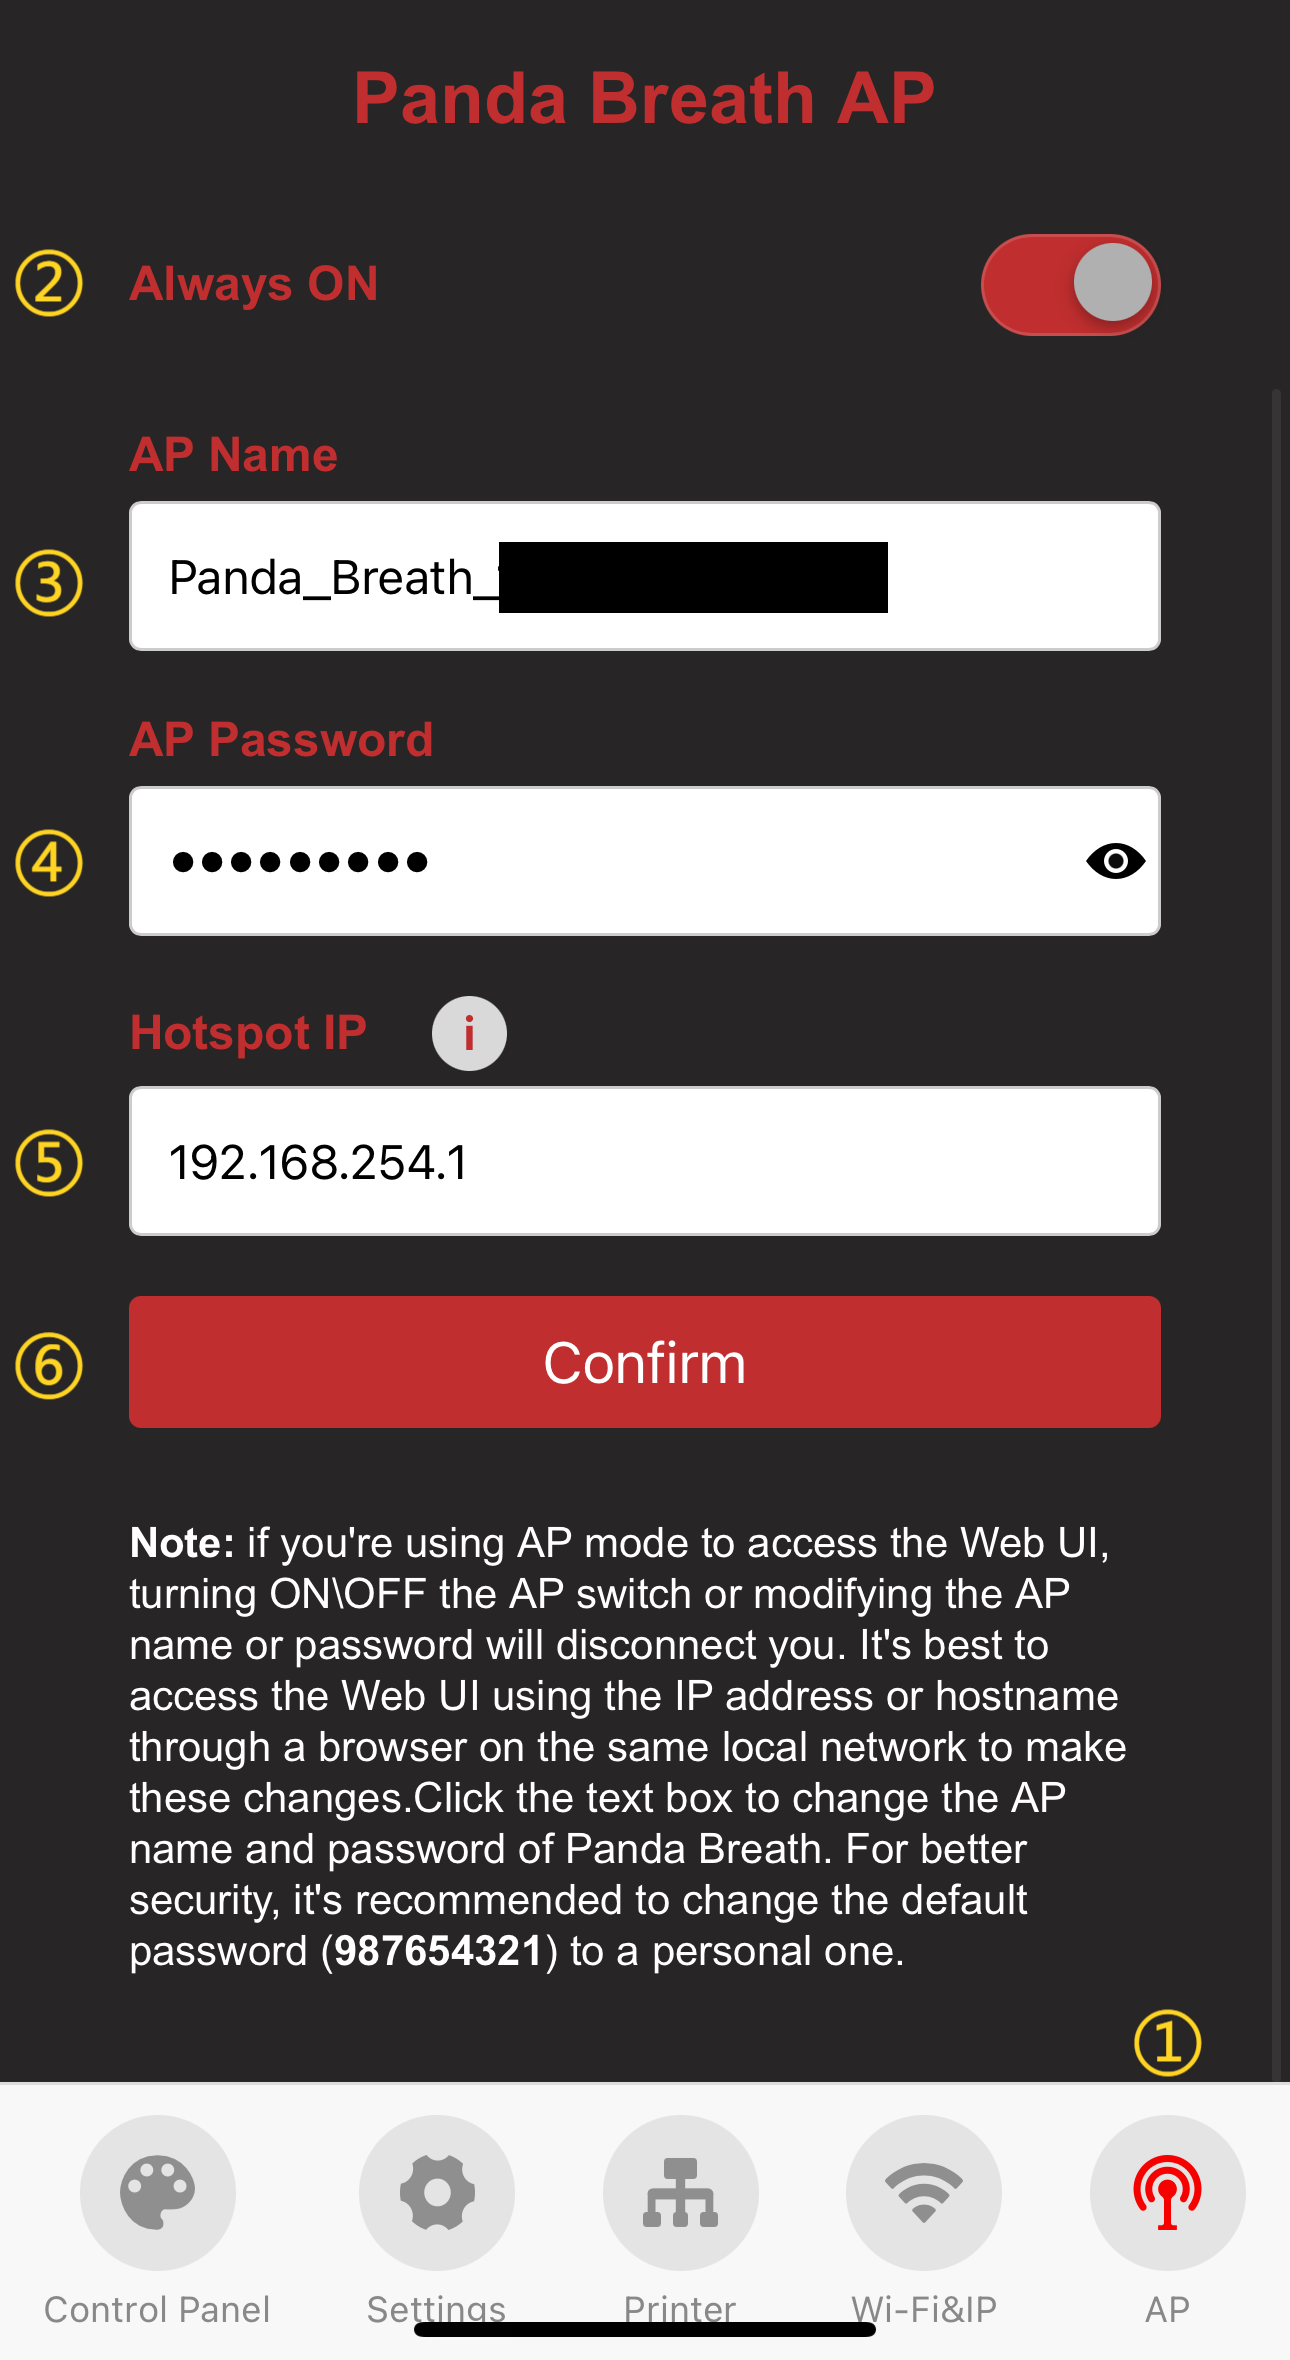
AP Page
-
① AP Page Selection: When you tap the icon, it will turn red to indicate that you are on the AP page.
-
② AP Hotspot Switch
-
③ AP Name: Default is
Panda_Breath_XXXXXXXXXX -
④ AP Password: Default is
987654321 -
⑤ Hotspot IP: Default Hotspot IP is "192.168.254.1." If your router's IP range is "192.168.254.xxx," an IP conflict will prevent the device from binding to the printer. Change the Panda Breath hotspot IP to a different range.
-
⑥ Confirm Button: Tapping this button will restart the device. After the restart, you can connect to the AP hotspot. (How to connect to the AP hotspot)
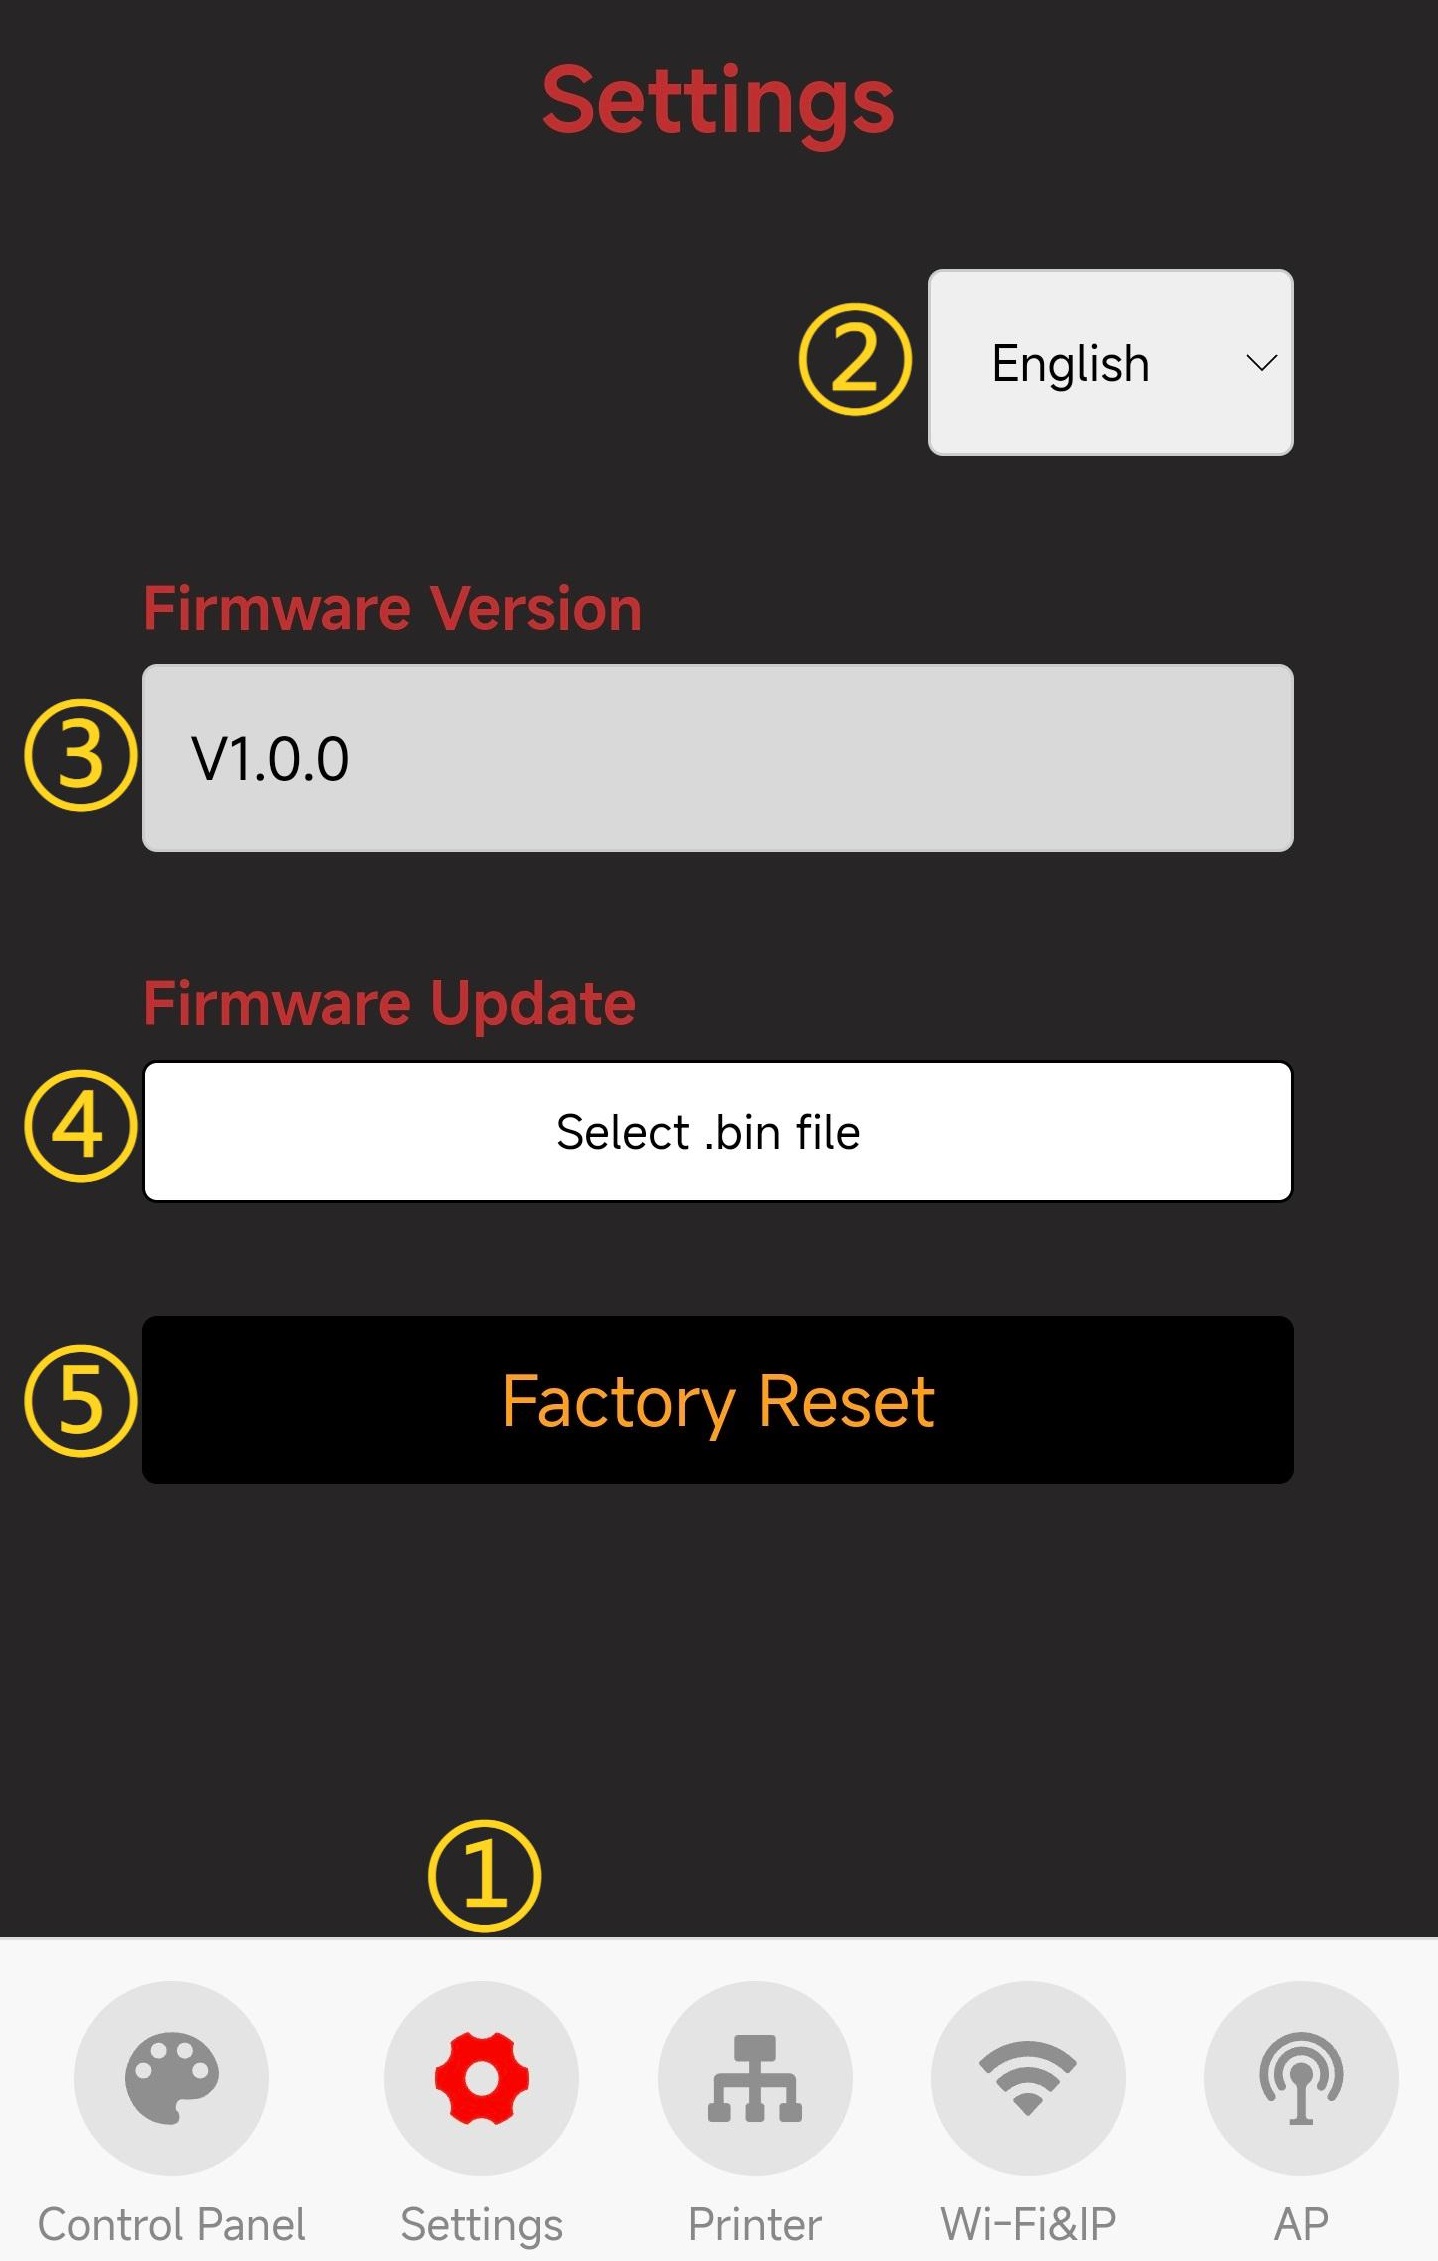
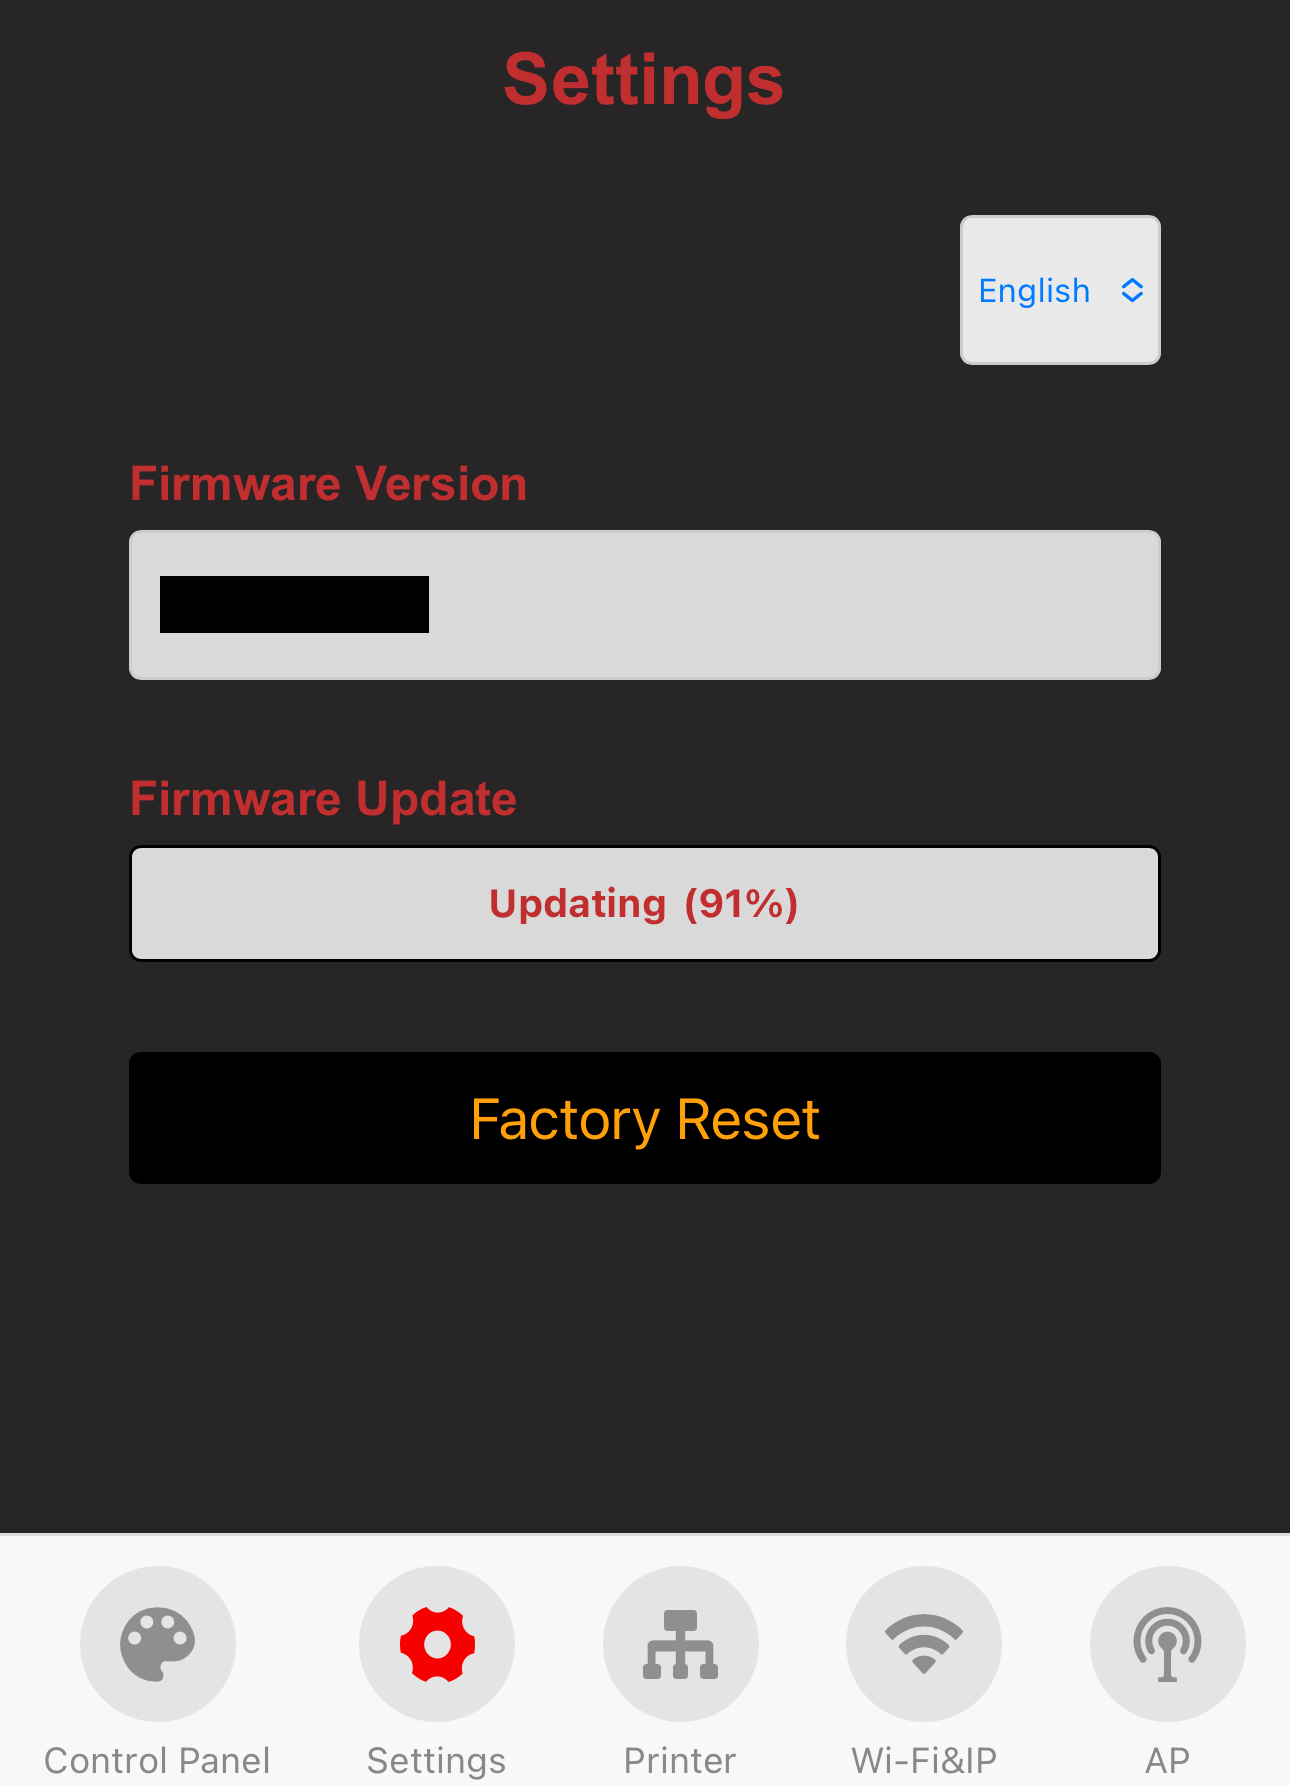
Settings Page
-
① Settings Page Selection: When you tap the icon, it will turn red to indicate that you are on the Settings page.
-
② Choose Language (Default: English)
-
③ Show Current Firmware Version
-
④ Firmware OTA Update: Select a
.binfile for the update.-
Tap the
Select .bin Filebutton to choose the bin file that requires OTA.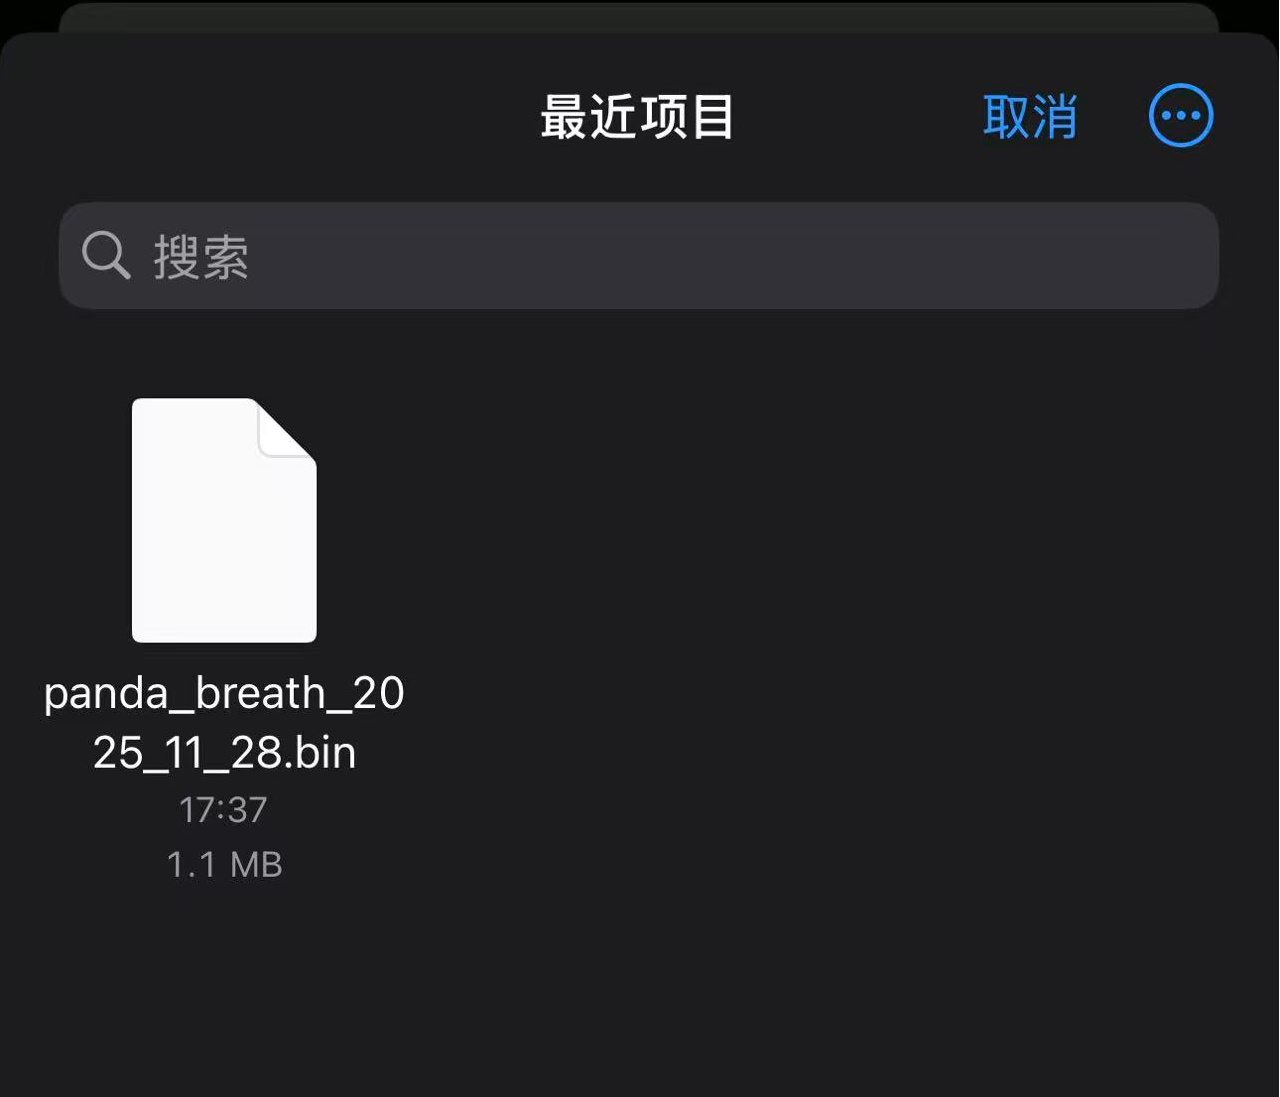
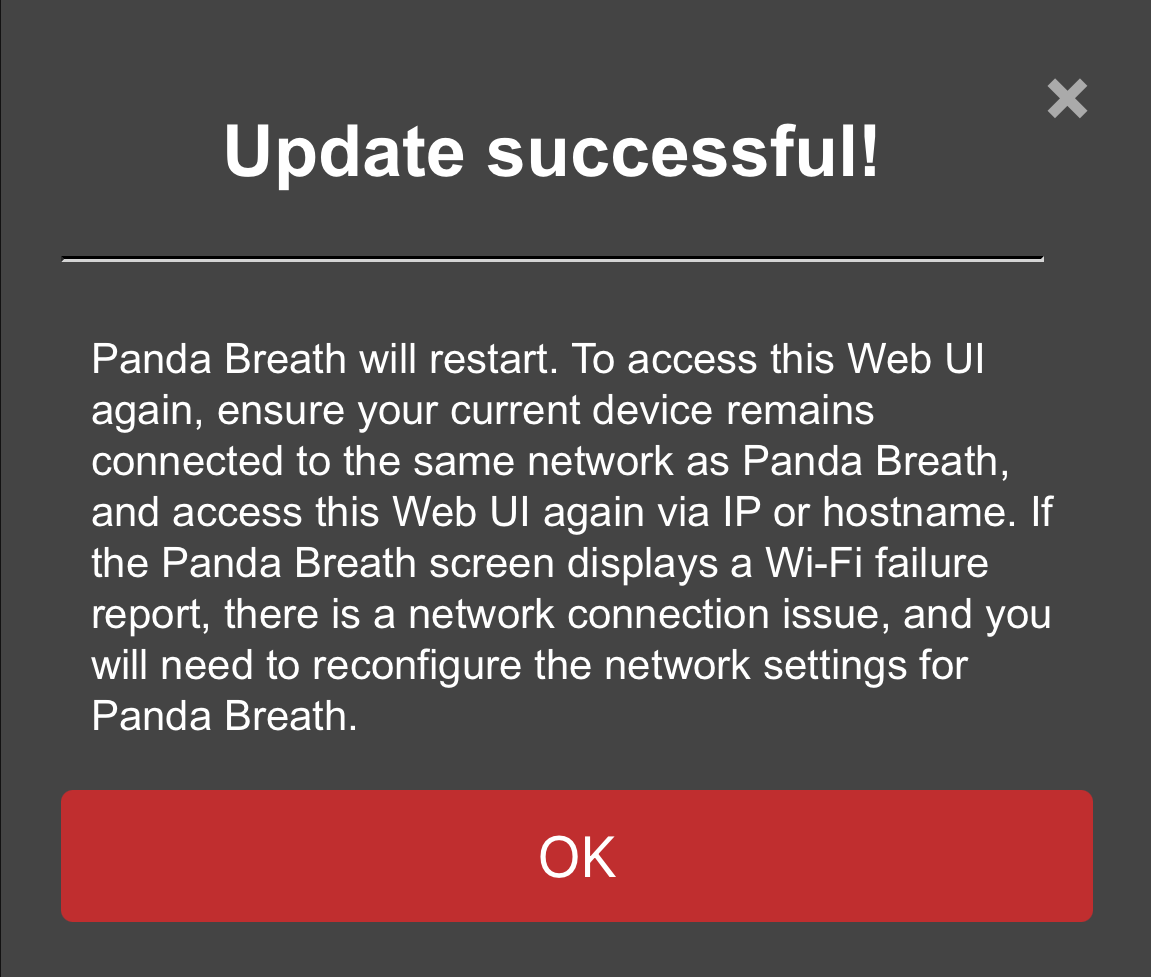
-
Wait for the progress to complete. The device will automatically restart once the update is finished.
-
-
⑤ Tap to Confirm Restore Factory Settings
Control Page
-
Features Overview
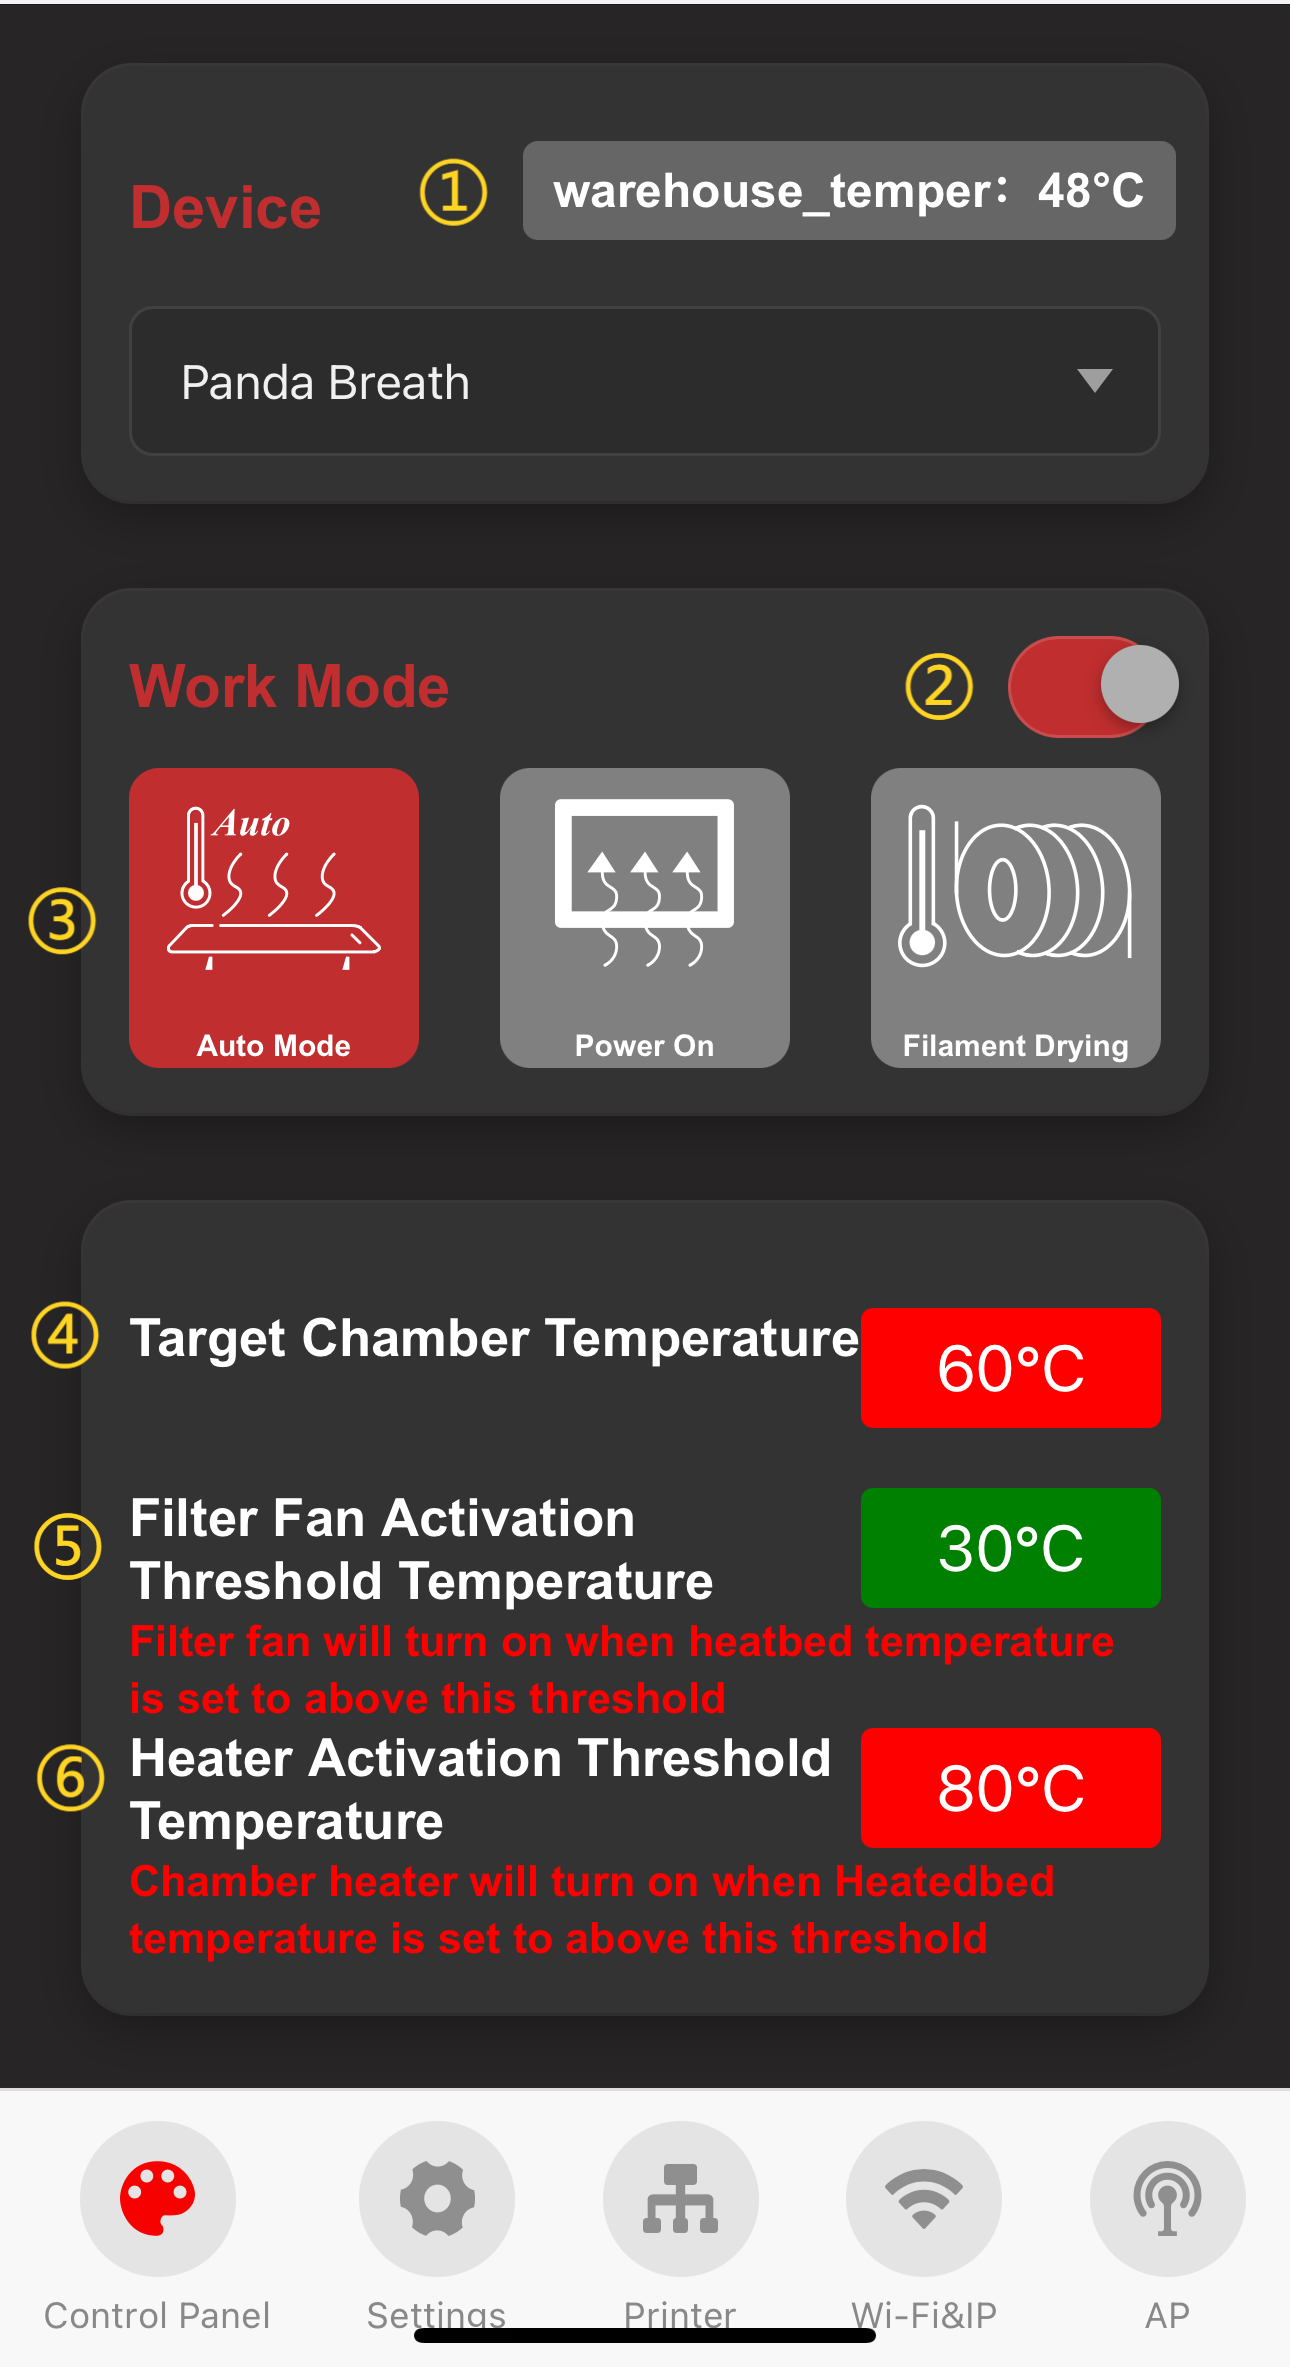
- ① Real-time display of the chamber temperature.
- ② Turn the Panda Breath on or off.
- ③ Select the operation mode:
- Auto Mode: When paired with a printer, the device follows the printer's heated bed temperature settings to perform the corresponding functions.
- Forced-On Mode: No need to pair with a printer; the device heats directly to the set temperature.
- Filament Drying Mode: Set a timer to dry the filament.
-
Auto Mode
- ④ Target chamber temperature.
- ⑤ Filter fan activation temperature (when the printer’s heated bed temperature exceeds this value, Panda Breath automatically turns on the filter fan).
- ⑥ Chamber heating activation temperature(when the printer’s heated bed temperature exceeds this value, Panda Breath automatically starts heating and filtration.)
-
Forced On Mode
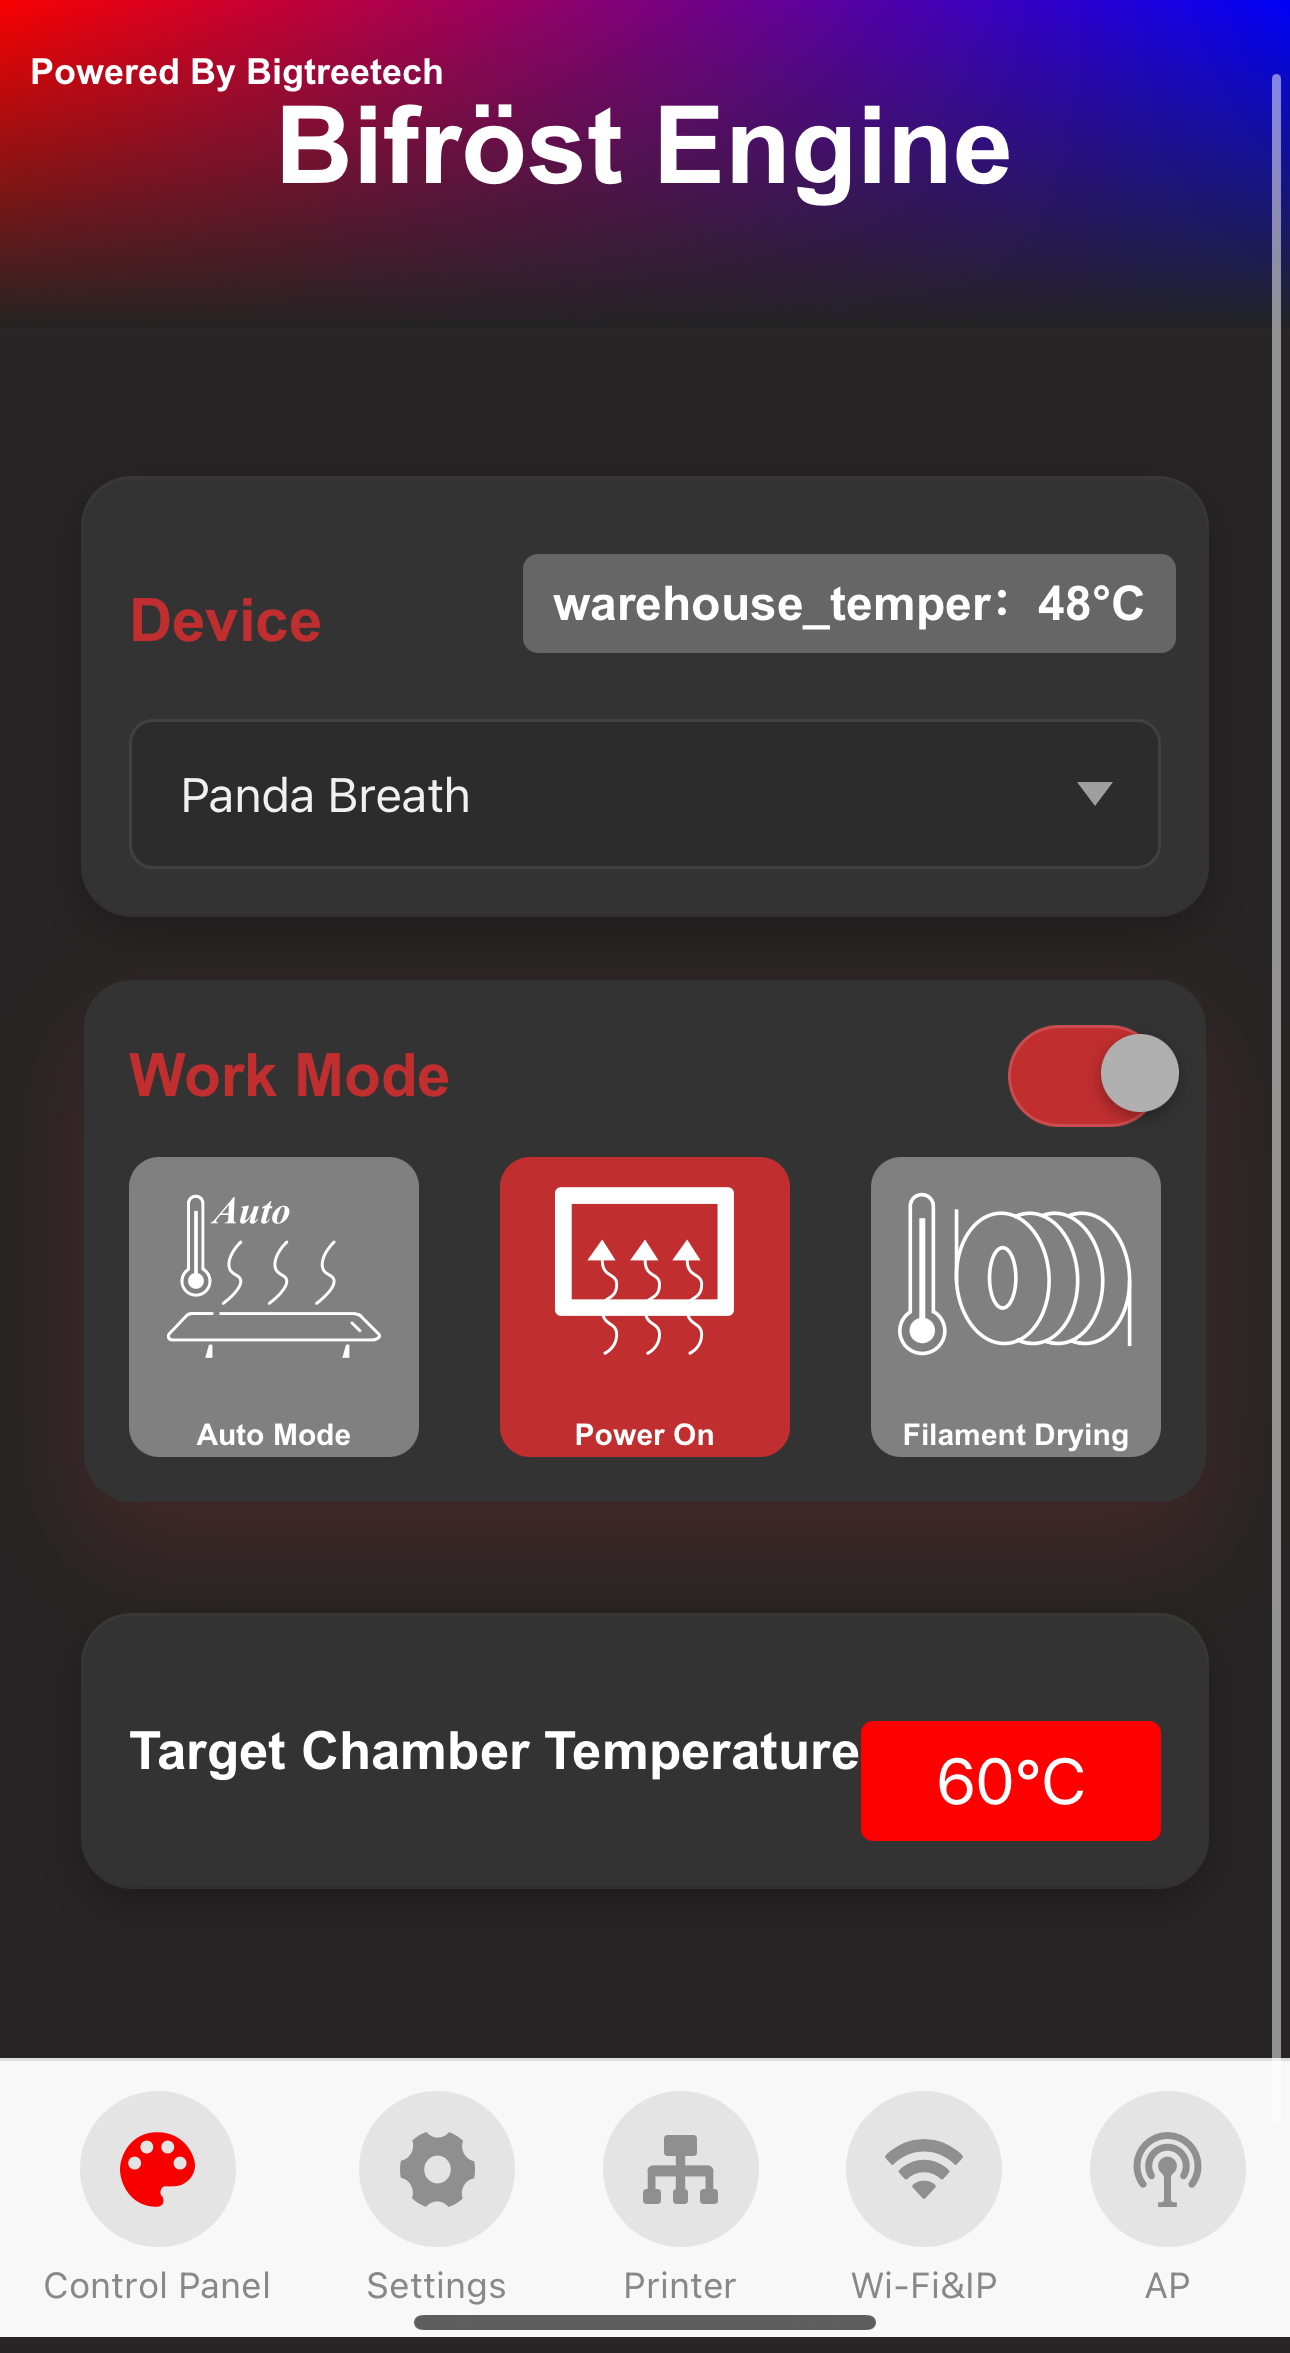
- Chamber target temperature (same value as the target temperature in Auto Mode).
-
Filament Drying Mode
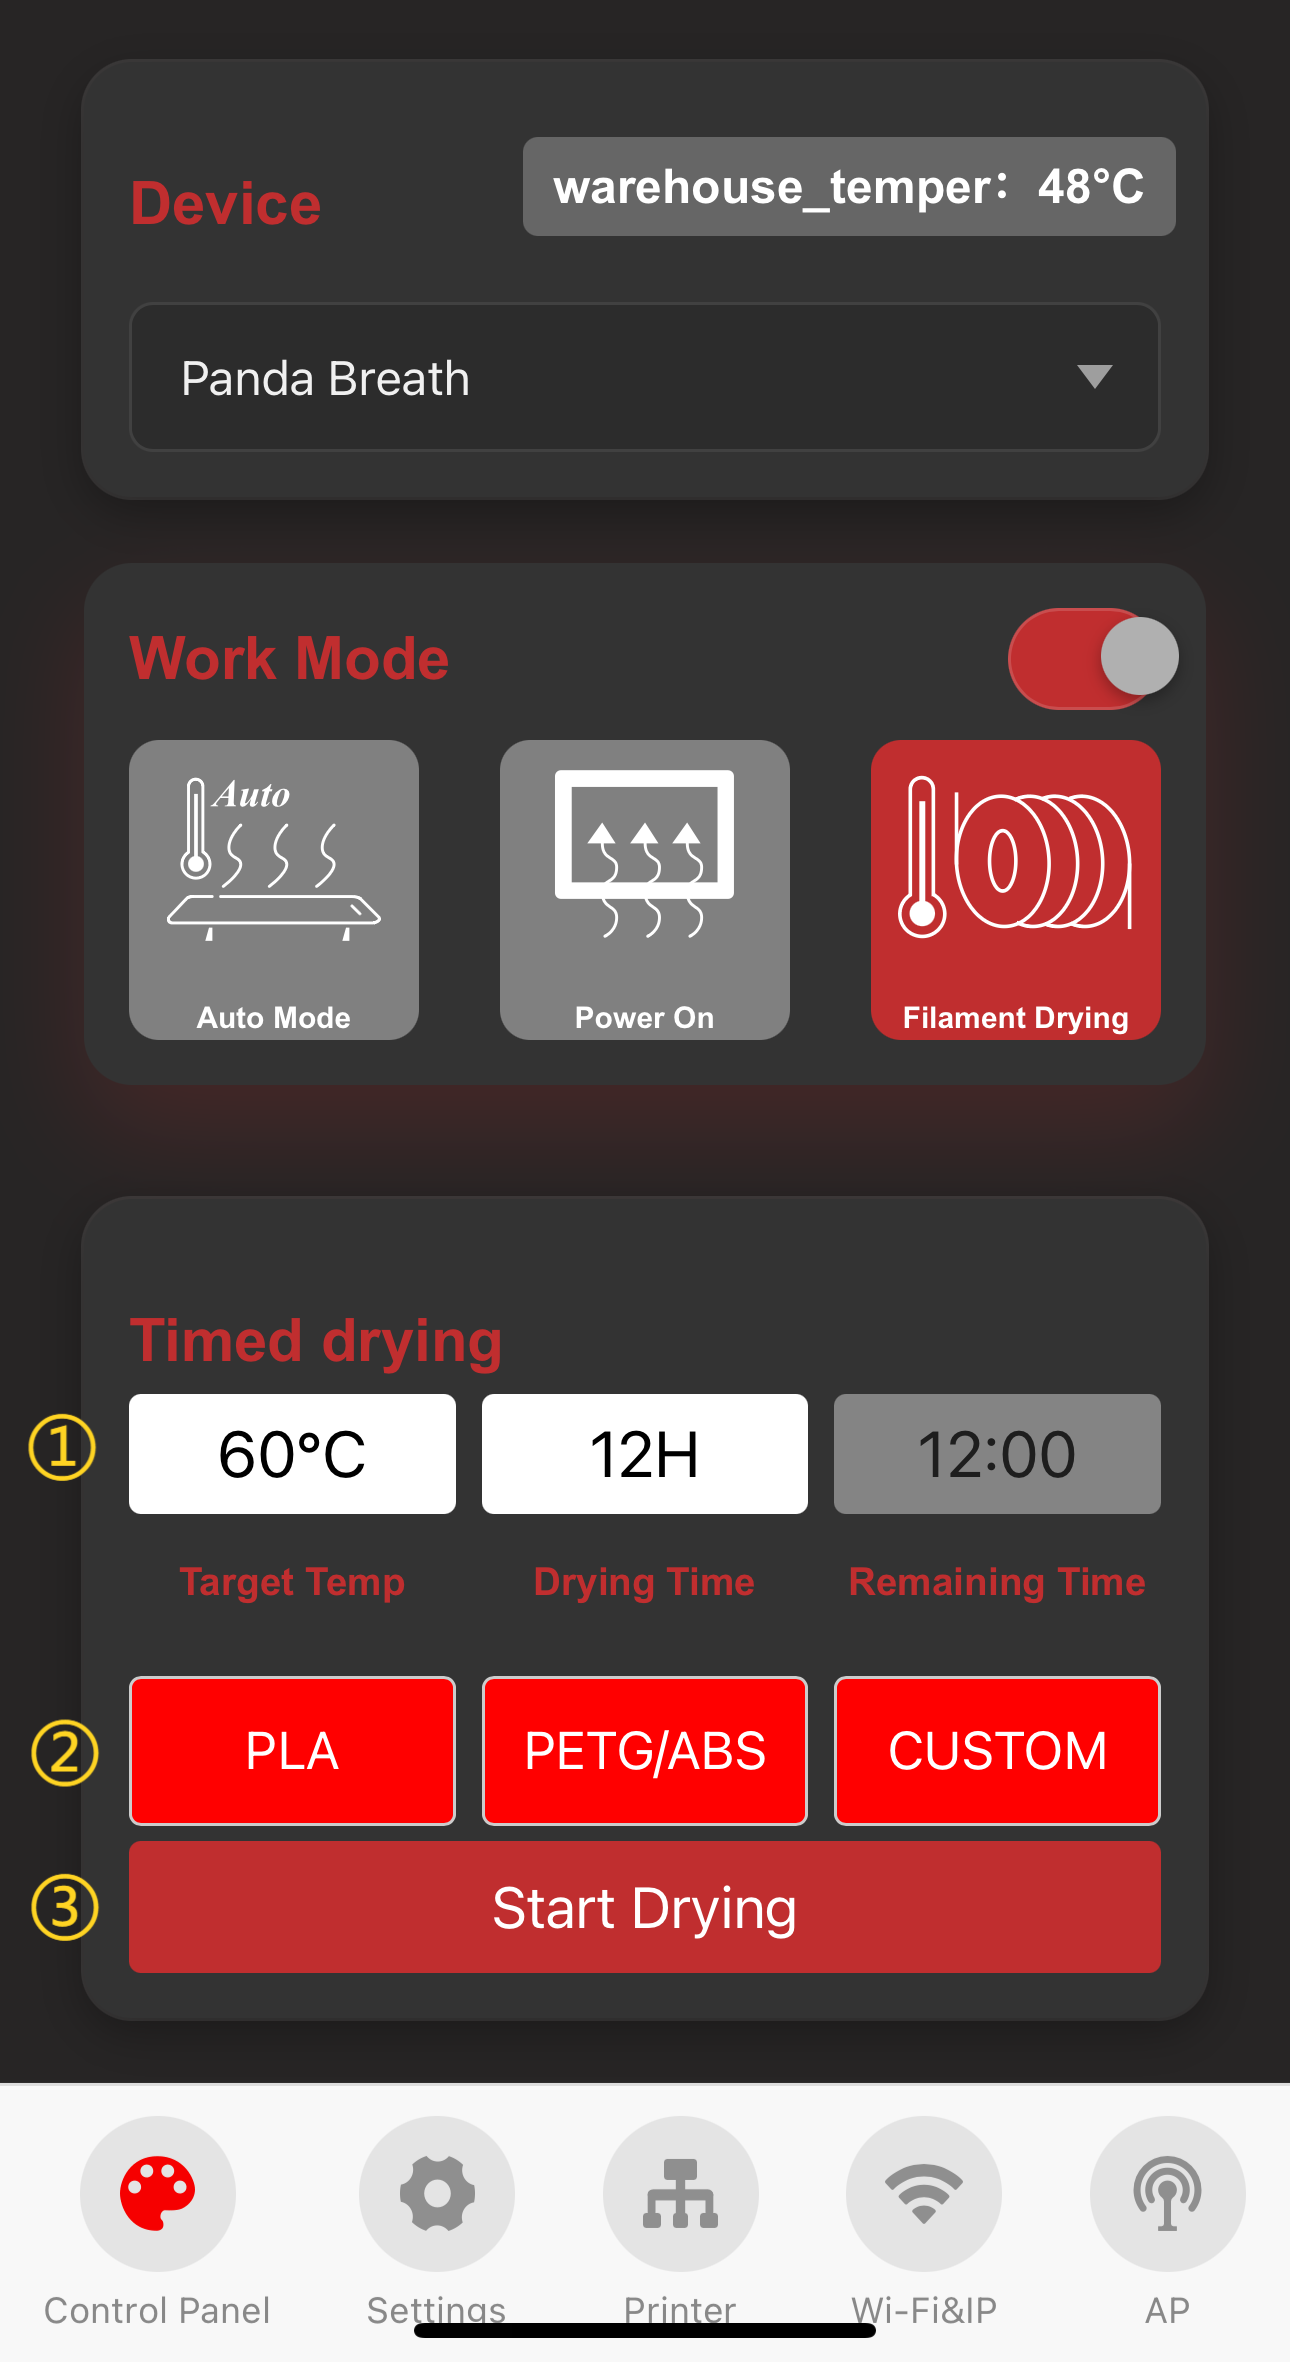
- ① Target chamber temperature and drying countdown timer.
- ② Quick parameter setting buttons:
- PLA : Target temperature 55°C, drying time 12 hours.
- PETG: Target temperature 60°C, drying time 12 hours.
- Custom: Manually adjusted values will be saved as custom settings.
- ③ Start/Stop drying.
Home Assistant Page

- 1、MQTT Broker IP.
- 2、Default port number 1883.
- 3、MQTT Broker user name.
- 4、MQTT Broker Password.
- 5、Bind Home Assistant button.
*If the broker has not set a username and password, it can still bind normally without filling in the username and password
Firmware History
V1.0.4
- Add compatibility with Home Assistant.
V1.0.3
- Added the ability to bind P2S and Klipper printers.
V1.0.2
- Fix the issue of incorrect self-test results of the device at certain temperatures. Fix the issue of abnormal shutdown of PTC heating device in low-temperature environment
V1.0.1
- Add a small self-calibration feature on the first heating(After restoring factory settings) to fix the issue of heating stopping due to mistakenly entering thermal protection mode
Feature Requests
If you'd like to see certain features in the upcoming firmware release, please submit a feature request on the official GitHub repository. Feature Requests.
Important Notice
Failure to follow the above instructions or any improper installation may void the product warranty and could result in damage to the product. BIQU is not liable for any damage or loss resulting from the misuse or incorrect installation of this product.