Panda Perch H2
- Product Link: Buy Here
- Print files are available on: MakerWorld or GitHub
Revision Log
| Version | Date | Revision |
|---|---|---|
| v1.00 | November 10th, 2025 | Initial Version |
Introduction
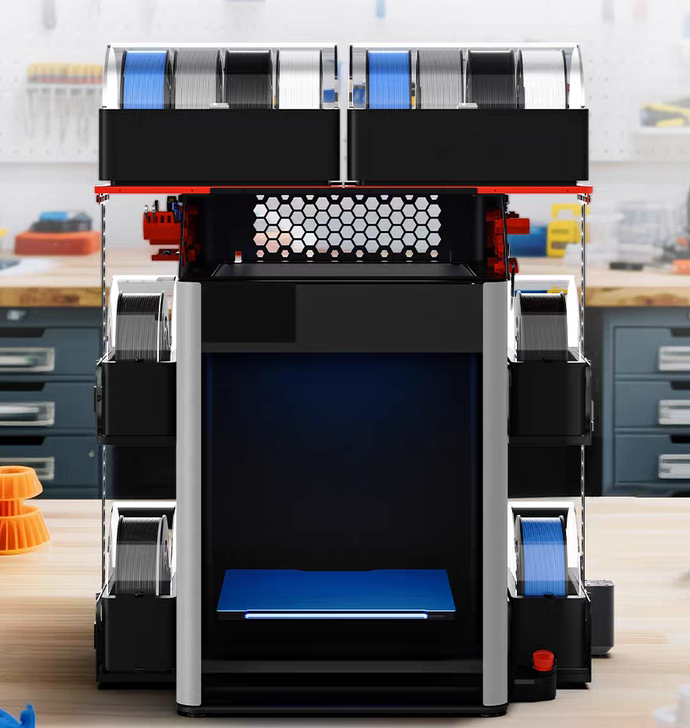
The Panda Perch H2 is a dedicated storage rack for Bambu Lab H2D, H2S, and H2C 3D printers. Its primary top platform securely holds either 2 standard AMS/AMS 2 Pro units or 6 AMS HT units. For expanded capacity, optional side baskets can accommodate up to 4 additional AMS HT units. The design also features versatile hexagonal side holes for mounting 3D-printed organizers, and offers an optional RGB lighting kit to personalize your workspace, combining efficient organization with customizable style.
Key Features
- Space Efficiency
The Panda Perch mounts directly on top of your Bambu Lab H2D/H2S/H2C printer, creating a sleek, elevated platform for AMS units. This space-saving design keeps your filament management organized and your workspace clear of clutter.
- Durable Construction
Crafted from high-strength 6061 aluminum alloy and steel, the Panda Perch is engineered for exceptional durability and reliable load-bearing capacity, ensuring long-term performance.
- Easy Expansion
A variety of printable add-on files allows you to easily create custom storage accessories, tailoring the Panda Perch to your specific organization needs.
- RGB Lighting Support
Personalize your workspace with integrated, customizable RGB lighting. Control dynamic color effects and patterns seamlessly through the WEB UI or the dedicated BQ App.
-
Broad Compatibility
-
3D Printers: for H2D/H2S/H2C
- Multi-material Systems: AMS/AMS 2 Pro/AMS HT
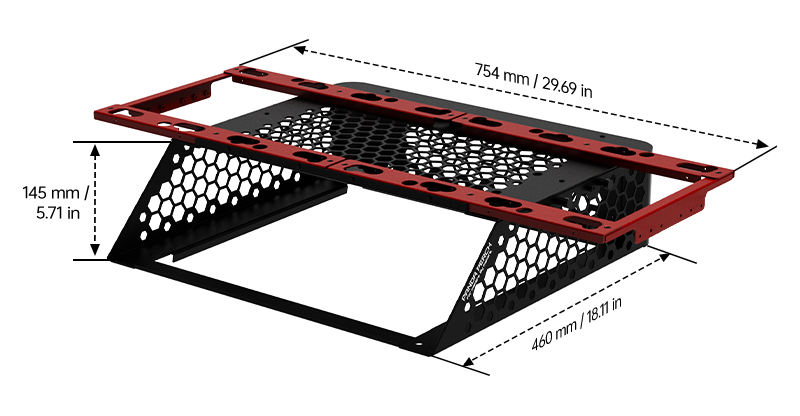
Specifications
- Product Name: BIQU Panda Perch H2
- Material: Aluminum Alloy + Iron
- Compatibility:
- For 3D Printer - H2D/H2S/H2C
- For Multi-Material Unit - AMS/AMS 2 Pro/AMS HT
Panda Perch H2 Assembly Guide
Video Tutorial
-
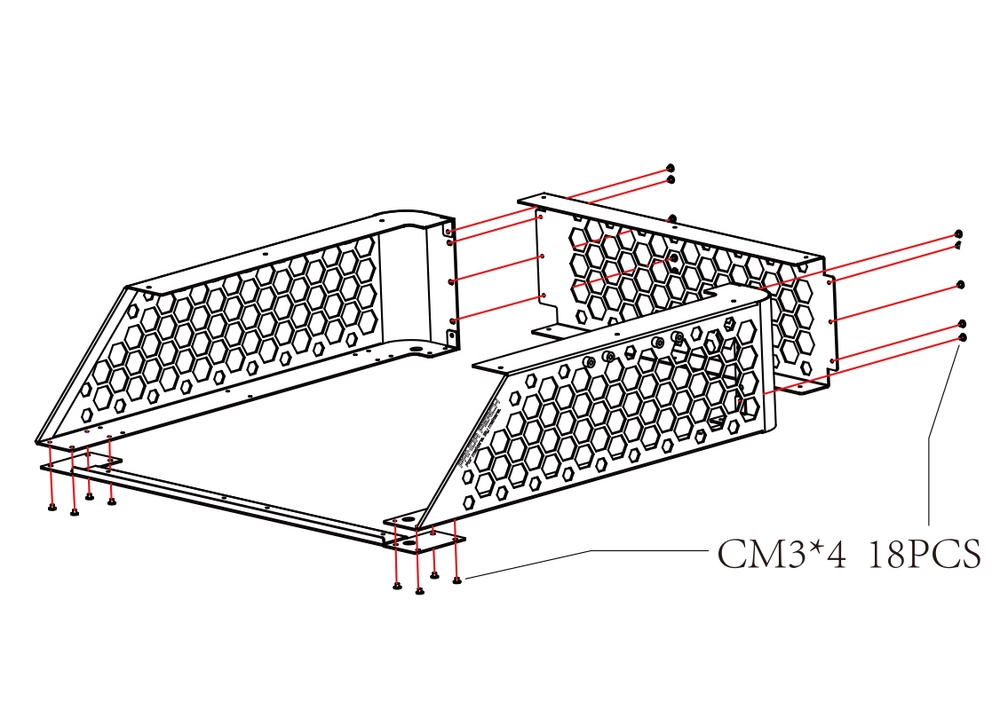
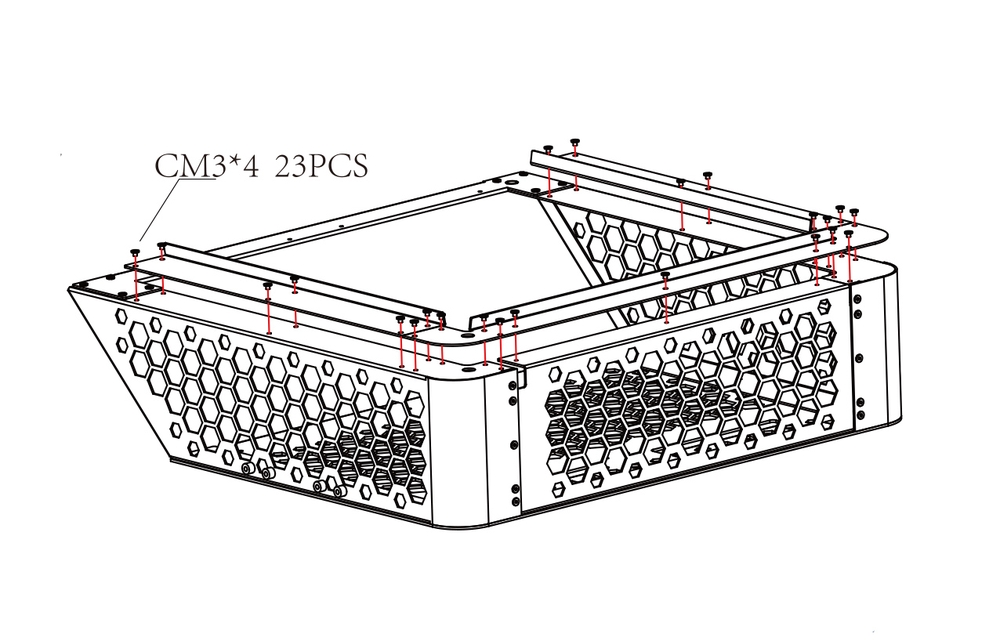
Step 1: Form the Main Frame
Unpack the side panels (note that the right panel is labeled with the product name), back panel, and front bottom bar. Assemble these components into the main frame, loosely fastening all joints with the CM3x4 screws.
Important: Final tightening must wait until after the top panel is secured in a later step.
-
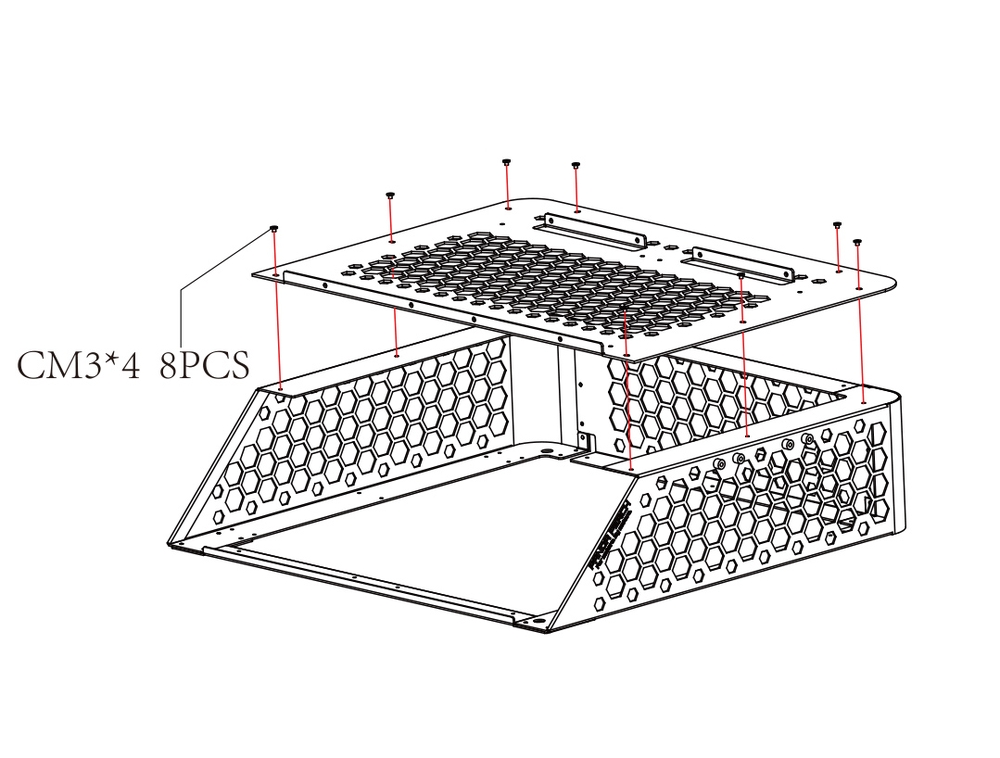
Step 2: Attach the Top Panel
Secure the top panel to the main frame using CM3x4 screws, ensuring the raised side is facing upward.
-
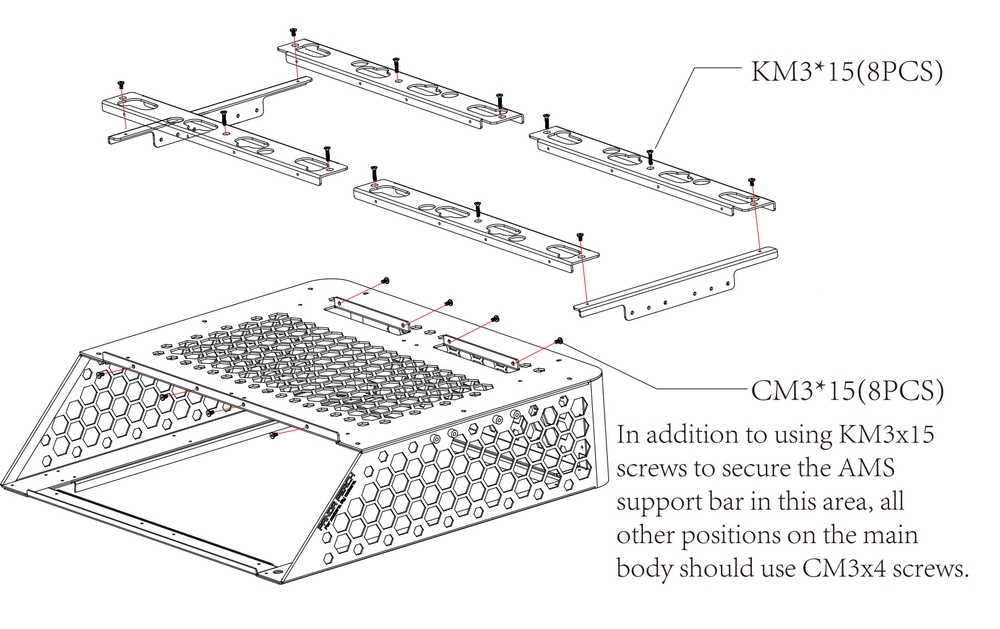
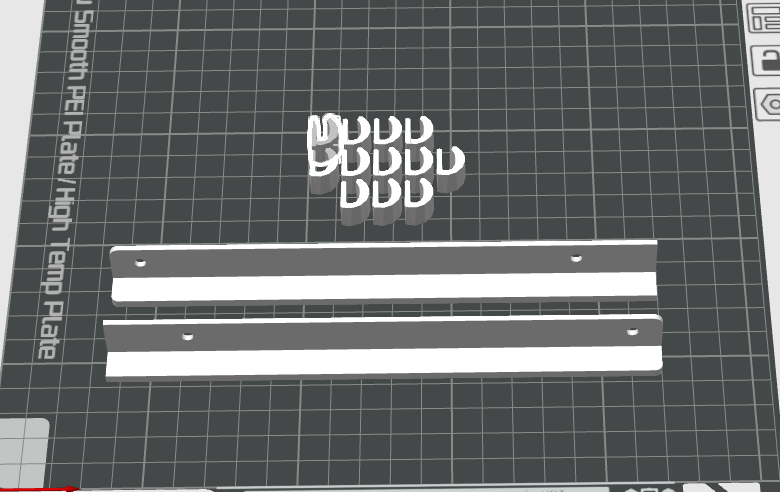
Step 3: Install the Bottom Support Bars
Install the three bottom support bars. The single longer bar attaches to the back of the unit, while the two identical shorter bars attach to the sides. Orient each bar so its folded edge faces upward and toward the inside of the frame (refer to the diagram). After positioning and securing all bars, tighten their mounting screws completely.
-
Step 4: Secure the AMS Support Bars
Position the AMS support bars onto the raised horizontal bars of the top panel and fasten them temporarily using CM3x4 screws (horizontal attachment). Then, fully secure the bars by driving KM3x15 screws vertically down through the bars and into the top panel. Finally, install the reinforcement bars at each end of the AMS support bars using CN3x4 screws to complete the assembly.
You can refer to the following video for a clearer understanding of the installation process.
AMS HT Storage Rack Assembly Guide
-
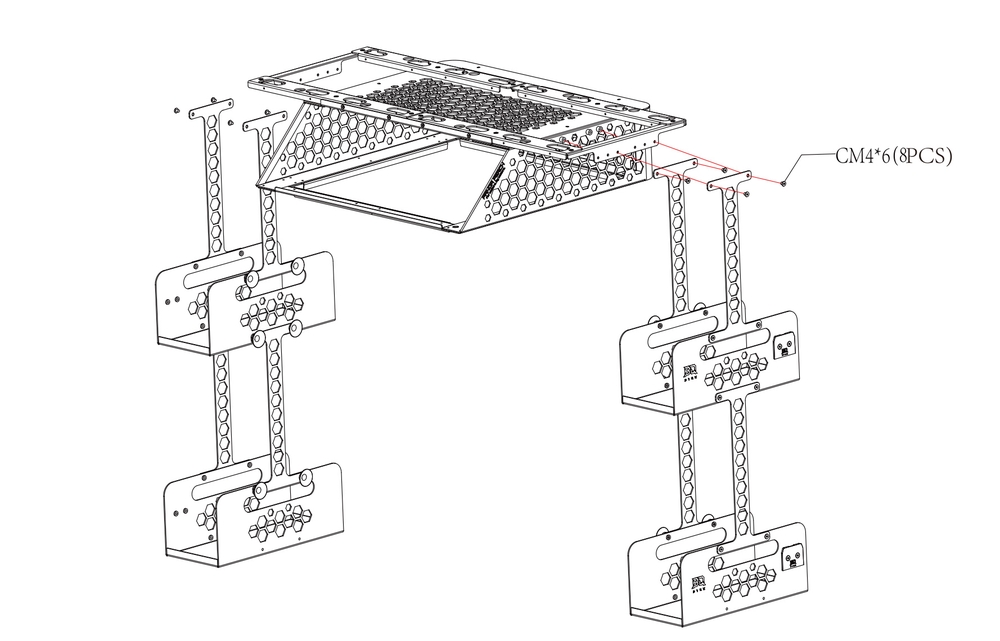
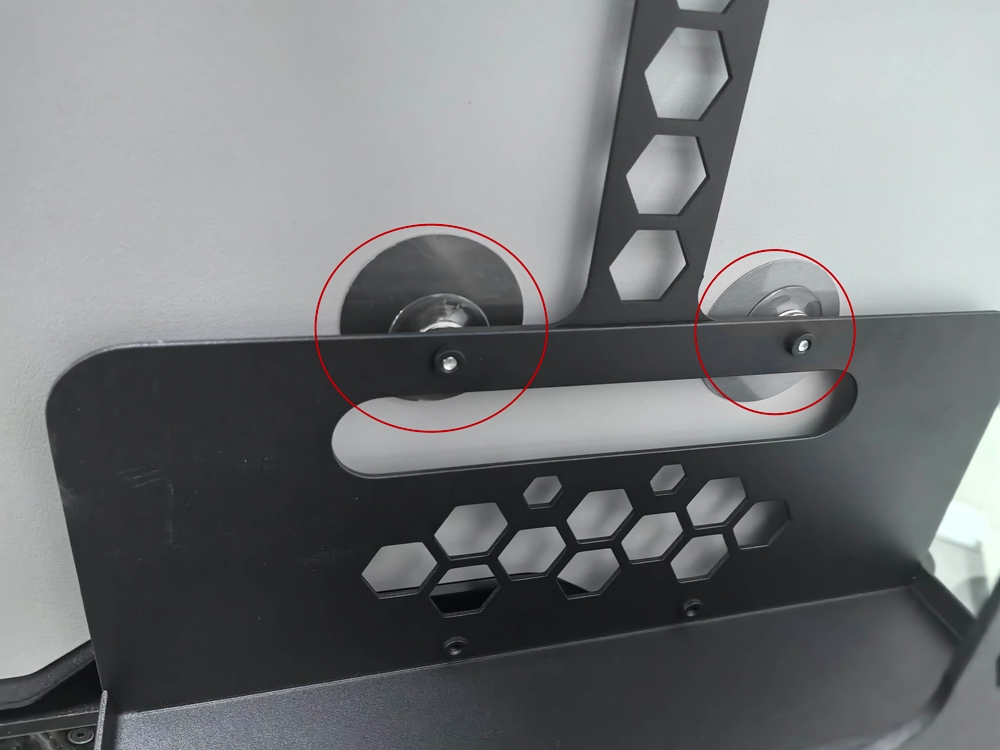
Step 1: Assemble the AMS HT Storage Rack
Retrieve the Storage Rack and the hanging rod. Attach the hanging rod to the rack using the CM4x6 screws.
Note: For each Storage Rack, use the regular CM4x6 screws to fix the hanging rod to one side, and use the screws with the suction cup to fix the other side. Ensure the suction cup screw is on the side that attaches to the printer, as shown in the image.

-
Step 2: Attatch on the Panda Perch H2
Use the CM4x6 screws to attach the Storage Rack to both sides of the Panda Perch H2D main body.
You can refer to the following video for a clearer understanding of the installation process.
Note: The AMS HT Storage Rack is an optional accessory. One Panda Perch H2 can be expanded with two sets (two Storage Racks per set, totaling four Storage Racks). If using only one set, we recommend placing one Storage Rack on each side of the Panda Perch H2 (left and right).
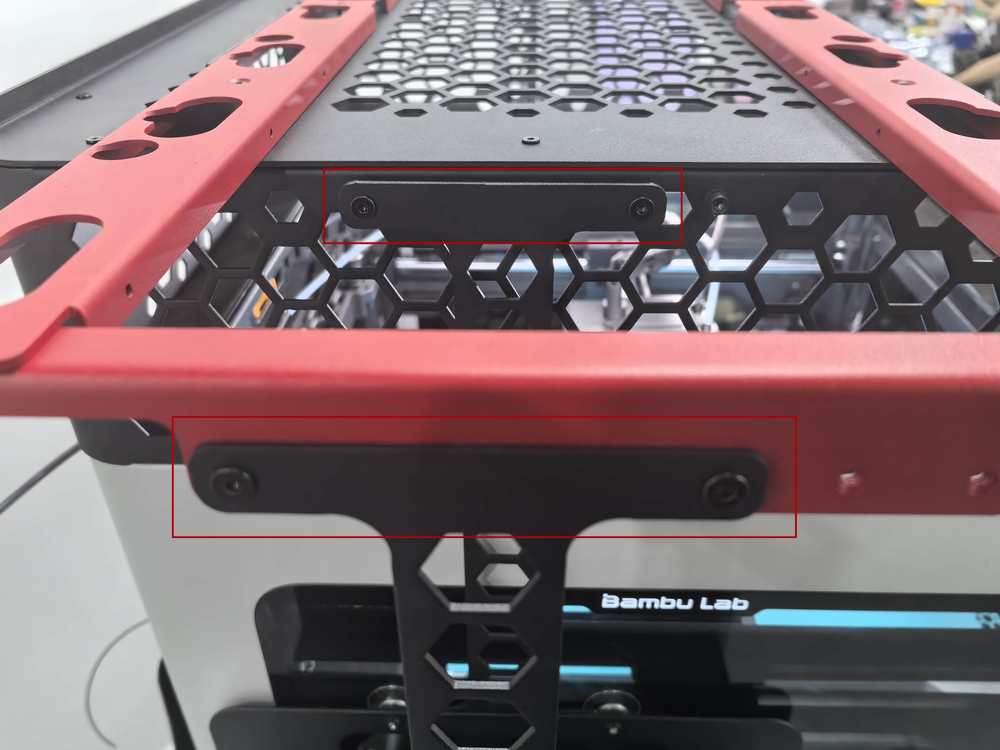
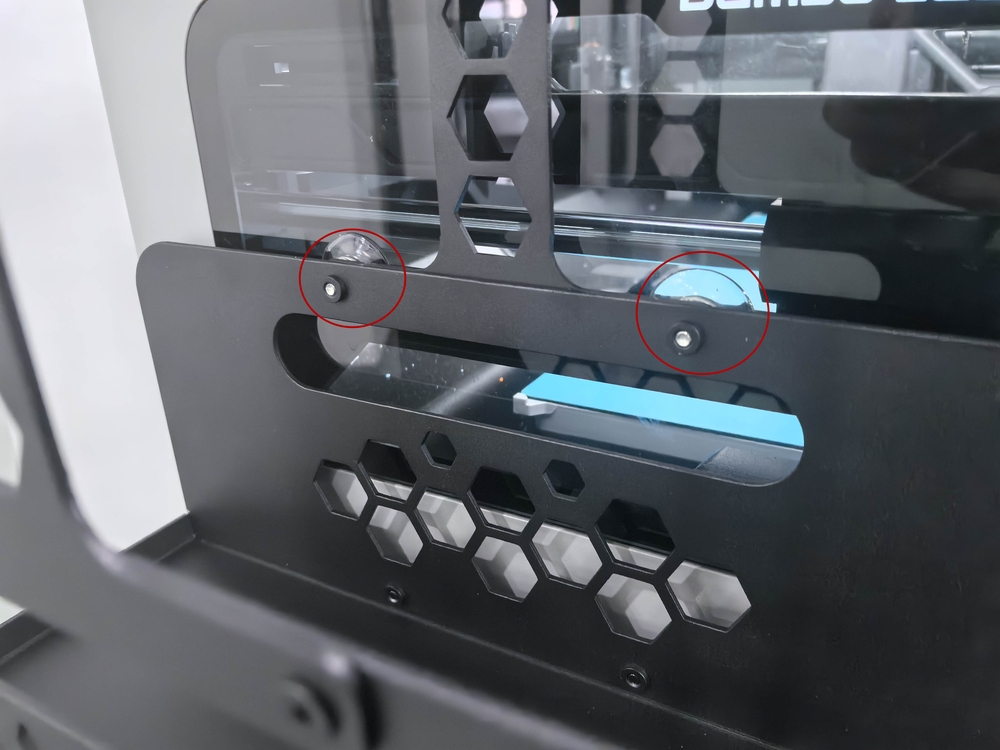
Important: Always ensure that the suction cup screws are installed at the contact points between the printer's outer wall and the rod and Storage Rack.
Installing the Panda Perch H2 on the Printer
-
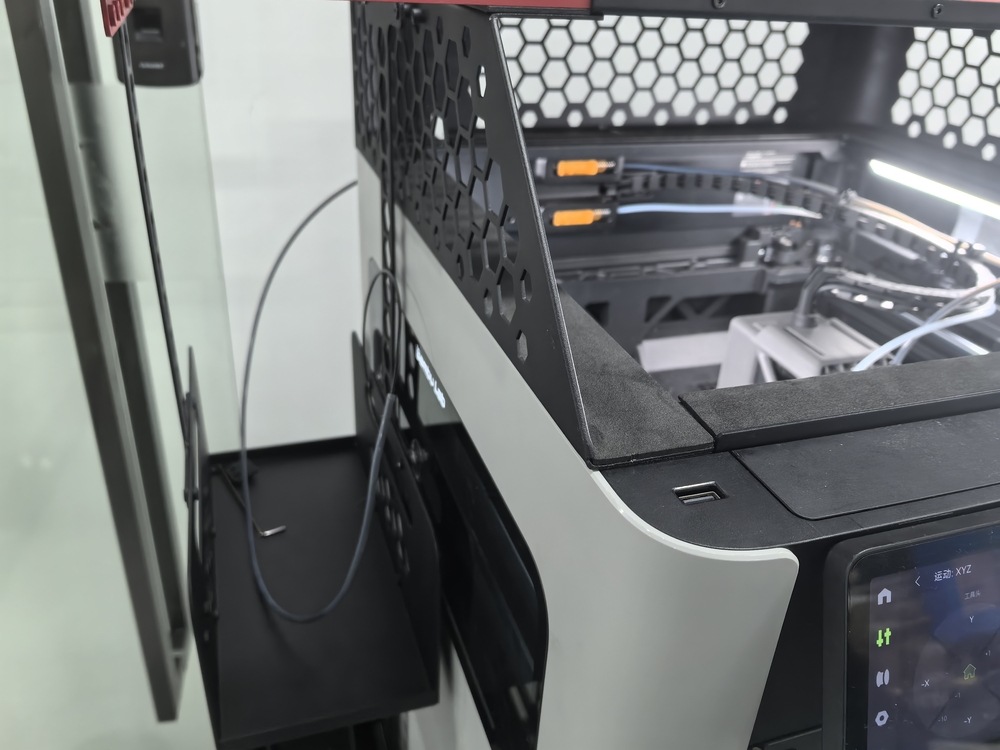
Step 1: Position the Panda Perch H2
After assembling the Panda Perch H2 main body with the AMS HT Storage Rack, we can now install the entire assembly onto the printer. Start by removing the printer’s top cover and positioning the Perch on top.
-
Step 2: Apply the Metal Sheet for Securing the Suction Cup Screws
For optimal suction cup adhesion, apply the included round adhesive metal sheet to the printer's outer wall at each screw contact point. Peel off both protective films and press the sheet firmly in place. (If the suction cup screws will be attached to the printer's smooth side window, this step can be skipped—no metal sheet is needed.)
-
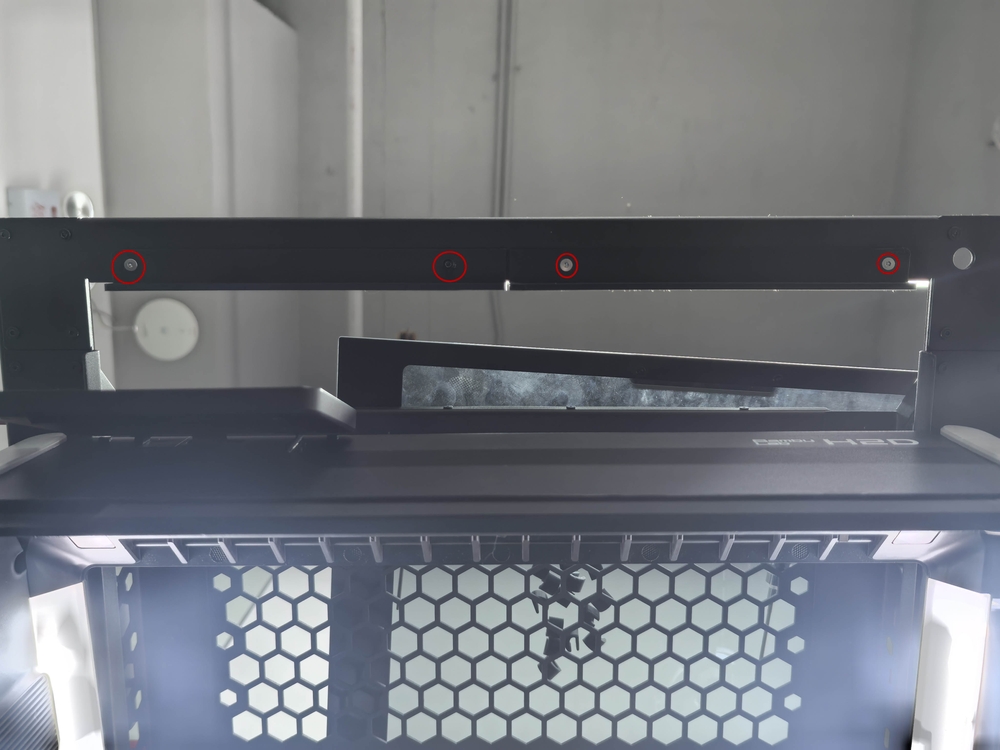
Step 3: Ensure Proper Function of the Top Cover Open-Door Detection
Attach the two R6x4 magnets (from the Panda Perch H2D package) to the designated detection areas on the printer's top cover.
Note for H2D Laser Edition Users: The H2D Laser Edition top cover has two open-door detection points—one at the front and one at the back. A magnet must be installed at both locations.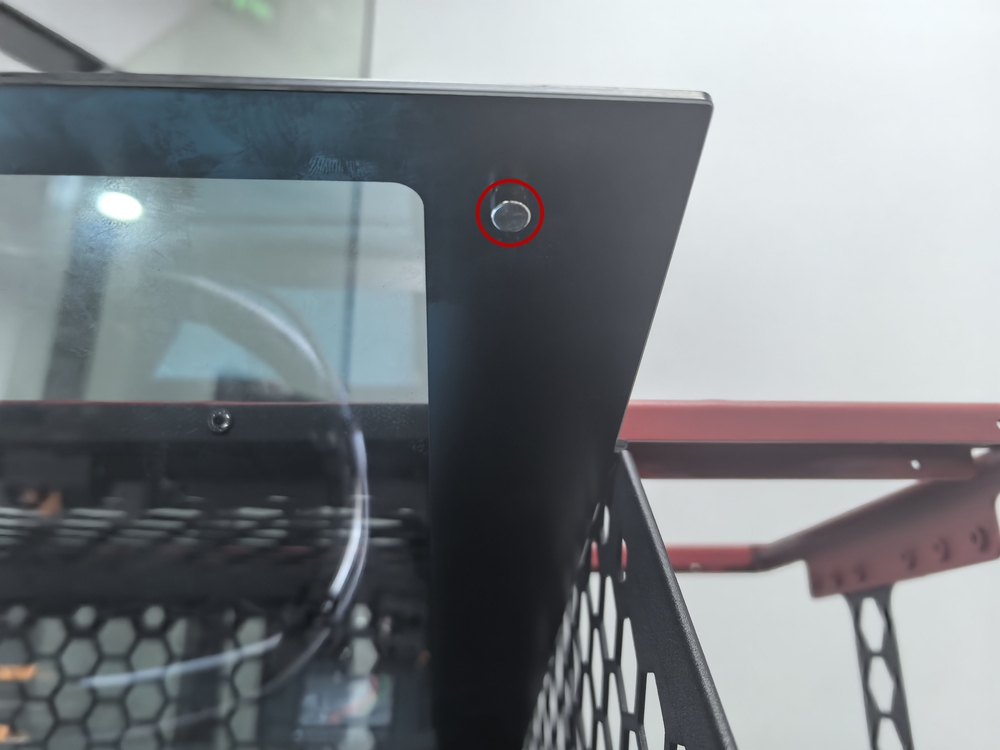
RGB Light Strip Installation Guide
-
Step 1: Print the RGB Light Strip Support Bar and Clips
In the print file, locate the RGB light strip support bar and light strip clips, then print them out (it is recommended to use high-temperature-resistant materials like ABS).
-
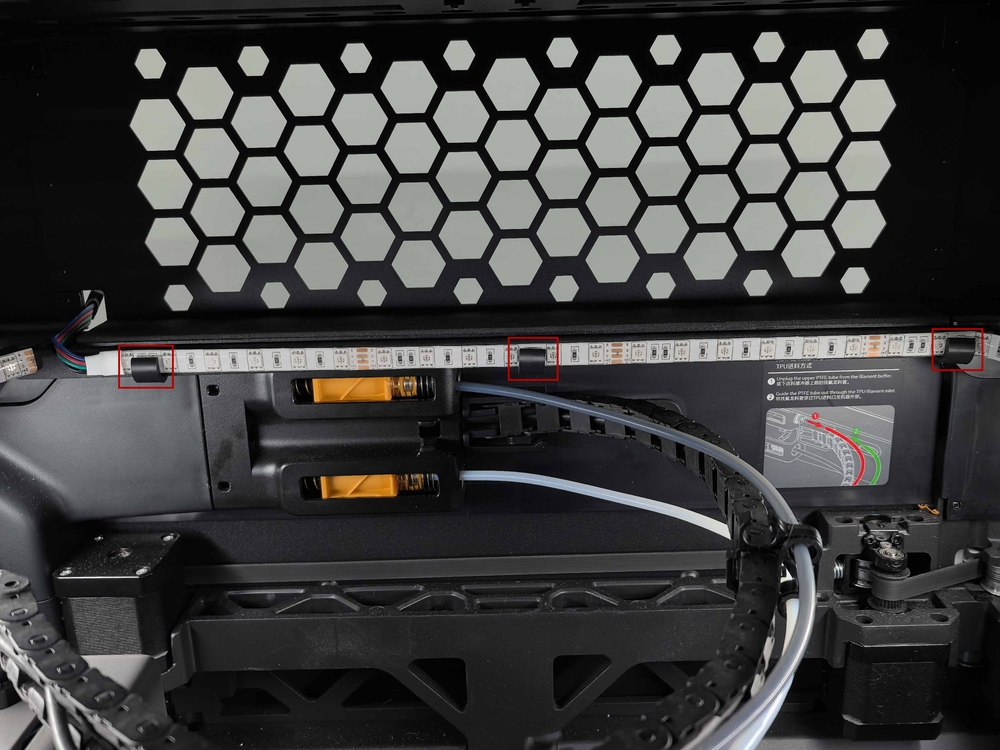
Step 2: Attach the Light Strip Support Bar
Mount the light strip support bar to the front bottom bar of the Panda Perch H2 frame using the provided CM3x4 screws.
-
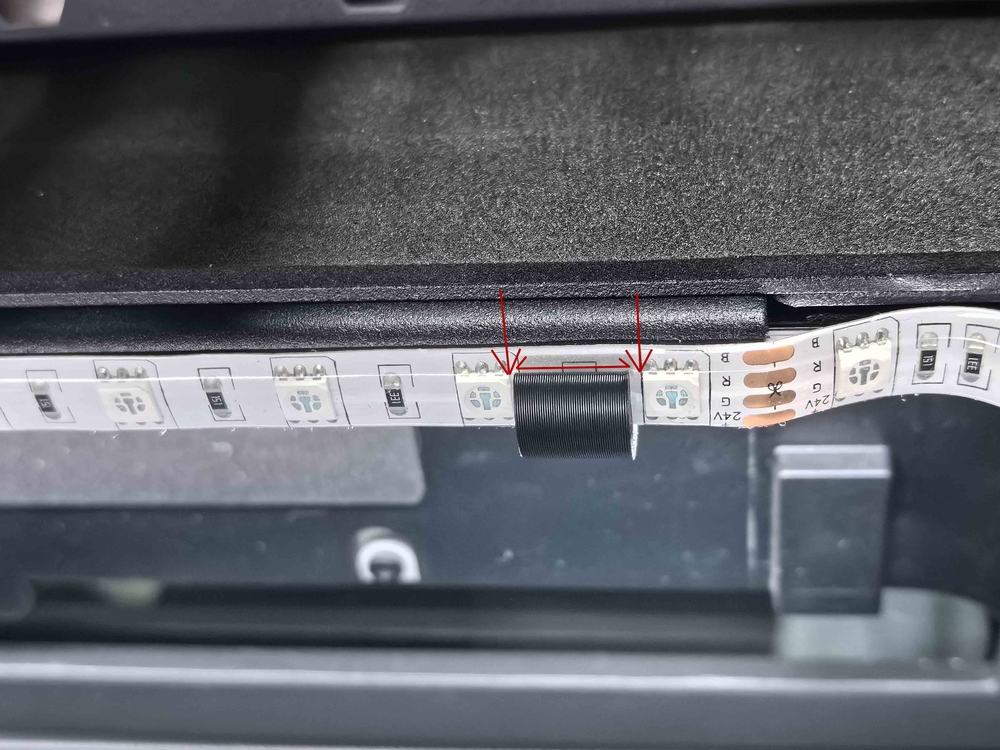
Step 3: Install the Light Strip and Secure with Clips
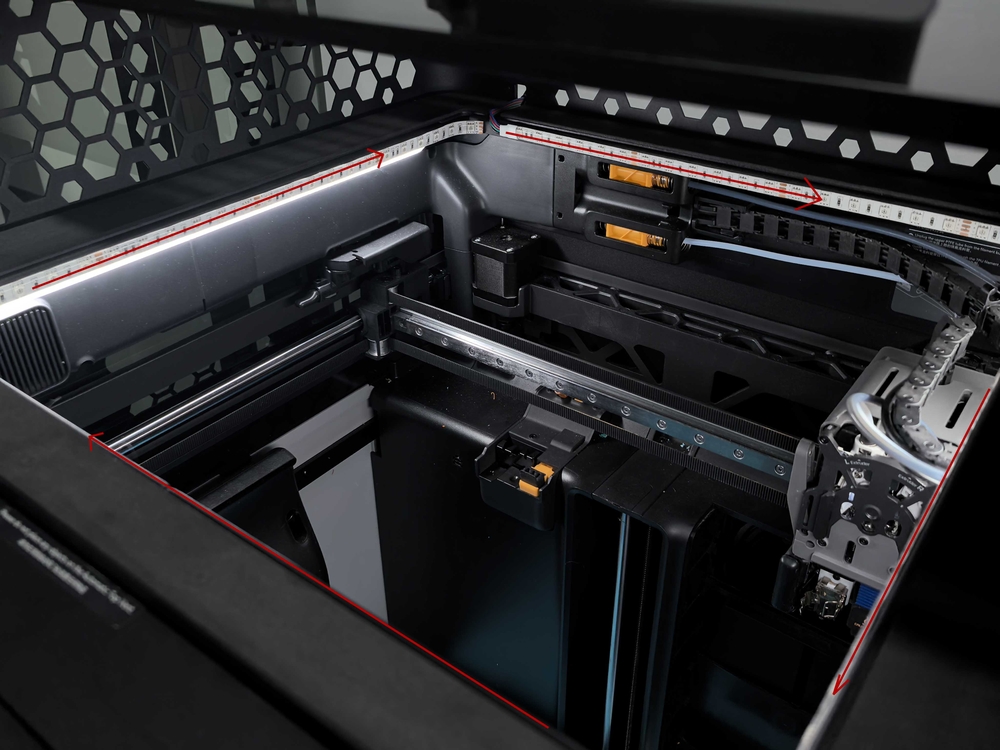
- Pass the Power Cable: Route the light strip's power cable by threading it through the reserved cable hole at the back of the Panda Perch H2.
-
Align and Stick the Light Strip: Carefully align the light strip along the bottom edge of the Panda Perch H2 frame. Before sticking, ensure the alignment is correct. Then, peel the protective film from the adhesive backing and press the strip down firmly, applying pressure along its entire length to activate the adhesive for a permanent, secure fit.
-
Trim and Secure the Light Strip: First, trim the light strip to your required length by cutting only at the clearly marked cut points. This ensures proper function and a clean finish. Next, use the included 3D-printed retention clips to snap the light strip securely into place along the bottom edge of the Panda Perch.
-
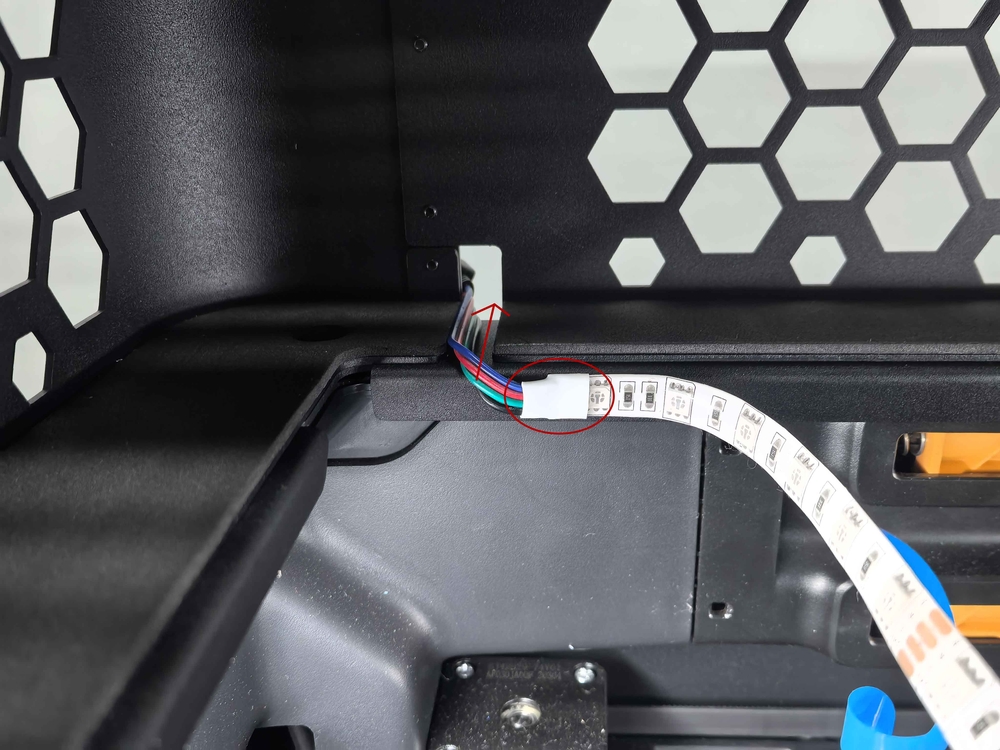
Connect the RGB Controller Click to view.
Important Notice
Failure to follow the above instructions or any improper installation may void the product warranty and could result in damage to the product. BIQU is not liable for any damage or loss resulting from the misuse or incorrect installation of this product.